kerberos认证的教程网上有很多,但是es的真的找遍全网都很少有详细的教程!我苦读官网,到处搜罗零碎信息,才终于完成es的kerberos认证。
一、elasticsearch升级白金版
在我跟着官网步骤勤勤恳恳操作却还是不行的时候,才突然发现基础版并不支持kerberos认证。所以我们需要升级白金版,而白金版是付费使用的。下面是白金版破解流程(仅供学习)如果公司要用的话当然是乖乖掏钱啊
1. 下载对应版本源码,修改相关类
源码地址:https://github.com/elastic/elasticsearch
我使用的是es的7.5.2版本,所以下载7.5.2版本的源码
修改LicenseVerifier.java,路径为:
x-pack/plugin/core/src/main/java/org/elasticsearch/license/LicenseVerifier.java
public class LicenseVerifier {

    /**
     * verifies the license content with the signature using the packaged
     * public key
     * @param license to verify
     * @return true if valid, false otherwise
     */
    public static boolean verifyLicense(final License license, byte[] publicKeyData) {
        return true;
    }

    public static boolean verifyLicense(final License license) {
        return true;
    }
}
修改XPackBuild.java,路径为:
x-pack/plugin/core/src/main/java/org/elasticsearch/xpack/core/XPackBuild.java
public class XPackBuild {

    public static final XPackBuild CURRENT;

    static {
        CURRENT = new XPackBuild("Unknown", "Unknown");
    }

    /**
     * Returns path to xpack codebase path
     */
    @SuppressForbidden(reason = "looks up path of xpack.jar directly")
    static Path getElasticsearchCodebase() {
        URL url = XPackBuild.class.getProtectionDomain().getCodeSource().getLocation();
        try {
            return PathUtils.get(url.toURI());
        } catch (URISyntaxException bogus) {
            throw new RuntimeException(bogus);
        }
    }

    private String shortHash;
    private String date;

    XPackBuild(String shortHash, String date) {
        this.shortHash = shortHash;
        this.date = date;
    }

    public String shortHash() {
        return shortHash;
    }

    public String date() {
        return date;
    }
}
2. 编译后替换jar包中的class文件
编译:
javac  -cp "/home/es/elasticsearch/lib/*:/home/es/elasticsearch/modules/x-pack-core/*" LicenseVerifier.java
javac  -cp "/home/es/elasticsearch/lib/*:/home/es/elasticsearch/modules/x-pack-core/*" XPackBuild.java
替换:
cp /home/es/elasticsearch/modules/x-pack-core/x-pack-core-7.5.2.jar x-pack-core-7.5.2.jar
unzip x-pack-core-7.5.2.jar -d ./x-pack-core-7.5.2
cp LicenseVerifier.class ./x-pack-core-7.5.2/org/elasticsearch/license/LicenseVerifier.class
cp XPackBuild.class ./x-pack-core-7.5.2/org/elasticsearch/xpack/core/XPackBuild.class
jar -cvf x-pack-core-7.5.2.crack.jar -C x-pack-core-7.5.2 .
cp x-pack-core-7.5.2.crack.jar /home/es/elasticsearch/modules/x-pack-core/x-pack-core-8.3.3.jar
3.更新license
官方申请地址:https://register.elastic.co/marvel_register
申请到的是json格式的许可证,将 ”type":“basic” 修改为 “platinum”,即白金版,还可以将"expiry_date_in_millis" 这个时间戳改大,延长有效期
建一个json文件license.json,把修改后的json放进去,然后上传该license
curl -XPUT node1:9200/_xpack/license -H “Content-Type: application/json” -d @license.json
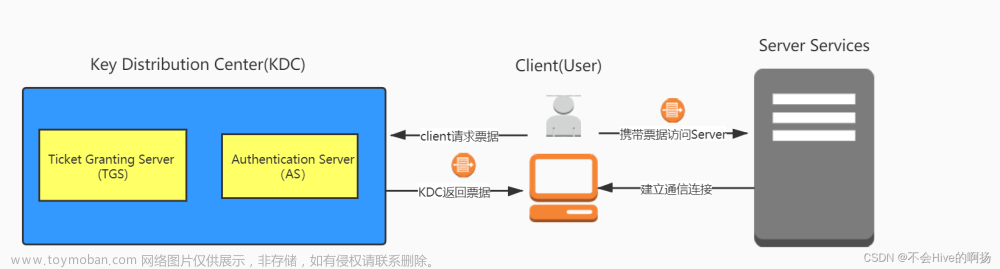
二、搭建kerberos服务
kerberos相关教程网上到处都是,所以我下面就简单写一下具体步骤
1. 安装kerberos服务端
yum install -y krb5-server
安装完会在/var/kerberos/krb5kdc下生成两个文件:kadm5.acl kdc.conf
2. 安装kerberos客户端
yum install -y krb5-workstation krb5-libs
安装完成会生成配置文件/etc/krb5.conf
3. 服务端配置文件kdc.conf
[kdcdefaults]
 kdc_ports = 88
 kdc_tcp_ports = 88

[realms]
 EXAMPLE.COM = {
  master_key_type = aes256-cts
  acl_file = /var/kerberos/krb5kdc/kadm5.acl
  dict_file = /usr/share/dict/words
  admin_keytab = /var/kerberos/krb5kdc/kadm5.keytab
  supported_enctypes = aes256-cts:normal aes128-cts:normal des3-hmac-sha1:normal arcfour-hmac:normal camellia256-cts:normal camellia128-cts:normal des-hmac-sha1:normal des-cbc-md5:normal des-cbc-crc:normal
 }
EXAMPLE.COM :设定的realm,名字自定义,但要保证所有相关的地方一致
4.服务端配置文件kadm5.acl
*/admin@EXAMPLE.COM *
EXAMPLE.COM和前面的realm保持一致
这个配置表示所有匹配*/admin的principal都拥有所有权限
5. 客户端配置文件/etc/krb5.conf
[logging]
 default = FILE:/var/log/krb5libs.log
 kdc = FILE:/var/log/krb5kdc.log
 admin_server = FILE:/var/log/kadmind.log

[libdefaults]
 dns_lookup_realm = false
 ticket_lifetime = 24h
 renew_lifetime = 7d
 forwardable = true
 rdns = false
 pkinit_anchors = FILE:/etc/pki/tls/certs/ca-bundle.crt
 default_realm = EXAMPLE.COM
 default_ccache_name = KEYRING:persistent:%{uid}

[realms]
  EXAMPLE.COM = {
   kdc = node1
   admin_server = node1
  }

[domain_realm]
# .example.com = EXAMPLE.COM
# example.com = EXAMPLE.COM
6. 初始化Kadmin数据库
kdb5_util create -s -r EXAMPLE.COM
需要初始化密码,我用的123456
7. 启动Kerberos服务并设置开机自启动
systemctl start krb5kdc
systemctl start kadmin

systemctl enable krb5kdc
systemctl enable kadmin
8. 添加principal并生成keytab供es使用
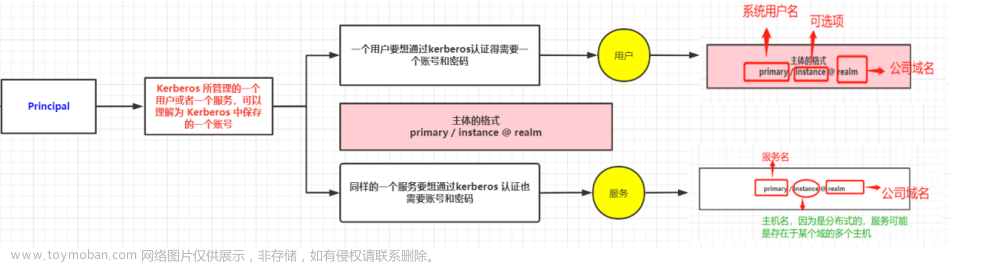
elasticsearch官网建议principal格式为:HTTP/主机名@realm
执行kadmin.local即可操作kadmin数据库
kadmin.local
添加principal,需要初始化密码,我设置的123456
addprinc HTTP/node1
生成该principal的keytab文件,我将该文件放到/home/keytabs目录下
ktadd -norandkey -kt /home/keytabs/es.keytab HTTP/node1@EXAMPLE.COM
三、es添加kerberos认证
官方文档:https://www.elastic.co/guide/en/elasticsearch/reference/7.5/kerberos-realm.html
1. 配置JVM系统属性定位krb5.conf
Kerberos配置文件(krb5.conf)提供了默认realm、密钥分发中心(KDC)和Kerberos身份验证所需的其他配置细节等信息。Elasticsearch使用Java GSS框架支持Kerberos身份验证,而GSS会尝试通过定位和加载krb5.conf来查找这些值。我们需要通过配置JVM系统属性java.security.krb5.conf 来使GSS定位到文件位置
编辑es的jvm.options配置文件,添加如下配置:
-Djava.security.krb5.conf=/etc/krb5.conf
2. 将keytab文件放到es的配置目录下
将上面生成的keytab文件放到es的config目录下
cp /home/keytabs/es.keytab /home/es/elasticsearch/config/es.keytab
这里可能会涉及到权限问题,最好让/home/es/elasticsearch/config/es.keytab和其他es文件处于同一个用户和用户组,权限也和其他文件保持一致
3. 在elasticsearch.yml中添加配置并重启
xpack.security.enabled: true
xpack.security.transport.ssl.enabled: true
xpack.security.authc.realms.kerberos.kerb1:
  order: 1
  keytab.path: es.keytab
  remove_realm_name: false
官网没有提到前两行配置,但必须开启这两个才能使用kerberos认证,否则启动会报错并提示需要加这两项配置
4. 为kerberos用户映射角色
官网示例如下:
POST /_security/role_mapping/kerbrolemapping
{
  "roles" : [ "monitoring_user" ],
  "enabled": true,
  "rules" : {
    "field" : { "username" : "user@REALM" }
  }
}
“roles” 为我们映射的角色
“username"为我们上面创建的principal,也就是kerberos用户
但官网示例的“monitoring_user"这个角色很多权限都没有,我们学习或者测试的话可以使用superuser,拥有所有权限。实际使用可根据需求而定。
示例如下:
curl -u elastic -H "Content-Type: application/json" -XPOST node1:9200/_security/role_mapping/kerbrolemapping -d

{
    "roles" : [ "superuser" ],
    "enabled": true,
    "rules" : {
    "field" : { "username" : "HTTP/node1@EXAMPLE.COM" }
    }
}
如果不知道elastic用户的密码可以通过bin/elasticsearch-setup-passwords interactive 重置
5. 验证是否成功
首先在客户端进行主体认证,有如下两种方式,选其一即可
密码认证:kinit HTTP/node1@EXAMPLE.COM ,并输入密码
keytab认证:kinit HTTP/node1@EXAMPLE.COM -kt /home/keytabs/es.keytab
然后使用negotiate参数调用curl,以便通过HTTP执行Kerberos身份验证:
curl --negotiate -u : -XGET node1:9200/
能成功返回es信息则认证成功
四、java操作kerberos认证的es
KerberosDemo:文章来源:https://www.toymoban.com/news/detail-798093.html
public class KerberosDemo {
    public static void main(String[] args) {
        RestHighLevelClient restHighLevelClient = null;
        try {
            System.setProperty("http.auth.preference","Kerberos");
            System.setProperty("java.security.krb5.conf", "/etc/krb5.conf");
            System.setProperty("sun.security.krb5.debug", "true");
            System.setProperty("sun.security.spnego.debug", "true");
            //密码认证方式
            /*SpnegoHttpClientConfigCallbackHandler callbackHandler = new SpnegoHttpClientConfigCallbackHandler("HTTP/node1@EXAMPLE.COM",
                    new SecureString("123456"), true);*/
            //keytab认证方式
            SpnegoHttpClientConfigCallbackHandler callbackHandler = new SpnegoHttpClientConfigCallbackHandler("HTTP/node1@EXAMPLE.COM",
                    "/home/keytabs/es.keytab", true);

            //业务逻辑开始
            List<HttpHost> hosts = new ArrayList<>();
            HttpHost hostNew = new HttpHost("node1", 9200, "http");
            hosts.add(hostNew);
            HttpHost[] httpHosts = hosts.toArray(new HttpHost[0]);

            RestClientBuilder restClientBuilder = RestClient.builder(httpHosts);
            restClientBuilder.setHttpClientConfigCallback(callbackHandler);
            restHighLevelClient = new RestHighLevelClient(restClientBuilder);

            //测试获取所有的索引
            GetIndexRequest getIndexRequest = new GetIndexRequest("*");
            GetIndexResponse getIndexResponse = restHighLevelClient.indices().get(getIndexRequest, RequestOptions.DEFAULT);
            String[] indexNames = getIndexResponse.getIndices();
        } catch (Exception e) {
            e.printStackTrace();
            System.out.println(e.getMessage());
        }finally {
            if(restHighLevelClient !=null){
                try {
                    restHighLevelClient.close();
                } catch (IOException e) {
                    e.printStackTrace();
                }
            }
        }
    }
}
demo中用到的类SpnegoHttpClientConfigCallbackHandler :文章来源地址https://www.toymoban.com/news/detail-798093.html
public class SpnegoHttpClientConfigCallbackHandler implements HttpClientConfigCallback {
    private static final String SUN_KRB5_LOGIN_MODULE = "com.sun.security.auth.module.Krb5LoginModule";
    private static final String CRED_CONF_NAME = "ESClientLoginConf";
    private static final Oid SPNEGO_OID = getSpnegoOid();

    private static Oid getSpnegoOid() {
        Oid oid = null;
        try {
            oid = new Oid("1.3.6.1.5.5.2");
        } catch (GSSException gsse) {
            throw ExceptionsHelper.convertToRuntime(gsse);
        }
        return oid;
    }

    private final String userPrincipalName;
    private final SecureString password;
    private final String keytabPath;
    private final boolean enableDebugLogs;
    private LoginContext loginContext;

    /**
     * principalName and password.
     *
     * @param userPrincipalName user principal name
     * @param password password for user
     * @param enableDebugLogs if {@code true} enables kerberos debug logs
     */
    public SpnegoHttpClientConfigCallbackHandler(final String userPrincipalName, final SecureString password,
                                                 final boolean enableDebugLogs) {
        this.userPrincipalName = userPrincipalName;
        this.password = password;
        this.keytabPath = null;
        this.enableDebugLogs = enableDebugLogs;
    }

    /**
     * principalName and keytab.
     *
     * @param userPrincipalName User principal name
     * @param keytabPath path to keytab file for user
     * @param enableDebugLogs if {@code true} enables kerberos debug logs
     */
    public SpnegoHttpClientConfigCallbackHandler(final String userPrincipalName, final String keytabPath, final boolean enableDebugLogs) {
        this.userPrincipalName = userPrincipalName;
        this.keytabPath = keytabPath;
        this.password = null;
        this.enableDebugLogs = enableDebugLogs;
    }

    @Override
    public HttpAsyncClientBuilder customizeHttpClient(HttpAsyncClientBuilder httpClientBuilder) {
        setupSpnegoAuthSchemeSupport(httpClientBuilder);
        return httpClientBuilder;
    }

    private void setupSpnegoAuthSchemeSupport(HttpAsyncClientBuilder httpClientBuilder) {
        final Lookup<AuthSchemeProvider> authSchemeRegistry = RegistryBuilder.<AuthSchemeProvider>create()
                .register(AuthSchemes.SPNEGO, new SPNegoSchemeFactory()).build();

        final GSSManager gssManager = GSSManager.getInstance();
        try {
            final GSSName gssUserPrincipalName = gssManager.createName(userPrincipalName, GSSName.NT_USER_NAME);
            login();
            final AccessControlContext acc = AccessController.getContext();
            final GSSCredential credential = doAsPrivilegedWrapper(loginContext.getSubject(),
                    (PrivilegedExceptionAction<GSSCredential>) () -> gssManager.createCredential(gssUserPrincipalName,
                            GSSCredential.DEFAULT_LIFETIME, SPNEGO_OID, GSSCredential.INITIATE_ONLY),
                    acc);

            final KerberosCredentialsProvider credentialsProvider = new KerberosCredentialsProvider();
            credentialsProvider.setCredentials(
                    new AuthScope(AuthScope.ANY_HOST, AuthScope.ANY_PORT, AuthScope.ANY_REALM, AuthSchemes.SPNEGO),
                    new KerberosCredentials(credential));
            httpClientBuilder.setDefaultCredentialsProvider(credentialsProvider);
        } catch (GSSException e) {
            throw new RuntimeException(e);
        } catch (PrivilegedActionException e) {
            throw new RuntimeException(e.getCause());
        }
        httpClientBuilder.setDefaultAuthSchemeRegistry(authSchemeRegistry);
    }

    /**
     * If logged in {@link LoginContext} is not available, it attempts login and
     * returns {@link LoginContext}
     *
     * @return {@link LoginContext}
     * @throws PrivilegedActionException
     */
    public synchronized LoginContext login() throws PrivilegedActionException {
        if (this.loginContext == null) {
            AccessController.doPrivileged((PrivilegedExceptionAction<Void>) () -> {
                final Subject subject = new Subject(false, Collections.singleton(new KerberosPrincipal(userPrincipalName)),
                        Collections.emptySet(), Collections.emptySet());
                Configuration conf = null;
                final CallbackHandler callback;
                if (password != null) {
                    conf = new PasswordJaasConf(userPrincipalName, enableDebugLogs);
                    callback = new KrbCallbackHandler(userPrincipalName, password);
                } else {
                    conf = new KeytabJaasConf(userPrincipalName, keytabPath, enableDebugLogs);
                    callback = null;
                }
                loginContext = new LoginContext(CRED_CONF_NAME, subject, callback, conf);
                loginContext.login();
                return null;
            });
        }
        return loginContext;
    }

    /**
     * Privileged Wrapper that invokes action with Subject.doAs to perform work as
     * given subject.
     *
     * @param subject {@link Subject} to be used for this work
     * @param action {@link PrivilegedExceptionAction} action for performing inside
     *            Subject.doAs
     * @param acc the {@link AccessControlContext} to be tied to the specified
     *            subject and action see
     *            {@link Subject#doAsPrivileged(Subject, PrivilegedExceptionAction, AccessControlContext)
     * @return the value returned by the PrivilegedExceptionAction's run method
     * @throws PrivilegedActionException
     */
    static <T> T doAsPrivilegedWrapper(final Subject subject, final PrivilegedExceptionAction<T> action, final AccessControlContext acc)
            throws PrivilegedActionException {
        try {
            return AccessController.doPrivileged((PrivilegedExceptionAction<T>) () -> Subject.doAsPrivileged(subject, action, acc));
        } catch (PrivilegedActionException pae) {
            if (pae.getCause() instanceof PrivilegedActionException) {
                throw (PrivilegedActionException) pae.getCause();
            }
            throw pae;
        }
    }

    /**
     * This class matches {@link AuthScope} and based on that returns
     * {@link Credentials}. Only supports {@link AuthSchemes#SPNEGO} in
     * {@link AuthScope#getScheme()}
     */
    private static class KerberosCredentialsProvider implements CredentialsProvider {
        private AuthScope authScope;
        private Credentials credentials;

        @Override
        public void setCredentials(AuthScope authscope, Credentials credentials) {
            if (authscope.getScheme().regionMatches(true, 0, AuthSchemes.SPNEGO, 0, AuthSchemes.SPNEGO.length()) == false) {
                throw new IllegalArgumentException("Only " + AuthSchemes.SPNEGO + " auth scheme is supported in AuthScope");
            }
            this.authScope = authscope;
            this.credentials = credentials;
        }

        @Override
        public Credentials getCredentials(AuthScope authscope) {
            assert this.authScope != null && authscope != null;
            return authscope.match(this.authScope) > -1 ? this.credentials : null;
        }

        @Override
        public void clear() {
            this.authScope = null;
            this.credentials = null;
        }
    }

    /**
     * Jaas call back handler to provide credentials.
     */
    private static class KrbCallbackHandler implements CallbackHandler {
        private final String principal;
        private final SecureString password;

        KrbCallbackHandler(final String principal, final SecureString password) {
            this.principal = principal;
            this.password = password;
        }

        public void handle(final Callback[] callbacks) throws IOException, UnsupportedCallbackException {
            for (Callback callback : callbacks) {
                if (callback instanceof PasswordCallback) {
                    PasswordCallback pc = (PasswordCallback) callback;
                    if (pc.getPrompt().contains(principal)) {
                        pc.setPassword(password.getChars());
                        break;
                    }
                }
            }
        }
    }

    /**
     * Usually we would have a JAAS configuration file for login configuration.
     * Instead of an additional file setting as we do not want the options to be
     * customizable we are constructing it in memory.
     * <p>
     * As we are using this instead of jaas.conf, this requires refresh of
     * {@link Configuration} and reqires appropriate security permissions to do so.
     */
    private static class PasswordJaasConf extends AbstractJaasConf {

        PasswordJaasConf(final String userPrincipalName, final boolean enableDebugLogs) {
            super(userPrincipalName, enableDebugLogs);
        }

        public void addOptions(final Map<String, String> options) {
            options.put("useTicketCache", Boolean.FALSE.toString());
            options.put("useKeyTab", Boolean.FALSE.toString());
        }
    }

    /**
     * Usually we would have a JAAS configuration file for login configuration. As
     * we have static configuration except debug flag, we are constructing in
     * memory. This avoids additional configuration required from the user.
     * <p>
     * As we are using this instead of jaas.conf, this requires refresh of
     * {@link Configuration} and requires appropriate security permissions to do so.
     */
    private static class KeytabJaasConf extends AbstractJaasConf {
        private final String keytabFilePath;

        KeytabJaasConf(final String userPrincipalName, final String keytabFilePath, final boolean enableDebugLogs) {
            super(userPrincipalName, enableDebugLogs);
            this.keytabFilePath = keytabFilePath;
        }

        public void addOptions(final Map<String, String> options) {
            options.put("useKeyTab", Boolean.TRUE.toString());
            options.put("keyTab", keytabFilePath);
            options.put("doNotPrompt", Boolean.TRUE.toString());
        }

    }

    private abstract static class AbstractJaasConf extends Configuration {
        private final String userPrincipalName;
        private final boolean enableDebugLogs;

        AbstractJaasConf(final String userPrincipalName, final boolean enableDebugLogs) {
            this.userPrincipalName = userPrincipalName;
            this.enableDebugLogs = enableDebugLogs;
        }

        @Override
        public AppConfigurationEntry[] getAppConfigurationEntry(final String name) {
            final Map<String, String> options = new HashMap<>();
            options.put("principal", userPrincipalName);
            options.put("isInitiator", Boolean.TRUE.toString());
            options.put("storeKey", Boolean.TRUE.toString());
            options.put("debug", Boolean.toString(enableDebugLogs));
            addOptions(options);
            return new AppConfigurationEntry[] { new AppConfigurationEntry(SUN_KRB5_LOGIN_MODULE,
                    AppConfigurationEntry.LoginModuleControlFlag.REQUIRED, Collections.unmodifiableMap(options)) };
        }

        abstract void addOptions(Map<String, String> options);
    }
}
到了这里,关于elasticsearch添加kerberos认证完整操作流程的文章就介绍完了。如果您还想了解更多内容,请在右上角搜索TOY模板网以前的文章或继续浏览下面的相关文章,希望大家以后多多支持TOY模板网!