目录
前言
一、Yolov8环境搭建
二、配置RealSense-ros功能包
1.安装ROS-humble
2.安装Intel RealSense SDK 2.0
编辑 3.克隆ROS功能包
三、物体距离检测代码实现
1.算法流程:
2.代码示例:
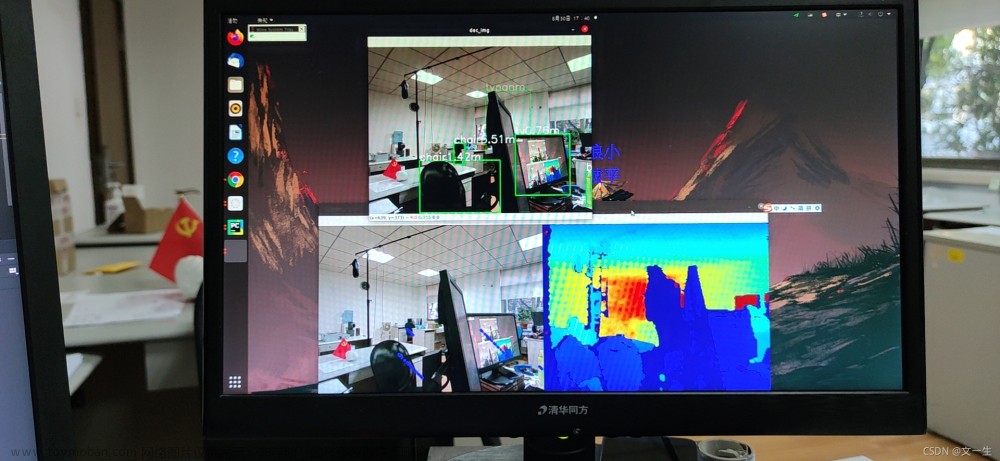
3.效果展示:
前言
要基于YOLOv8和RealsenseD455相机实现物体距离检测,可以按照以下步骤进行操作:
-
准备环境:
- 安装YOLOv8:可以使用开源框架如Darknet或PyTorch实现YOLOv8模型。
- 安装Realsense SDK:根据相机型号和操作系统,下载并安装相机的SDK。
-
获取相机数据:
- 使用Realsense SDK连接并获取相机数据。
- 通过相机获取的RGB图像作为输入,传递给YOLOv8模型。
-
物体检测:
- 使用YOLOv8模型对输入的图像进行物体检测,获取物体的边界框和类别。
-
距离估计:
- 根据Realsense相机的深度图像,对检测到的物体进行距离估计。
- 使用相机的深度图像,可以通过计算像素与实际距离的关系来获取物体的距离。
-
结果显示:
- 将检测到的物体类别、边界框和距离信息进行显示或保存。
一、Yolov8环境搭建
YOLOv8是一种基于深度学习的目标检测算法,可以实现实时的物体检测、分割、分类等操作。
官方网址:
https://github.com/ultralytics/ultralytics
基本环境要求:Python>=3.8 Pytorch>=1.8
以第三方库的形式安装Yolov8:
pip install ultralytics安装完毕后,通过以下命令测试是否安装成功:
yolo predict model=yolov8n.pt source='https://ultralytics.com/images/bus.jpg'命令执行完毕后,将在同级目录下得到runs目录,内容为示例图的检测结果。

得到示例图片说明Yolo模型运行正常。
如果由于网络问题,下载资源速度很慢,可以选择直接下载网盘中链接到当前目录进行测试。

网盘链接:https://pan.baidu.com/s/1txVCeJ0eBOEv2DF4evzftg 提取码: hnnp
二、配置RealSense-ros功能包
1.安装ROS-humble
官方安装手册:
Installation — ROS 2 Documentation: Humble documentation
2.安装Intel RealSense SDK 2.0
GitHub - IntelRealSense/realsense-ros: Intel(R) RealSense(TM) ROS Wrapper for Depth Camera
sudo apt install ros-humble-librealsense2*可以选择安装realsense viewer进行相机调试,Intel提供两种安装方法,第一种是通过build好的package安装,第二种是通过源码自己build安装,为了方便,本文直接使用第一种方法。
step1:注册服务器的公钥
sudo apt-key adv --keyserver keyserver.ubuntu.com --recv-key F6E65AC044F831AC80A06380C8B3A55A6F3EFCDE || sudo apt-key adv --keyserver hkp://keyserver.ubuntu.com:80 --recv-key F6E65AC044F831AC80A06380C8B3A55A6F3EFCDE
step2:将服务器加入到repo列表
sudo add-apt-repository "deb https://librealsense.intel.com/Debian/apt-repo $(lsb_release -cs) main" -u
step3:安装realsense-viewer的libraries
sudo apt-get install librealsense2-dev
sudo apt-get install librealsense2-dbg
step4: 打开realsense viewer查看图像是否正常(注意打开软件中RGB开关)
realsense-viewer3.克隆ROS功能包
1.克隆到workspace/src目录下:
git clone https://github.com/IntelRealSense/realsense-ros.git -b ros2-development2.安装相关依赖项:
回到当前工作空间目录下
sudo apt-get install python3-rosdep -y
sudo rosdep init
rosdep update
rosdep install -i --from-path src --rosdistro $ROS_DISTRO --skip-keys=librealsense2 -y
如果发生rosdep失败可以下载使用国内版rosdepc替代。
3.编译当前工作空间:
colcon build4.节点启动命令:
ros2 launch realsense2_camera rs_launch.py

三、物体距离检测代码实现
1.算法流程:
将相机输出的深度图像信息与RGB图像对齐处理,滤除深度值大于阈值的背景图像,在将背景去除后的图像送入Yolo模型进行处理,得到对应物体的类别信息与蒙板信息。使用简化的KNN算法对蒙板对应的深度值进行筛选,取出边缘点和极端数据。最后均值处理得到物体的三维坐标信息。
2.代码示例:
源码链接: https://pan.baidu.com/s/1M2_yx7Cu9UXm3u0VwzLELQ 提取码: ai64
物体测距节点:
obj_detect.py:
#!/usr/bin/env python
# Basic ROS2
# Author:Jin Xiangyv
# 2024.1.2

#System imports
import rclpy
from rclpy.node import Node
from rclpy.qos import qos_profile_sensor_data
from rclpy.qos import ReliabilityPolicy, QoSProfile

# Executor and callback imports
from rclpy.callback_groups import MutuallyExclusiveCallbackGroup
from rclpy.executors import MultiThreadedExecutor

# ROS2 interfaces
from sensor_msgs.msg import Image, CameraInfo
from std_msgs.msg import String

# Image msg parser
from cv_bridge import CvBridge

# Vision model
from ultralytics import YOLO

# Others
import numpy as np
import time, json, torch

class Yolov8Node(Node):

    '''
        Work:
            a class based on the visual recognition moudle of YOLOv8
            which can obtain the object's category and position.
        Param:
            model:neural network model
            device:use GPU accelerationn or use CPU
            depth_threshold:background remove
            threshold:reserved parameter
            enable_yolo:use YOLO or not

    '''

    def __init__(self):
        super().__init__("yolov8_node")
        rclpy.logging.set_logger_level('yolov8_node', rclpy.logging.LoggingSeverity.INFO)

        ## Declare parameters for node
        self.declare_parameter("model", "yolov8n-seg.pt")
        self.declare_parameter("device", "cuda:0")
        self.declare_parameter("depth_threshold", 0.6)
        self.declare_parameter("threshold", 0.3)
        self.declare_parameter("enable_yolo", True)

        ## Transmit parameters
        model = self.get_parameter("model").get_parameter_value().string_value

        self.device = self.get_parameter("device").get_parameter_value().string_value
        self.depth_threshold = self.get_parameter("depth_threshold").get_parameter_value().double_value
        self.threshold = self.get_parameter("threshold").get_parameter_value().double_value
        self.enable_yolo = self.get_parameter("enable_yolo").get_parameter_value().bool_value

        ## Camera correction matrix
        self.tf_world_to_camera = np.array([[1.000,  0.000,  0.000,  0.000],
                                            [0.000,  1.000,  0.000,  0.000],
                                            [0.000,  0.000,  1.000,  0.000],
                                            [0.000,  0.000,  0.000,  1.000]])

        self.tf_camera_to_optical = np.array([[385.591,    0.000,  324.346,   0.000],
                                              [  0.000,  385.137,  244.673,   0.000],
                                              [  0.000,    0.000,    1.000,   0.000]])


        self.tf_world_to_optical = np.matmul(self.tf_camera_to_optical, self.tf_world_to_camera)

        ## Multithread processing
        self.group_img_sub = MutuallyExclusiveCallbackGroup()
        self.group_timer = MutuallyExclusiveCallbackGroup()

        ## Others init
        self.cv_bridge = CvBridge()
        self.yolo = YOLO("yolov8n-seg.pt")

        self.yolo.fuse()
        '''
            Conv2d and BatchNorm2d Layer Fusion:
            Conv2d layers are often followed by BatchNorm2d layers in deep neural networks.
            Fusing these layers means combining the operations of the convolutional layer and the batch normalization layer into a single operation.
            This can reduce the computational cost and improve inference speed.

        '''

        self.color_image_msg = None
        self.depth_image_msg = None
        self.camera_intrinsics = None
        self.pred_image_msg = Image()
        self.result_img = None

        # Set clipping distance for background removal
        depth_scale = 0.001
        self.depth_threshold = self.depth_threshold/depth_scale

        # Publishers
        self._item_dict_pub = self.create_publisher(String, "/yolo/prediction/item_dict", 10)
        self._pred_pub = self.create_publisher(Image, "/yolo/prediction/image", 10)
        self._bg_removed_pub = self.create_publisher(Image, "/yolo/bg_removed", 10)
        self._test = self.create_publisher(Image, "/yolo/test", 10)

        # Subscribers
        self._color_image_sub = self.create_subscription(Image, "/camera/camera/color/image_raw", self.color_image_callback, qos_profile_sensor_data, callback_group=self.group_img_sub)
        self._depth_image_sub = self.create_subscription(Image, "/camera/camera/depth/image_rect_raw", self.depth_image_callback, qos_profile_sensor_data, callback_group=self.group_img_sub)
        self._camera_info_subscriber = self.create_subscription(CameraInfo, '/camera/camera/color/camera_info', self.camera_info_callback, QoSProfile(depth=1,reliability=ReliabilityPolicy.RELIABLE), callback_group=self.group_img_sub)

        # Timers
        self._vision_timer = self.create_timer(0.04, self.object_segmentation, callback_group=self.group_timer) # 25 hz

    def color_image_callback(self, msg):
        self.color_image_msg = msg

    def depth_image_callback(self, msg):
        self.depth_image_msg = msg

    def camera_info_callback(self, msg):
        pass

    def clsuter_select(self, num_list, threshold):
        """
        parameters
        num_list: original number list
        threshold: retention rate

        returns
        new number list

        Works by removing singularity in original number list
        """
        n = len(num_list)
        n_threshold = n*(1-threshold)
        new_list = []
        out_list = []

        for i in num_list:
             if i != 0:
                  new_list.append(i)

        for num in new_list:
            fit_num = 0
            current = num
            for item in new_list:
                flag = abs(current - item)
                if flag < 200*threshold:
                    fit_num = fit_num + 1
            if fit_num > n_threshold:
                out_list.append(num)

        return out_list


    def bg_removal(self, color_img_msg: Image, depth_img_msg: Image):
        """
        parameters
        color_img_msg: Message class 'Image'--RGB image
        depth_img_msg: Message class 'Image'--Z16 image

        returns
        Backgroung removed image

        Works by removing background in original image
        """
        if self.color_image_msg is not None and self.depth_image_msg is not None:

            # Convert color image msg
            cv_color_image = self.cv_bridge.imgmsg_to_cv2(color_img_msg, desired_encoding='bgr8')
            np_color_image = np.array(cv_color_image, dtype=np.uint8)

            # Convert depth image msg
            cv_depth_image = self.cv_bridge.imgmsg_to_cv2(depth_img_msg, desired_encoding='passthrough')
            np_depth_image = np.array(cv_depth_image, dtype=np.uint16)

            self.test_msg = self.cv_bridge.cv2_to_imgmsg(np_depth_image, encoding='16UC1')
            self._test.publish(self.test_msg)


            # background removal
            grey_color = 153
            depth_image_3d = np.dstack((np_depth_image, np_depth_image, np_depth_image)) # depth image is 1 channel, color is 3 channels
            # bg_removed = np.where((depth_image_3d > self.depth_threshold) | (depth_image_3d != depth_image_3d), grey_color, np_color_image)
            bg_removed = np.where((depth_image_3d > 10000) | (depth_image_3d != depth_image_3d), grey_color, np_color_image)
            return bg_removed, np_color_image, np_depth_image

        self.get_logger().error("Background removal error, color or depth msg was None")


    def filter_depth_object_img(self, img, starting_mask, deviation): #TODO: I need explanation from alfredo -Dreez
        """
        parameters
        img: np depth image
        deviation: the deviation allowed
        returns
        filteref image

        Works by removing pixels too far from the median value
        """
        mdv = np.median(img[starting_mask]) #median depth value
        u_lim = mdv + mdv*deviation #upper limit

        uidx = (img >= u_lim)

        #we stack the two masks and then takes the max in the new axis
        out_img = img
        zero_img = np.zeros_like(img)
        out_img[uidx] = zero_img[uidx]
        return out_img


    def object_segmentation(self):
        if self.enable_yolo and self.color_image_msg is not None and self.depth_image_msg is not None:
            self.get_logger().debug("Succesfully acquired color and depth image msgs")

            # Remove background
            bg_removed, np_color_image, np_depth_image = self.bg_removal(self.color_image_msg, self.depth_image_msg)
            self.get_logger().debug("Succesfully removed background")

            self._bg_removed_pub.publish(self.cv_bridge.cv2_to_imgmsg(bg_removed, encoding='bgr8'))

            # Predict on image "bg_removed"
            results = self.yolo(source=bg_removed,device='0')

            self.get_logger().debug("Succesfully predicted")

            # Go through detections in prediction results
            for detection in results:

                # Extract image with yolo predictions
                pred_img = detection.plot()
                self.result_img = pred_img

                self.pred_image_msg = self.cv_bridge.cv2_to_imgmsg(pred_img, encoding='bgr8')
                self._pred_pub.publish(self.pred_image_msg)

                # Get number of objects in the scene
                object_boxes = detection.boxes.xyxy.cpu().numpy()
                n_objects = object_boxes.shape[0]

                try:

                    masks = detection.masks

                except AttributeError:

                    continue

                self.get_logger().debug("Succesfully extracted boxes and masks")

                # Declare variables used later

                objects_median_center = []
                objects_median_center_transform = []

                detection_class = detection.boxes.cls.cpu().numpy()
                detection_conf = detection.boxes.conf.cpu().numpy()

                for i in range(n_objects):
                    # Get mask for the i'th object
                    single_selection_mask = np.array(masks.xyn[i])
                    single_object_box = object_boxes[i]

                    center_x = int(0.5*(single_object_box[0] + single_object_box[2]))
                    center_y = int(0.5*(single_object_box[1] + single_object_box[3]))

                    depth = []
                    sum = 0
                    dict = 0

                    for point in single_selection_mask:
                         p_x = int(point[0]*480)
                         p_y = int(point[1]*640)
                         if np_depth_image.item(p_x, p_y)!= 0:
                            depth.append(np_depth_image.item(p_x, p_y))

                    print("original")
                    print(depth)
                    print(len(depth))

                    selected_depth = self.clsuter_select(depth, 0.8)
                    selected_depth = self.clsuter_select(selected_depth, 0.8)

                    print("selected")
                    print(selected_depth)
                    print(len(selected_depth))

                    for dep in selected_depth:
                        sum = sum + dep

                    if len(selected_depth) != 0:
                        dict = sum/len(selected_depth)
                    else:
                        dict = 0

                    dict = dict/1024

                    print("end")
                    print("class:" + str(detection.names[detection_class[i]]))
                    print(dict)

                    a = self.tf_world_to_optical[:,3]
                    obj_center = [dict*center_x - a[0],dict*center_y - a[1], dict*1 - a[2]]
                    obj_transformed = np.linalg.solve(self.tf_world_to_optical[:,[0,1,2]], obj_center)

                    objects_median_center.append(obj_center)
                    objects_median_center_transform.append(obj_transformed)

                # Item dict creation
                item_dict = {}

                for item, n, median_tf in zip(detection_class, range(n_objects), objects_median_center_transform):
                    item_dict[f'item_{n}'] = {'class': detection.names[item],'position': median_tf.tolist()}

                self.item_dict = item_dict
                self.item_dict_str = json.dumps(self.item_dict)
                print(self.item_dict)
                self.get_logger().info(f"Yolo detected items: {[detection.names[item] for item in detection_class]}")
                item_dict_msg = String()
                item_dict_msg.data = self.item_dict_str
                self._item_dict_pub.publish(item_dict_msg)

                self.get_logger().debug("Item dictionary succesfully created and published")

    def shutdown_callback(self):
        self.get_logger().warn("Shutting down...")

##Main funtion

def main(args=None):
    rclpy.init(args=args)

    # Instansiate node class
    vision_node = Yolov8Node()

    # Create executor
    executor = MultiThreadedExecutor()
    executor.add_node(vision_node)

    try:

        # Run executor
        executor.spin()

    except KeyboardInterrupt:

        pass

    finally:

        # Shutdown executor
        vision_node.shutdown_callback()
        executor.shutdown()

if __name__ == "__main__":
    main()
图像可视化节点:
video_player.py:
#!/usr/bin/env python
# Basic ROS2
# Author:Jin Xiangyv
# 2024.1.2

import rclpy
import message_filters

import rclpy
from rclpy.node import Node
from sensor_msgs.msg import Image
from cv_bridge import CvBridge
import cv2

class Video_player(Node):
    def __init__(self, name):
        super().__init__(name)
        self.version_info()
        self.get_logger().info("Wait for video source......")
        self.subcriber_1 = message_filters.Subscriber(self,Image,'/yolo/prediction/image')
        self.subcriber_2 = message_filters.Subscriber(self,Image,'/yolo/bg_removed')

        self.sync = message_filters.ApproximateTimeSynchronizer([self.subcriber_1,
                                                                 self.subcriber_2],\
                                                                 10,0.5,allow_headerless=True)
        self.sync.registerCallback(self.multi_callback)
        self.cv_bridge = CvBridge()


    def multi_callback(self,stream_1,stream_2):

        self.get_logger().info("Image received:")
        prediction_img = self.cv_bridge.imgmsg_to_cv2(stream_1,'bgr8')
        background_removal_img = self.cv_bridge.imgmsg_to_cv2(stream_2,'bgr8')

        cv2.imshow("prediction_img",prediction_img)
        cv2.imshow("background_removal_img",background_removal_img)

        cv2.waitKey(10)


    def version_info(self):
        self.get_logger().info("VERSION 1.2.0")


def main(args=None):
    rclpy.init(args=args)
    node = Video_player("video_player")
    rclpy.spin(node)
    node.destroy_node()
    rclpy.shutdown()
3.效果展示:
ros2 launch realsense2_camera rs_launch.py
ros2 run vision_pkg_python obj_detectros2 run vision_pkg_python video_player 

查看物体位置信息:文章来源:https://www.toymoban.com/news/detail-798437.html
ros2 topic echo /yolo/prediction/item_dict
 文章来源地址https://www.toymoban.com/news/detail-798437.html
到了这里,关于基于YOLOv8和RealsenseD455相机实现物体距离检测的文章就介绍完了。如果您还想了解更多内容,请在右上角搜索TOY模板网以前的文章或继续浏览下面的相关文章,希望大家以后多多支持TOY模板网!


