一、概述
剪枝(Pruning)的一些概念:
- 当提及神经网络的"参数"时,大多数情况指的是网络的学习型参数,也就是权重矩阵weights和偏置bias;
- 现代网络的参数量大概在百万至数十亿之间,因此实际上在一个网络中也并不是所有权值都是重要的,剪枝的作用就是削减那些不重要权重矩阵的一种直接压缩模型的方式;
- 对于一个已经训练好的模型,切断或删除某些连接,同时保证不对精度造成重大影响,这样得到的模型就是一个参数较少的剪枝模型;
- 从生物学的角度来说,人类在成长过程中突触会减少,但思维能力反而更强了;
- 和dropout的区别:dropout具有随机性,剪枝具有针对性;
下面看一下剪枝的实际操作图:

二、策略
剪枝主要有以下几种方法:
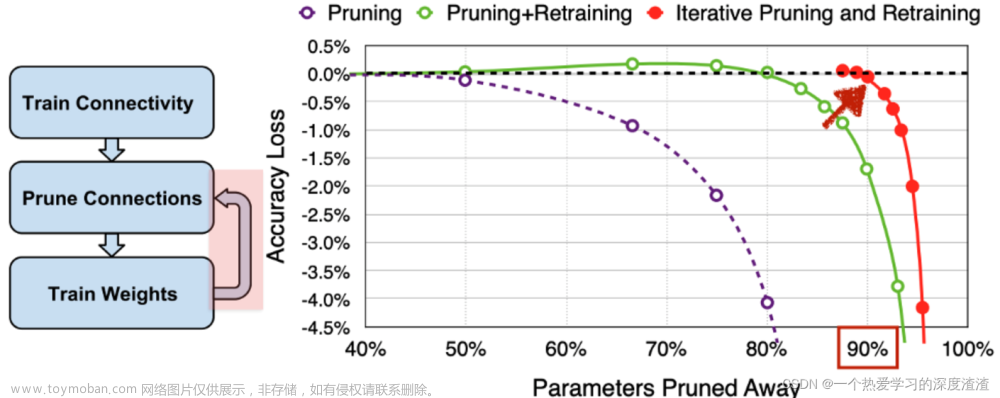
1、迭代式剪枝:训练权重——剪枝(根据阈值)——重新训练权重【最常用】
2、动态剪枝:剪枝和训练同时进行,在网络的优化目标中加入权重的稀疏正则项,使得网络训练时部分权重趋近于0;
3、对推理过程中单个目标剪枝;
总结:大多数的剪枝方法实际上是迭代的方式进行的,因为修剪后重新训练,可以让模型因修剪操作导致的精度下降恢复过来,然后在进行下一次修剪,直到达到精度下降的阈值,就不再修剪;
策略对比图:

从图中可以看出,单纯剪枝到50%精度就开始下降,剪枝后训练到80%精度才开始下降,迭代进行剪枝到90%精度才下降;
拓展:
实际上剪枝的大类分为几种:
1、非结构化剪枝:也就是上述介绍的将不重要的权重置为0;
2、结构化剪枝:将模型的一个完整结构剪除,比如channels、filters、layers;
3、自动化剪枝:NAS,需要大量的算力支持;
三、优缺点
优点:
-
可以应用在训练期间或训练结束后;
-
对于任意一个结构,可以自主控制推理时间/模型大小与准确率之间的平衡;
-
可应用于卷积层和全连接层;
缺点:
- 没有直接切换到一个更好的网络来的有效;
四、代码案例
首先需要明确,剪枝是需要对模型层做一定修改的;
本次代码是基于小模型LeNet进行剪枝实验;
1、对模型结构中的Liner层进行修改,添加mask这个变量(自定义MaskedLinear层)
class MaskedLinear(Module):
    def __init__(self, in_features, out_features, bias=True):
        super(MaskedLinear, self).__init__()
        self.in_features = in_features
        self.out_features = out_features
        # 将weight转换为可学习的变量
        self.weight = Parameter(torch.Tensor(out_features, in_features))
        # 初始化mask的值为1,并转换为可学习的变量
        self.mask = Parameter(torch.ones([out_features, in_features]), requires_grad=False)
        if bias:
        	# 对bias进行初始化
            self.bias = Parameter(torch.Tensor(out_features))
        else:
        	# 将bias设置为空
            self.register_parameter('bias', None)
        self.reset_parameters()

    # 参数初始化
    def reset_parameters(self):
        stdv = 1. / math.sqrt(self.weight.size(1))
        self.weight.data.uniform_(-stdv, stdv)
        if self.bias is not None:
            self.bias.data.uniform_(-stdv, stdv)

    # 前向传播(实际上也是使用标准的Liner层)
    def forward(self, input):
    	# 其中的weight、mask都定义成可变的可学习变量
        return F.linear(input, self.weight * self.mask, self.bias)
LeNet的定义没有做任何修改,也就是几层全连接层,就不在这里进行代码展示了;
2、对模型每一层学习到的参数进行处理
for name, p in model.named_parameters():
	if 'mask' in name:
		continue
    # 模型参数
	tensor = p.data.cpu().numpy()
    # 梯度信息
	grad_tensor = p.grad.data.cpu().numpy()
    # 将参数的值为0的,梯度也更新为0
	grad_tensor = np.where(tensor == 0, 0, grad_tensor)
	p.grad.data = torch.from_numpy(grad_tensor).to(device)
3、统计每一层参数的非零数量,可用于展示剪枝的效果
def print_nonzeros(model):
    nonzero = total = 0
    for name, p in model.named_parameters():
        if 'mask' in name:
            continue
        tensor = p.data.cpu().numpy()
        # 用numpy中的函数统计tensor中非0值的数量
        nz_count = np.count_nonzero(tensor)
        total_params = np.prod(tensor.shape)
        nonzero += nz_count
        total += total_params
        print(f'{name:20} | nonzeros = {nz_count:7} / {total_params:7} ({100 * nz_count / total_params:6.2f}%) | total_pruned = {total_params - nz_count :7} | shape = {tensor.shape}')
    print(f'alive: {nonzero}, pruned : {total - nonzero}, total: {total}, Compression rate : {total/nonzero:10.2f}x  ({100 * (total-nonzero) / total:6.2f}% pruned)')
4、实现剪枝的具体操作
# 参数s控制剪枝的力度
def prune_by_std(self, s=0.25):
	for name, module in self.named_modules():
		if name in ['fc1', 'fc2', 'fc3']:
			# 取weight值得标准差乘以s
            threshold = np.std(module.weight.data.cpu().numpy()) * s
            # 打印每一层计算标准差阈值后得结果
            print(f'Pruning with threshold : {threshold} for layer {name}')
            # 得到阈值后进行剪枝
            module.prune(threshold)

# 具体实现剪枝的函数
def prune(self, threshold):
    weight_dev = self.weight.device
    # mask就是一开始传入的参数,全为1
    mask_dev = self.mask.device
    # Convert Tensors to numpy and calculate
    tensor = self.weight.data.cpu().numpy()
    mask = self.mask.data.cpu().numpy()
    # 更新mask(小于阈值的时候为0,不小于阈值的还是为1)
    new_mask = np.where(abs(tensor) < threshold, 0, mask)
    # weight和新的mask进行矩阵相乘
    self.weight.data = torch.from_numpy(tensor * new_mask).to(weight_dev)
    # 更新对应的mask
    self.mask.data = torch.from_numpy(new_mask).to(mask_dev)
说明:这里进行剪枝后,模型的精度会有下降,需要进行重新训练;
重新训练直接用原来的优化器参数训练即可,此时置为0的weight也不再参与梯度优化;
五、结果展示
剪枝前,经过了100个epoch:

此时精度为95.23%,wight参数全部不为0;
经过剪枝后:

此时可以看出,精度下降到85.08%,但weight的数值缩小了接近22倍,大大减少了参数量;
剪枝后再重新训练100个epoch:

此时精度又回到了97%,甚至比剪枝前还高,并且压缩度也保持不变;
总结
剪枝的操作总结下来分为几步:
模型的训练 —— 修改要剪枝的层(添加同weight维度的mask) —— 进行剪枝后推理 —— 根据剪枝后的权重重新训练
下图给到了剪枝的一个建议:
个人理解:剪枝本质就是忽略那些低于阈值的参数,从而减少参数量,使得模型得到压缩;文章来源:https://www.toymoban.com/news/detail-798635.html
实际上在每一种结构中都可以用到剪枝,弊端就是工作量较大,需要针对不同层进行修改,并且还要重新训练,如果剪枝的力度过大,可能导致和剪枝前精度相差过大;文章来源地址https://www.toymoban.com/news/detail-798635.html
到了这里,关于【模型压缩】(二)—— 剪枝的文章就介绍完了。如果您还想了解更多内容,请在右上角搜索TOY模板网以前的文章或继续浏览下面的相关文章,希望大家以后多多支持TOY模板网!


