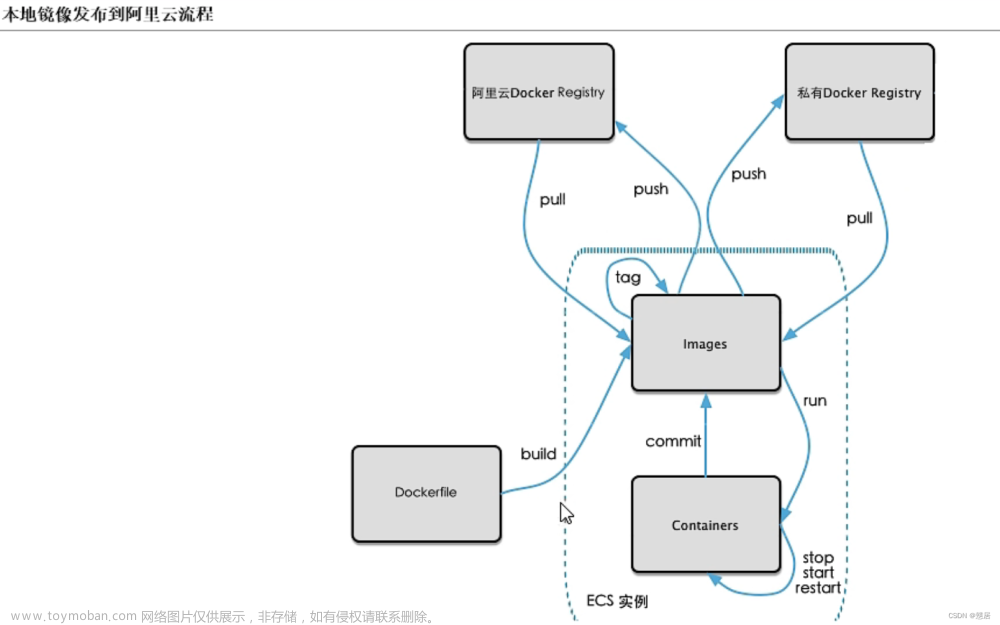
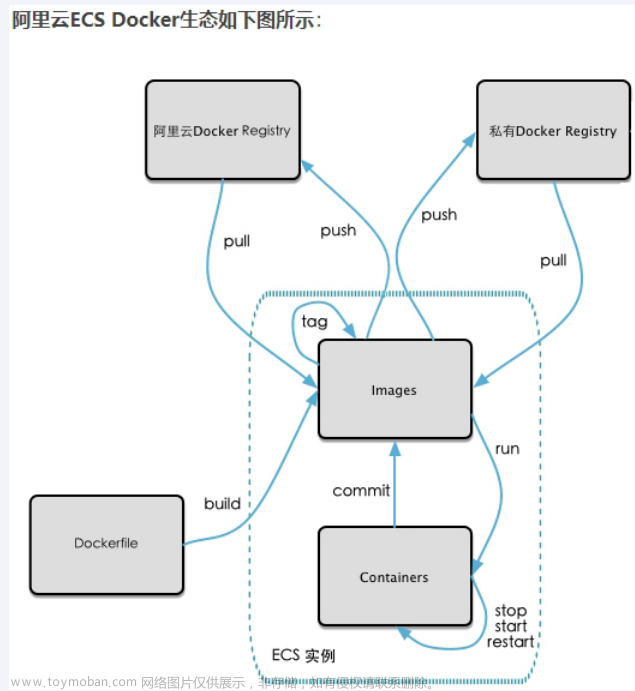
打开阿里云登录账号打开控制台
阿里云-为了无法计算的价值 (aliyun.com)
进入控制台点击折叠框
 找到容器服务里面的容器镜像服务
 找到实例创建个人实例记住你输入的密码

创建命名空间

创建镜像仓库
使用本地仓库来进行创建
创建完成会有一些指令
2.容器打包成镜像
docker commit -m "add a.txt" -a="alx" a8579a697673 qlx/tomcat-self:1.0[root@localhost yum.repos.d]# docker commit -m "add a self" -a="yjt" 500044e28ac5 yjt/tomcat-self:1.0
sha256:8c59be74a4056e8af2946fd1c10a2467f33c4e62f27b0cd286c8c81e67aa50d9
[root@localhost yum.repos.d]# docker images
REPOSITORY TAG IMAGE ID CREATED SIZE
yjt/tomcat-self 1.0 8c59be74a405 9 seconds ago 680MB
tomcat latest fb5657adc892 10 months ago 680MB
输入刚刚创建仓库输入的密码输入进来
[root@localhost yum.repos.d]# docker login --username=aliyun3938503944 registry.cn-hangzhou.aliyuncs.com
Password:
成功
WARNING! Your password will be stored unencrypted in /root/.docker/config.json.
Configure a credential helper to remove this warning. See
https://docs.docker.com/engine/reference/commandline/login/#credentials-store

Login Succeeded
输入指令进行上传
输入你的阿里云的账号(复制创建完成的指令里面带的有你的账号)
docker login --username=aliyun registry.cn-hangzhou.aliyuncs.comtag后面是要输入你要上传的 IMAGE ID  docker:1.0是你创建镜像的版本号
docker tag 8c59be74a405 registry.cn-hangzhou.aliyuncs.com/pub_1/docker:1.0这里也是需要输入你的版本号
docker push registry.cn-hangzhou.aliyuncs.com/pub_1/docker:1.0[root@localhost yum.repos.d]# docker tag 8c59be74a405 registry.cn-hangzhou.aliyuncs.com/pub_1/docker:1.0
[root@localhost yum.repos.d]# docker push registry.cn-hangzhou.aliyuncs.com/pub_1/docker:1.0
The push refers to repository [registry.cn-hangzhou.aliyuncs.com/pub_1/docker]
2b1e9584388c: Pushed
3e2ed6847c7a: Pushed
bd2befca2f7e: Pushed
59c516e5b6fa: Pushed
3bb5258f46d2: Pushed
832e177bb500: Pushed
f9e18e59a565: Pushed
26a504e63be4: Pushed
8bf42db0de72: Pushed
31892cc314cb: Pushed
11936051f93b: Pushed
1.0: digest: sha256:a7f70852b74a84f67d57508a08a46a8409dceb3c26c7219d5476706f16fc7028 size: 2630
上传完成后就可以在镜像版本里找到刚刚上传的镜像版本
本地镜像发布到阿里云后下载测试
docker pull registry.cn-hangzhou.aliyuncs.com/yjt/tomcat-self:[镜像版本号]本地镜像发布到私有云
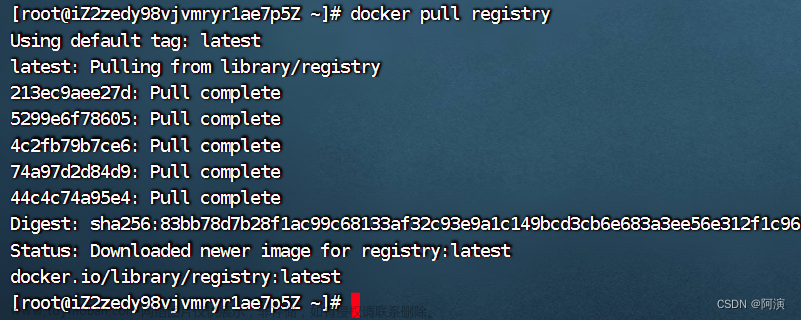
拉取Docker Registry
docker pull registryUsing default tag: latest
latest: Pulling from library/registry
79e9f2f55bf5: Pull complete
0d96da54f60b: Pull complete
5b27040df4a2: Pull complete
e2ead8259a04: Pull complete
3790aef225b9: Pull complete
Digest: sha256:169211e20e2f2d5d115674681eb79d21a217b296b43374b8e39f97fcf866b375
Status: Downloaded newer image for registry:latest
docker.io/library/registry:latest
运行register,作为本地的docker hub
docker run -d -p 5000:5000 -v /data/docker-registry/:/tmp/registry --privileged=true registrybc395361c94a42890d7dfad456c2b7e2a2adf6e4c4604a9f072f9845a75d3d2a
[root@localhost yum.repos.d]# docker ps
CONTAINER ID IMAGE COMMAND CREATED STATUS PORTS NAMES
bc395361c94a registry "/entrypoint.sh /etc…" 22 seconds ago Up 20 seconds 0.0.0.0:5000->5000/tcp, :::5000->5000/tcp stupefied_engelbart
500044e28ac5 tomcat "catalina.sh run" 11 hours ago Up 11 hours 8080/tcp 准备一个本地镜像
运行一个tomcat容器,进入容器内部安装ifconfig
此处省略启动romcat容器
进入容器内部
docker exec -it 500044e28ac5 /bin/bash
安装ifconfig工具
apt-get update root@500044e28ac5:/usr/local/tomcat# apt-get update
Get:1 http://deb.debian.org/debian bullseye InRelease [116 kB]
Get:2 http://deb.debian.org/debian bullseye-updates InRelease [44.1 kB]
Get:3 http://deb.debian.org/debian bullseye/main amd64 Packages [8184 kB]
Get:4 http://security.debian.org/debian-security bullseye-security InRelease [48.4 kB]
Get:5 http://security.debian.org/debian-security bullseye-security/main amd64 Packages [194 kB]
Get:6 http://deb.debian.org/debian bullseye-updates/main amd64 Packages [14.6 kB]
Fetched 8600 kB in 2min 5s (69.1 kB/s)
Reading package lists... Done
安装ifconfig工具
apt-get install net-tools root@500044e28ac5:/usr/local/tomcat# apt-get install net-tools
Reading package lists... Done
Building dependency tree... Done
Reading state information... Done
The following NEW packages will be installed:
net-tools
0 upgraded, 1 newly installed, 0 to remove and 54 not upgraded.
Need to get 250 kB of archives.
After this operation, 1015 kB of additional disk space will be used.
Get:1 http://deb.debian.org/debian bullseye/main amd64 net-tools amd64 1.60+git20181103.0eebece-1 [250 kB]
Fetched 250 kB in 1s (187 kB/s)
debconf: delaying package configuration, since apt-utils is not installed
Selecting previously unselected package net-tools.
(Reading database ... 12672 files and directories currently installed.)
Preparing to unpack .../net-tools_1.60+git20181103.0eebece-1_amd64.deb ...
Unpacking net-tools (1.60+git20181103.0eebece-1) ...
Setting up net-tools (1.60+git20181103.0eebece-1) ...
测试ifconfig是否安装成功
ifconfigroot@500044e28ac5:/usr/local/tomcat# ifconfig
eth0: flags=4163<UP,BROADCAST,RUNNING,MULTICAST> mtu 1500
inet 172.17.0.2 netmask 255.255.0.0 broadcast 172.17.255.255
ether 02:42:ac:11:00:02 txqueuelen 0 (Ethernet)
RX packets 3354 bytes 9043353 (8.6 MiB)
RX errors 0 dropped 0 overruns 0 frame 0
TX packets 2654 bytes 144876 (141.4 KiB)
TX errors 0 dropped 0 overruns 0 carrier 0 collisions 0
lo: flags=73<UP,LOOPBACK,RUNNING> mtu 65536
inet 127.0.0.1 netmask 255.0.0.0
loop txqueuelen 1000 (Local Loopback)
RX packets 0 bytes 0 (0.0 B)
RX errors 0 dropped 0 overruns 0 frame 0
TX packets 0 bytes 0 (0.0 B)
TX errors 0 dropped 0 overruns 0 carrier 0 collisions 0
成功后退出当前容器
exit将容器打包成为镜像
-m: 表示描述说明
-a:表示作者author
docker commit -m "add ifconfig" -a="yjt" 708291eec891 yjt/tomcat-ifconfigcurl查看私服镜像
[root@localhost docker-registry]# curl -XGET http://192.168.216.130:5000/v2/_catalog
响应如下:说明私有仓库没有镜像
{"repositories":[]}
修改本地镜像格式
将本地镜像格式修改为符合私服镜像的格式
按照公式: docker tag 镜像:Tag Host:Port/Repository:Tag
[root@localhost tomcatData]# docker tag yjt/tomcat-ifconfig 192.168.216.130:5000/yjt/tomcat-ifconfig
[root@localhost tomcatData]# docker images
REPOSITORY                                       TAG       IMAGE ID       CREATED         SIZE
192.168.216.130:5000/yjt/tomcat-ifconfig         latest    929c10a0c159   14 hours ago    700MB
yjt/tomcat-ifconfig                              latest    929c10a0c159   14 hours ago    700MB
yjt/tomcat-self                                  1.0       8c59be74a405   21 hours ago    680MB
registry.cn-hangzhou.aliyuncs.com/pub_1/docker   1.0       8c59be74a405   21 hours ago    680MB
tomcat                                           latest    fb5657adc892   10 months ago   680MB
registry                                         latest    b8604a3fe854   12 months ago   26.2MB
修改docker允许http方式推送镜像
docker默认不允许http方式推送镜像,通过配置选项来取消这个限制。修改完后如果不生效,建议重启docker
vim /etc/docker/daemon.json[root@localhost docker-registry]# cat /etc/docker/daemon.json
{
"registry-mirrors": ["https://ljcd9lt8.mirror.aliyuncs.com"],
"insecure-registries": ["192.168.216.130:5000"]
}需要重启docker
systemctl restart docker重新运行register
docker run -d -p 5000:5000 -v /data/docker-registry/:/tmp/registry --privileged=true registry将本地镜像推送到私服
[root@localhost docker-registry]# docker push 192.168.216.130:5000/yjt/tomcat-ifconfig
Using default tag: latest
The push refers to repository [192.168.216.130:5000/yjt/tomcat-ifconfig]
f3e8bdea284c: Pushed
39804b54e3da: Pushed
3e2ed6847c7a: Pushed
bd2befca2f7e: Pushed
59c516e5b6fa: Pushed
3bb5258f46d2: Pushed
832e177bb500: Pushed
f9e18e59a565: Pushed
26a504e63be4: Pushed
8bf42db0de72: Pushed
31892cc314cb: Pushed
11936051f93b: Pushed
latest: digest: sha256:dc4c7e53b4dea2dd05e1acf4a56e1c8d40d4692c4a5deb3203a8989136434e9f size: 2842
验证是否推送成功
[root@localhost docker-registry]# curl -XGET http://192.168.216.130:5000/v2/_catalog
{"repositories":["qlx/tomcat-ifconfig"]}
拉取私有云的镜像
拉取镜像文章来源:https://www.toymoban.com/news/detail-798731.html
docker pull 192.168.216.130:5000/yjt/tomcat-ifconfig启动容器文章来源地址https://www.toymoban.com/news/detail-798731.html
docker run -it 镜像ID /bin/bash到了这里,关于Docker 镜像上传到私有云和阿里云的超详细图文步骤的文章就介绍完了。如果您还想了解更多内容,请在右上角搜索TOY模板网以前的文章或继续浏览下面的相关文章,希望大家以后多多支持TOY模板网!


![[每周一更]-(第45期):Docker私有镜像仓库配置并打通阿里云OSS](https://imgs.yssmx.com/Uploads/2024/02/768090-1.png)


