看到这个文章相信你有一定的sentinel和gateway基础了吧。
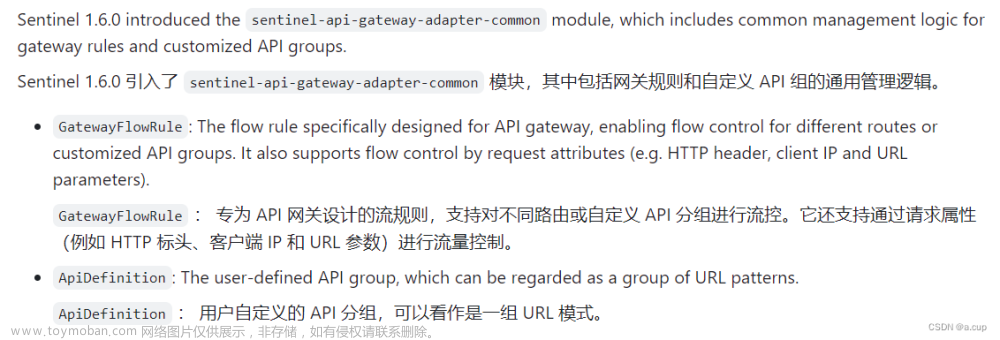
官网的gateway和sentinel联合使用有些过时了,于是有了这个哈哈,给你看看官网的:
才sentinel1.6,现在都几了啊,所以有些过时。
下面开始讲解:
首先我们总的回顾一下,sentinel就是需要运行一个jar包,开启dashbord页面,来显示流控信息。
然后运行我们的程序,调用需要的接口,该接口就会在dashbord上面显示了对吧。
但是啊,gateway和sentinel进行配合之后,两个dashbord内容是不同的:
下面我们来对比一下:
这个是gateway和sentinel配合之后的控制台:
这个是配合之前的控制台:
可以看到有明显的差别。。。
回忆到这里,我们在浏览器输入接口名称,调用接口的时候,如果接口调用错误就直接显示404啊,而且呀控制台也会报错: 'org.springframework.web.reactive.function.server.ServerResponse$BodyBuilder org.springframework. web.reactive.function.server.ServerResponse.status(org.springframework.http.HttpStatus)'
那现在我不想让他在控制台报错,不然就影响的对bug的判断了。我想让他按照我的想法来显示指定的页面或者指定的字符串该怎么做?下面有具体几种做法:
1.文件配置添加scg:
server:
  port: 7009

spring:
  application:
    name: gateway-sentinel-name
  cloud:
    nacos:
      discovery:
        server-addr: localhost:8848
        password: nacos
        username: nacos
    gateway:
      routes:
        - id: gateway_sentinel
          uri: lb://consume-name1
          predicates:
            - Path=/consume/**   #**/
          filters:
            - StripPrefix=1
    sentinel:
      transport:
        port: 8719
        dashboard: localhost:8080
      eager: true
      filter:
        enabled: false
=====================================================================================
#此时如果你在sentinel进行限流每秒两次。如果超过两次就会进行报错:
    'org.springframework.web.reactive.function.server.ServerResponse$BodyBuilder org.springframework.
    web.reactive.function.server.ServerResponse.status(org.springframework.http.HttpStatus)'并且加载不出数据
#上面的scg的配置可以解决这个异常哦!!!
#      scg:
#        fallback:
#          mode: redirect #这个redirect是直接跳转新的地址
#          redirect: https://www.baidu.com
#下面这个可以自定义异常处理方式::[下面这个处理就是自定义的了,你想给前端返回啥就在这里定义就好]
#      scg: #这个是解决超过流控限制的时候进行什么操作(添加这个后,就算超过流控了,也不会正在控制套打印啥错误了,而是直接跳转指定页面!!!非常的方便的!!)
#        fallback:
#          mode: response
#          response-status: 429
#          response-body: '{"status":429,"msg":"请求过于频繁"}'
#          content-type: "application/json"
2.API方式,就是写的代码,不是配置文件配置了。
##嘿嘿还有其他处理方式:::编码处理方式:(使用Gateway API)
#  //        如果使用配置的方式就卸载配置文件中,如果使用编码方式就写在启动类里面!!!
##使用编码处理方式的时候。就是在网关回调的时候进行出来被拦截的请求!!!
#那网关回调是啥?官网可以看到哦,就是请求经过网关与两个过程,一个是经历网关过滤器,经过过滤器后会进行服务调用。调用后在返回给网关,网关在传给前端信息。
  @SpringBootApplication
  public class GatewaySentinelApplication {

  public static void main(String[] args) {
  SpringApplication.run(GatewaySentinelApplication.class, args);

  GatewayCallbackManager.setBlockHandler(new RedirectBlockRequestHandler("https://www.baidu.com"));

}
}

#编码处理方式(自定义)这个就是自定义的了,是不是和application.xml配置的自定义的很像呢!
  @SpringBootApplication
  public class GatewaySentinelApplication {

  public static void main(String[] args) {
  SpringApplication.run(GatewaySentinelApplication.class, args);

  GatewayCallbackManager.setBlockHandler(new BlockRequestHandler() {
  @Override
  public Mono<ServerResponse> handleRequest(ServerWebExchange exchange, Throwable t) {
  Map<String,Object> map1=new HashMap();
  map1.put("status",HttpStatus.TOO_MANY_REQUESTS);
  map1.put("msg","请求过于频繁");
  return ServerResponse.status(HttpStatus.TOO_MANY_REQUESTS)
  .contentType(MediaType.APPLICATION_JSON).body(BodyInserters.fromValue(map1));
  }
});
}
}
网关流控规则

上面的这个具体的网关流控规则配置页面了。
你可以在针对参数属性里面选中Client IP ,然后选中属性值配置,在匹配传中添加127.0.0.1,你会发现,这次配置的流控规则只会对ip为127.0.0.1的ip有用。localhost都不会受这个流控规则的管制。
其他的参数属性也是如此。
我们可以清楚的看到上面的API类型是Route ID类型的。那要是我们有多个接口都想设置相同的流控规则呢?我们可以把API类型设置为API分组。

设置成API分组前首先在API分组管理先设置匹配模式(就是在分组,就是说把哪些接口分组在一个起)。

然后访问接口的时候就要按照流控规则了。比如我设置的是每秒只能访问一次,超过这个次数就返回我设置好的字符串了。
api方式书写流网关限流规则
上面我们是通过dashbord方式进行限流的。这样可以直观的操作页面,但是重启程序就没了。接下来我们通过api方式书写在程序里吧。。
里面需要的各种参数可以看官方文档:github上的网关限流api
下面直接上代码:
/**
 * @ClassName GatewayFlowRuleConfig
 * @Description TODO
 * GatewayFlowRule : 专为 API 网关设计的流规则,支持对不同路由或自定义 API 分组进行流控。
 * 它还支持通过请求属性(例如 HTTP 标头、客户端 IP 和 URL 参数)进行流量控制。
 * @Author zyhh
 * @version: 1.0
 */
@Configuration
public class GatewayFlowRuleConfig {

    @PostConstruct
    public void initRules(){
        Set<GatewayFlowRule> rules=new HashSet();
        GatewayFlowRule rule=new GatewayFlowRule();
        rule.setResourceMode(SentinelGatewayConstants.RESOURCE_MODE_ROUTE_ID);
        rule.setResource("zyhh");
//        对应阈值类型
        rule.setGrade(RuleConstant.FLOW_GRADE_QPS);
//        对应QPS阈值
        rule.setCount(1);
//        对应间隔时间
        rule.setIntervalSec(1);
//        对应流控方式(默认的:快速失败)
        rule.setControlBehavior(RuleConstant.CONTROL_BEHAVIOR_DEFAULT);
//        对应流控方式的排队
//        rule.setControlBehavior(RuleConstant.CONTROL_BEHAVIOR_RATE_LIMITER);
//        对应设置突发流量
        rule.setBurst(2);

//        针对属性来源
        GatewayParamFlowItem paramFlowItem=new GatewayParamFlowItem();
        paramFlowItem.setFieldName("token");
//        对应参数属性
        paramFlowItem.setParseStrategy(SentinelGatewayConstants.PARAM_PARSE_STRATEGY_CLIENT_IP);
//        对应匹配模式
        paramFlowItem.setMatchStrategy(SentinelGatewayConstants.PARAM_MATCH_STRATEGY_EXACT);
//        设置匹配模式
        paramFlowItem.setPattern("12345");

        rule.setParamItem(paramFlowItem);
        rules.add(rule);
        GatewayRuleManager.loadRules(rules);
    }
}
然后重启程序,再打开sentinel的dashbord发现结果如下:就给自己加上了。
那如果我想使用代码的方式配置api分组呢?接下来贴上代码:
这个代码写在了springboot启动类里面,我本来是写在Configuration类里面的,运行之后sentinel没显示,于是就配置在springboot启动类里面了,就成功呢了。如果有小伙伴知道原因,可不可以在评论区指点一二,感激不尽。。
下面贴上我在springboot启动类运行成功的代码:文章来源:https://www.toymoban.com/news/detail-798772.html
@SpringBootApplication
public class GatewaySentinelApplication {

    public static void main(String[] args) {
        SpringApplication.run(GatewaySentinelApplication.class, args);

        GatewayCallbackManager.setBlockHandler(new BlockRequestHandler() {

        initCustomizedApis();
        initRules();
    }
    private static void initCustomizedApis() {
        System.out.println("=====================================进api分组");
        Set<ApiDefinition> definitions = new HashSet<>();
//        对应完成了api分组
        ApiDefinition api1 = new ApiDefinition("zyhh_api")
                .setPredicateItems(new HashSet<ApiPredicateItem>() {{
                    add(new ApiPathPredicateItem().setPattern("/consume/get/1")
                            .setMatchStrategy(SentinelGatewayConstants.PARAM_MATCH_STRATEGY_EXACT));
                    add(new ApiPathPredicateItem().setPattern("/product/.*")
                            .setMatchStrategy(SentinelGatewayConstants.URL_MATCH_STRATEGY_REGEX));
                }});
        definitions.add(api1);
        GatewayApiDefinitionManager.loadApiDefinitions(definitions);
    }
    public static void initRules(){
        Set<GatewayFlowRule> rules=new HashSet();
//        ====接下来我们设置分组流控规则=======================
        GatewayFlowRule rule2=new GatewayFlowRule();
        rule2.setResourceMode(SentinelGatewayConstants.RESOURCE_MODE_CUSTOM_API_NAME);
        rule2.setResource("zyhh_api");
        rule2.setGrade(RuleConstant.FLOW_GRADE_QPS);
        rule2.setCount(2);
        rule2.setIntervalSec(1);
        rule2.setControlBehavior(RuleConstant.CONTROL_BEHAVIOR_DEFAULT);
        rule2.setBurst(2);
        rules.add(rule2);
//===============分组流控api结束=============================
        GatewayRuleManager.loadRules(rules);
    }
}
运行成功后sentinel在dashbord就显示这样了,就说明成功了:
==================== over=============================文章来源地址https://www.toymoban.com/news/detail-798772.html
到了这里,关于springcloud Alibaba中gateway和sentinel联合使用的文章就介绍完了。如果您还想了解更多内容,请在右上角搜索TOY模板网以前的文章或继续浏览下面的相关文章,希望大家以后多多支持TOY模板网!


