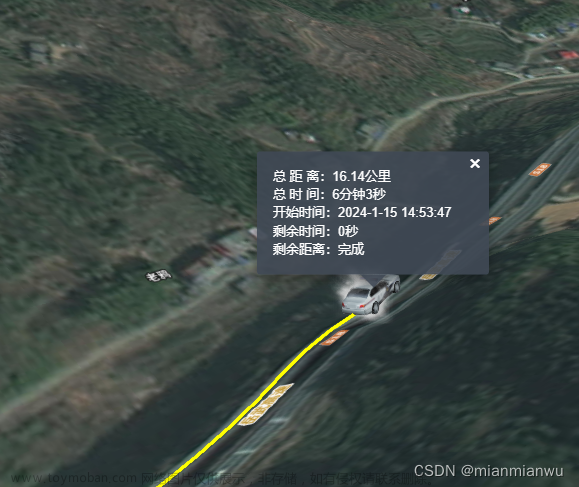
实现效果:new mars3d.graphic.FixedRoute({无需单击小车,即可在地图上实现默认打开弹窗的激活效果。↓↓↓↓↓↓↓↓

相关链接说明:
1.popup的示例完全开源,可参考:功能示例(Vue版) | Mars3D三维可视化平台 | 火星科技
2.绑定的矢量数据上的弹框通过代码默认激活打开参考:功能示例(Vue版) | Mars3D三维可视化平台 | 火星科技
3.实现逻辑:在该矢量数据上bindPopup(),bindPopup之后再该小车数据上openPopup()
4.api说明:
BaseGraphic - V3.7.0 - Mars3D API文档

BaseGraphic - V3.7.0 - Mars3D API文档

相关演示代码:
import * as mars3d from "mars3d"
export let map // mars3d.Map三维地图对象
export const eventTarget = new mars3d.BaseClass() // 事件对象,用于抛出事件到面板中
let graphicLayer
// 需要覆盖config.json中地图属性参数(当前示例框架中自动处理合并)
export const mapOptions = {
scene: {
center: { lat: 30.836861, lng: 116.044673, alt: 1395, heading: 14, pitch: -42 }
},
control: {
clockAnimate: true, // 时钟动画控制(左下角)
timeline: true, // 是否显示时间线控件
compass: { top: "10px", left: "5px" }
}
}文章来源地址https://www.toymoban.com/news/detail-801958.html
/**
* 初始化地图业务,生命周期钩子函数(必须)
* 框架在地图初始化完成后自动调用该函数
* @param {mars3d.Map} mapInstance 地图对象
* @returns {void} 无
*/
export function onMounted(mapInstance) {
map = mapInstance // 记录map
map.toolbar.style.bottom = "55px" // 修改toolbar控件的样式
// 创建矢量数据图层
graphicLayer = new mars3d.layer.GraphicLayer()
map.addLayer(graphicLayer)
// 加载完成在加载小车,否则地形未加载完成,小车会处于地下
map.on(mars3d.EventType.load, function (event) {
addGraphicLayer()
})
}
/**
* 释放当前地图业务的生命周期函数
* @returns {void} 无
*/
export function onUnmounted() {
map = null
}
function addGraphicLayer() {
const fixedRoute = new mars3d.graphic.FixedRoute({
name: "贴地表表面漫游",
speed: 160,
positions: [
[116.043233, 30.845286, 392.48],
[116.046833, 30.846863, 411.33],
[116.052137, 30.848801, 439.45],
[116.060838, 30.850918, 442.91],
[116.069013, 30.852035, 435.14],
[116.18739, 30.854441, 244.53],
[116.205214, 30.859332, 300.96]
],
clockLoop: false, // 是否循环播放
camera: {
type: "gs",
pitch: -30,
radius: 500
},
// model: {
// show: true,
// url: '//data.mars3d.cn/gltf/mars/qiche.gltf',
// scale: 0.2,
// minimumPixelSize: 50,
// },
model: {
url: "//data.mars3d.cn/gltf/mars/jingche/jingche.gltf",
heading: 90,
mergeOrientation: true, // 用于设置模型不是标准的方向时的纠偏处理,在orientation基础的方式值上加上设置是heading值
minimumPixelSize: 50
},
polyline: {
color: "#ffff00",
width: 3
}
})
graphicLayer.addGraphic(fixedRoute)
// 绑定popup
bindPopup(fixedRoute)
fixedRoute.on(mars3d.EventType.start, function (event) {
console.log("漫游开始start")
})
fixedRoute.on(mars3d.EventType.end, function (event) {
console.log("漫游结束end")
})
// ui面板信息展示
fixedRoute.on(mars3d.EventType.change, (event) => {
// const popup = event.graphic.getPopup()
// const container = popup?.container // popup对应的DOM
// console.log("漫游change", event)
throttled(eventTarget.fire("roamLineChange", event), 500)
})
map.on(mars3d.EventType.keydown, function (event) {
// 空格 切换暂停/继续
if (event.keyCode === 32) {
if (fixedRoute.isPause) {
fixedRoute.proceed()
} else {
fixedRoute.pause()
}
}
})
// 不贴地时,直接开始
// startFly(fixedRoute)
// 需要计算贴地点时,异步计算完成贴地后再启动
showLoading()
fixedRoute.autoSurfaceHeight().then(function (e) {
hideLoading()
startFly(fixedRoute)
})
}
function startFly(fixedRoute) {
fixedRoute.start()
fixedRoute.openPopup() // 显示popup
addParticleSystem(fixedRoute.property)
}
function bindPopup(fixedRoute) {
fixedRoute.bindPopup(
`<div style="width: 200px">
<div>总 距 离:<span id="lblAllLen"> </span></div>
<div>总 时 间:<span id="lblAllTime"> </span></div>
<div>开始时间:<span id="lblStartTime"> </span></div>
<div>剩余时间:<span id="lblRemainTime"> </span></div>
<div>剩余距离:<span id="lblRemainLen"> </span></div>
</div>`,
{ closeOnClick: false }
)
// 刷新局部DOM,不影响popup面板的其他控件操作
fixedRoute.on(mars3d.EventType.postRender, function (event) {
const container = event.container // popup对应的DOM
const params = fixedRoute?.info
if (!params) {
return
}
const lblAllLen = container.querySelector("#lblAllLen")
if (lblAllLen) {
lblAllLen.innerHTML = mars3d.MeasureUtil.formatDistance(params.distance_all)
}
const lblAllTime = container.querySelector("#lblAllTime")
if (lblAllTime) {
lblAllTime.innerHTML = mars3d.Util.formatTime(params.second_all / map.clock.multiplier)
}
const lblStartTime = container.querySelector("#lblStartTime")
if (lblStartTime) {
lblStartTime.innerHTML = mars3d.Util.formatDate(Cesium.JulianDate.toDate(fixedRoute.startTime), "yyyy-M-d HH:mm:ss")
}
const lblRemainTime = container.querySelector("#lblRemainTime")
if (lblRemainTime) {
lblRemainTime.innerHTML = mars3d.Util.formatTime((params.second_all - params.second) / map.clock.multiplier)
}
const lblRemainLen = container.querySelector("#lblRemainLen")
if (lblRemainLen) {
lblRemainLen.innerHTML = mars3d.MeasureUtil.formatDistance(params.distance_all - params.distance) || "完成"
}
})
}
// 添加尾气粒子效果
function addParticleSystem(property) {
const particleSystem = new mars3d.graphic.ParticleSystem({
position: property,
style: {
image: "./img/particle/smoke.png",
particleSize: 12, // 粒子大小(单位:像素)
emissionRate: 20.0, // 发射速率 (单位:次/秒)
pitch: 40, // 俯仰角
maxHeight: 1000, // 超出该高度后不显示粒子效果
startColor: Cesium.Color.GREY.withAlpha(0.7), // 开始颜色
endColor: Cesium.Color.WHITE.withAlpha(0.0), // 结束颜色
startScale: 1.0, // 开始比例(单位:相对于imageSize大小的倍数)
endScale: 5.0, // 结束比例(单位:相对于imageSize大小的倍数)
minimumSpeed: 1.0, // 最小速度(米/秒)
maximumSpeed: 4.0 // 最大速度(米/秒)
},
attr: { remark: "车辆尾气" }
})
graphicLayer.addGraphic(particleSystem)
}
// ui层使用
export const formatDistance = mars3d.MeasureUtil.formatDistance
export const formatTime = mars3d.Util.formatTime
// 节流
function throttled(fn, delay) {
let timer = null
let starttime = Date.now()
return function () {
const curTime = Date.now() // 当前时间
const remaining = delay - (curTime - starttime)
// eslint-disable-next-line @typescript-eslint/no-this-alias
const context = this
// eslint-disable-next-line prefer-rest-params
const args = arguments
clearTimeout(timer)
if (remaining <= 0) {
fn.apply(context, args)
starttime = Date.now()
} else {
timer = setTimeout(fn, remaining)
}
}
}
备注说明:

1.直接通过new mars3d.graphic.ModelEntity({相关矢量上绑定再激活也可以,关键代码:
graphic.bindPopup(inthtml).openPopup()
实现链接:
功能示例(Vue版) | Mars3D三维可视化平台 | 火星科技
实现代码参考:
function addDemoGraphic1(graphicLayer) {
const graphic = new mars3d.graphic.ModelEntity({
name: "警车",
position: [116.346929, 30.861947, 401.34],
style: {
url: "//data.mars3d.cn/gltf/mars/jingche/jingche.gltf",
scale: 20,
minimumPixelSize: 50,
heading: 90,
distanceDisplayCondition: true,
distanceDisplayCondition_near: 0,
distanceDisplayCondition_far: 10000,
distanceDisplayPoint: {
// 当视角距离超过一定距离(distanceDisplayCondition_far定义的) 后显示为点对象的样式
color: "#00ff00",
pixelSize: 8
},
label: {
text: "我是原始的",
font_size: 18,
color: "#ffffff",
pixelOffsetY: -50,
distanceDisplayCondition: true,
distanceDisplayCondition_far: 10000,
distanceDisplayCondition_near: 0
}
},
attr: { remark: "示例1" }
})
graphicLayer.addGraphic(graphic)
// 演示个性化处理graphic
initGraphicManager(graphic)
}
// 也可以在单个Graphic上做个性化管理及绑定操作
function initGraphicManager(graphic) {
const inthtml = `<table style="width: auto;">
<tr>
<th scope="col" colspan="2" style="text-align:center;font-size:15px;">我是graphic上绑定的Popup </th>
</tr>
<tr>
<td>提示:</td>
<td>这只是测试信息,可以任意html</td>
</tr>
</table>`
graphic.bindPopup(inthtml).openPopup()
文章来源:https://www.toymoban.com/news/detail-801958.html
}
到了这里,关于【mars3d】 graphic.bindPopup(inthtml).openPopup()无需单击小车,即可在地图上自动激活弹窗的效果。的文章就介绍完了。如果您还想了解更多内容,请在右上角搜索TOY模板网以前的文章或继续浏览下面的相关文章,希望大家以后多多支持TOY模板网!


![[mars3d 学习] 最近升级版本造成的问题](https://imgs.yssmx.com/Uploads/2024/02/585611-1.png)


