一、TVM
TVM是一个开源的端到端优化机器学习编译器,目的是加速模型在任意硬件上的计算。
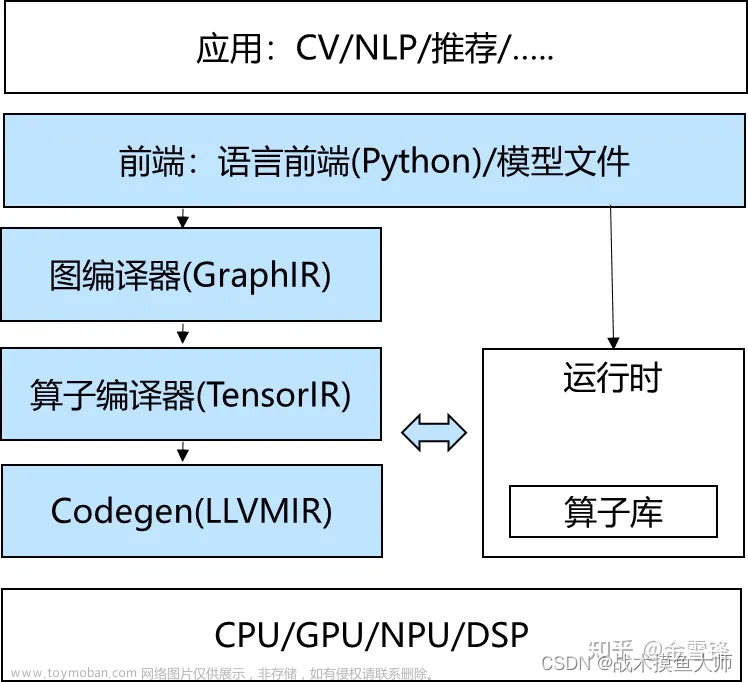
一般情况下如果实在intel的cpu上面部署可能用OpenVino,N卡上面肯定TensorRT,arm架构机器可能会用Ncnn等,意味着要针对每个框架做部署,这里面涉及到的转换非常复杂,部署过的就知道有多少坑在里面。而TVM最重要的一块就是自动生成和优化模型的基础架构,具有更好的性能,这张图简单说就是不管你什么深度学习框架不管什么硬件部署都能通过TVM搞定。
编译器的基本结构如下:
编译前端: 接收C/C++/Java等不同语言,进行代码生成,吐出IR,TVM这里相当于是输入模型的环节
编译器中端:接收IR,进行不同编译器后端可以共享的优化,如常量替换,死代码消除,循环优化等,吐出优化后的IR
编译器后端:接收优化后的IR,进行不同硬件的平台相关优化与硬件指令生成,吐出目标文件

二、示例代码
示例代码使用的同样是最简单的mobilenet_v3分类模型,是使用pytorch训练然后转onnx,可以参考前面几个文章有详细代码https://blog.csdn.net/Y_snower/article/details/125443366,首先安装tvm相关环境。我这里是python3.7 tvm1.0.0 onnx1.10.0
1.TVM文件生成
代码中针对tuning_option,在官方文档中这样说的For a production job, you will want to set the number of trials to be larger than the value of 20 used here. For CPU we recommend 1500, for GPU 3000-4000. The number of trials required can depend on the particular model and processor, so it’s worth spending some time evaluating performance across a range of values to find the best balance between tuning time and model optimization.
对cpu和gpu给出了不同的推荐值,实测下来选择不同的值对最终的推理速度也有影响。
代码如下:
import tvm.auto_scheduler as auto_scheduler
from tvm.autotvm.tuner import XGBTuner
from tvm import autotvm
import onnx
import numpy as np
import tvm
from tvm import relay


onnx_model = onnx.load('tiankong.onnx')  # 加载onnx模型,当然也可以用tvmc来load
target = tvm.target.Target('llvm -mcpu=skylake')  # 因为是cpu上的优化,所以llvm,GPU的话是cuda
# target = tvm.target.Target('llvm -mcpu=core-avx2')
input_name = 'input'
shape_dict = {input_name: (1, 1, 128, 128)}  # 输入的shape,因为之前一直训练的灰度所以是1,1不是1,3
mod, params = relay.frontend.from_onnx(onnx_model, shape_dict)
number = 10
repeat = 1
min_repeat_ms = 0
timeout = 10
# create a TVM runner
# min_repeat_ms is a value that specifies how long need to run configuration test. If the number of repeats falls under this time, it will be increased. This option is necessary for accurate tuning on GPUs, and is not required for CPU tuning. Setting this value to 0 disables it.
runner = autotvm.LocalRunner(
    number=number,  # number specifies the number of different configurations that we will test
    repeat=repeat,  # repeat specifies how many measurements we will take of each configuration
    timeout=timeout,  # in seconds,The timeout places an upper limit on how long to run training code for each tested configuration.
    min_repeat_ms=min_repeat_ms,
    enable_cpu_cache_flush=True,
)

#以下这部分是计算优化
tuning_option = {
    "tuner": "xgb",
    "trials": 1500,
    "early_stopping": 100,
    "measure_option": autotvm.measure_option(
        builder=autotvm.LocalBuilder(build_func="default"), runner=runner  # 默认的是XGBOOST优化
    ),
    "tuning_records": "resnet-50-v2-autotuning.json",  # 这里名称自己写,官方示例这样的我没改无所谓
}
# begin by extracting the tasks from the onnx model
tasks = autotvm.task.extract_from_program(mod["main"], target=target, params=params)

# Tune the extracted tasks sequentially.
for i, task in enumerate(tasks):
    prefix = "[Task %2d/%2d] " % (i + 1, len(tasks))
    tuner_obj = XGBTuner(task, loss_type="rank")
    tuner_obj.tune(
        n_trial=min(tuning_option["trials"], len(task.config_space)),
        early_stopping=tuning_option["early_stopping"],
        measure_option=tuning_option["measure_option"],
        callbacks=[
            autotvm.callback.progress_bar(tuning_option["trials"], prefix=prefix),
            autotvm.callback.log_to_file(tuning_option["tuning_records"]),
        ],
    )

with autotvm.apply_history_best(tuning_option["tuning_records"]):
    with tvm.transform.PassContext(opt_level=3):
        graph, lib, params = relay.build(mod, target, params=params)
# 输出TVM需要的三个文件
from tvm.contrib import graph_runtime
libpath = "test.so"
lib.export_library(libpath)
graph_json_path = 'test.json'
with open(graph_json_path, 'w') as f:
    f.write(graph)

param_path = "./test.params"
with open(param_path, 'wb') as fo:
    fo.write(relay.save_param_dict(params))
2.TVM推理
代码如下:文章来源:https://www.toymoban.com/news/detail-804474.html
import time
import numpy as np
import tvm
import tvm.relay as relay
from tvm.contrib import graph_runtime
import cv2


def preprocess(img):
    h, w = img.shape[:2]
    if h < w:
        distance = int((w - h) / 2)
        img = cv2.copyMakeBorder(img, distance, distance, 0, 0, cv2.BORDER_CONSTANT, value=0)
    else:
        distance = int((h - w) / 2)
        img = cv2.copyMakeBorder(img, 0, 0, distance, distance, cv2.BORDER_CONSTANT, value=0)
    img = cv2.resize(img, (128, 128), cv2.LINE_AA)
    img = img.astype(np.float32) / 255.0
    img = img[np.newaxis, np.newaxis, :, :]
    img = np.array(img, dtype=np.float32)
    return img


if __name__ == "__main__":
    test_json = "test.json"
    test_lib = "test.so"
    test_params = "test.params"
    loaded_json = open(test_json).read()
    loaded_lib = tvm.runtime.load_module(test_lib)
    loaded_params = bytearray(open(test_params, 'rb').read())

    img = cv2.imread("my_test.jpg", 0)
    img_input = preprocess(img)  # 预处理方法,按照自己的方法改造
    ctx = tvm.cpu(0)
    module = graph_runtime.create(loaded_json, loaded_lib, ctx)
    module.load_params(loaded_params)
    start = time.time()
    for i in range(1000):
        module.set_input("input", img_input)
        module.run()
        out_deploy = module.get_output(0).numpy()
        out = np.argmax(out_deploy)  # 输出分类结果,我这里二分类输出0或者1的值
        # print(out_deploy, out)
    print(time.time()-start)
总结
从推理测试结果来看,如果不做优化自动搜索参数这一步,在cpu上循环识别1000次大概4ms/次,优化后的速度在2.7ms/次,后面会把代码上传至 https://github.com/Ysnower/pytorch-static-quant C++的推理后期会写,如有错误之处望指正。文章来源地址https://www.toymoban.com/news/detail-804474.html
到了这里,关于TVM编译器推理加速模型的文章就介绍完了。如果您还想了解更多内容,请在右上角搜索TOY模板网以前的文章或继续浏览下面的相关文章,希望大家以后多多支持TOY模板网!