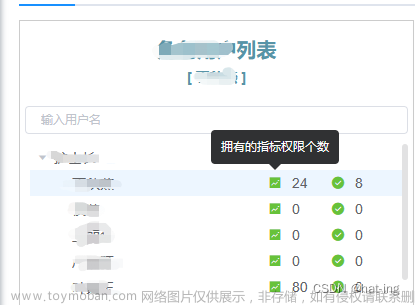
1、代码
 <el-tree
                        v-loading="nameLoding"
                        :data="data"
                        node-key="id"
                        :highlight-current="true"
                        empty-text="暂无数据"
                        :props="defaultPropsIndex"
                        default-expand-all
                        :filter-node-method="filterNodeIndex"
                        ref="treeName"
                        @node-click="getCheckedNodes"
                      >
                        <span
                          class="custom-tree-node"
                          slot-scope="{ node, data }"
                        >
                          <span>{{ node.label }}</span>
                          <span v-if="node.level > 1">
                            <span
                              style="
                                text-align: left;
                                width: 63px;
                                display: inline-block;
                              "
                            >
                              <el-tooltip
                                class="item"
                                effect="dark"
                                content="拥有的指标权限个数"
                                placement="top"
                              >
                                <i
                                  title=""
                                  class="el-icon-s-marketing"
                                  style="color: rgb(103, 194, 58)"
                                ></i> </el-tooltip
                              ><span style="margin-right: 10%">{{
                                data.num
                              }}</span></span
                            >
                            <span
                              style="
                                text-align: left;
                                width: 71px;
                                display: inline-block;
                              "
                            >
                              <el-tooltip
                                class="item"
                                effect="dark"
                                content="拥有的访问权限个数"
                                placement="top"
                              >
                                <i
                                  class="el-icon-success"
                                  style="color: rgb(103, 194, 58)"
                                ></i> </el-tooltip
                              ><span style="margin-right: 10%">{{
                                data.sub_num
                              }}</span>
                            </span>
                          </span>
                        </span>
                      </el-tree>
css
.custom-tree-node {
  flex: 1;
  display: flex;
  align-items: center;
  justify-content: space-between;
  font-size: 14px;
  /* padding-right: 8px; */
  /* padding-right: 15%; */
}效果图:文章来源:https://www.toymoban.com/news/detail-804803.html
 文章来源地址https://www.toymoban.com/news/detail-804803.html
到了这里,关于elementui-树形控件实现子节点右侧添加图标和数据,鼠标放上去显示文字的文章就介绍完了。如果您还想了解更多内容,请在右上角搜索TOY模板网以前的文章或继续浏览下面的相关文章,希望大家以后多多支持TOY模板网!


