Jenkins安装:jenkins-2.426.2-1.1.noarch.rpm
安装Jenkins
1、下载Jenkins
$wget https://mirrors.aliyun.com/jenkins/redhat-stable/jenkins-2.426.2-1.1.noarch.rpm

2、安装Jenkins
$rpm -ivh jenkins-2.426.2-1.1.noarch.rpm

3、修改配置文件
2.426版本的配置文件是/usr/lib/systemd/system/jenkins.service
修改以下途中部分

配置文件如下:
#
# This file is managed by systemd(1). Do NOT edit this file manually!
# To override these settings, run:
#
#     systemctl edit jenkins
#
# For more information about drop-in files, see:
#
#     https://www.freedesktop.org/software/systemd/man/systemd.unit.html
#

[Unit]
Description=Jenkins Continuous Integration Server
Requires=network.target
After=network.target

[Service]
Type=notify
NotifyAccess=main
ExecStart=/usr/bin/jenkins
Restart=on-failure
SuccessExitStatus=143

# Configures the time to wait for start-up. If Jenkins does not signal start-up
# completion within the configured time, the service will be considered failed
# and will be shut down again. Takes a unit-less value in seconds, or a time span
# value such as "5min 20s". Pass "infinity" to disable the timeout logic.
#TimeoutStartSec=90

# Unix account that runs the Jenkins daemon
# Be careful when you change this, as you need to update the permissions of
# $JENKINS_HOME, $JENKINS_LOG, and (if you have already run Jenkins)
# $JENKINS_WEBROOT.
User=root
Group=root

# Directory where Jenkins stores its configuration and workspaces
Environment="JENKINS_HOME=/var/lib/jenkins"
WorkingDirectory=/var/lib/jenkins

# Location of the Jenkins WAR
#Environment="JENKINS_WAR=/usr/share/java/jenkins.war"

# Location of the exploded WAR
Environment="JENKINS_WEBROOT=%C/jenkins/war"

# Location of the Jenkins log. By default, systemd-journald(8) is used.
#Environment="JENKINS_LOG=%L/jenkins/jenkins.log"
Environment="JENKINS_LOG=/var/log/jenkins/jenkins.log"

# The Java home directory. When left empty, JENKINS_JAVA_CMD and PATH are consulted.
#Environment="JAVA_HOME=/usr/lib/jvm/java-17-openjdk-amd64"
Environment="JAVA_HOME=/home/java64/jdk-11.0.10"

# The Java executable. When left empty, JAVA_HOME and PATH are consulted.
#Environment="JENKINS_JAVA_CMD=/etc/alternatives/java"
Environment="JENKINS_JAVA_CMD=/home/java64/jdk-11.0.10/bin/java"

# Arguments for the Jenkins JVM
Environment="JAVA_OPTS=-Djava.awt.headless=true"

# IP address to listen on for HTTP requests.
# The default is to listen on all interfaces (0.0.0.0).
#Environment="JENKINS_LISTEN_ADDRESS="

# Port to listen on for HTTP requests. Set to -1 to disable.
# To be able to listen on privileged ports (port numbers less than 1024),
# add the CAP_NET_BIND_SERVICE capability to the AmbientCapabilities
# directive below.
Environment="JENKINS_PORT=8080"


# IP address to listen on for HTTPS requests. Default is disabled.
#Environment="JENKINS_HTTPS_LISTEN_ADDRESS="

# Port to listen on for HTTPS requests. Default is disabled.
# To be able to listen on privileged ports (port numbers less than 1024),
# add the CAP_NET_BIND_SERVICE capability to the AmbientCapabilities
# directive below.
#Environment="JENKINS_HTTPS_PORT=443"

# Path to the keystore in JKS format (as created by the JDK's keytool).
# Default is disabled.
#Environment="JENKINS_HTTPS_KEYSTORE=/path/to/keystore.jks"

# Password to access the keystore defined in JENKINS_HTTPS_KEYSTORE.
# Default is disabled.
#Environment="JENKINS_HTTPS_KEYSTORE_PASSWORD=s3cR3tPa55w0rD"

# IP address to listen on for HTTP2 requests. Default is disabled.
#Environment="JENKINS_HTTP2_LISTEN_ADDRESS="

# HTTP2 port to listen on. Default is disabled.
# To be able to listen on privileged ports (port numbers less than 1024),
# add the CAP_NET_BIND_SERVICE capability to the AmbientCapabilities
# directive below.
#Environment="JENKINS_HTTP2_PORT="

# Controls which capabilities to include in the ambient capability set for the
# executed process. Takes a whitespace-separated list of capability names, e.g.
# CAP_SYS_ADMIN, CAP_DAC_OVERRIDE, CAP_SYS_PTRACE. Ambient capability sets are
# useful if you want to execute a process as a non-privileged user but still
# want to give it some capabilities. For example, add the CAP_NET_BIND_SERVICE
# capability to be able to listen on privileged ports (port numbers less than
# 1024).
#AmbientCapabilities=CAP_NET_BIND_SERVICE

# Debug level for logs. The higher the value, the more verbose. 5 is INFO.
#Environment="JENKINS_DEBUG_LEVEL=5"

# Set to true to enable logging to /var/log/jenkins/access_log.
#Environment="JENKINS_ENABLE_ACCESS_LOG=false"

# Servlet context (important if you want to use reverse proxying)
#Environment="JENKINS_PREFIX=/jenkins"

# Arbitrary additional arguments to pass to Jenkins.
# Full option list: java -jar jenkins.war --help
#Environment="JENKINS_OPTS="

# Maximum core file size. If unset, the value from the OS is inherited.
#LimitCORE=infinity

# Maximum file size. If unset, the value from the OS is inherited.
#LimitFSIZE=infinity

# File descriptor limit. If unset, the value from the OS is inherited.
#LimitNOFILE=8192

# Maximum number of processes. If unset, the value from the OS is inherited.
#LimitNPROC=32768

# Set the umask to control the permission bits of files that Jenkins creates.
#
# 0027 makes files read-only for group and inaccessible for others, which some
# security sensitive users might consider beneficial, especially if Jenkins
# is running on a server that is used for multiple purposes. Beware that 0027
# permissions would interfere with sudo scripts that run on the controller
# (see JENKINS-25065).
#
# Note also that the particularly sensitive parts of $JENKINS_HOME (such as
# credentials) are always written without 'other' access. So the umask values
# only affect job configuration, build records, etc.
#
# If unset, the value from the OS is inherited, which is normally 0022.
# The default umask comes from pam_umask(8) and /etc/login.defs.
#UMask=0022

[Install]
WantedBy=multi-user.target
修改完成后执行systemctl daemon-reload重新加载配置文件。
4、加入自启动和启动jenkins
#设置开机自启
$systemctl enable jenkins
#启动Jenkins
$systemctl start jenkins
# 查看状态
$systemctl status jenkins

其他命令
备注:记得如果修改配置文件后,需要执行systemctl daemon-reload重新加载配置文件,systemctl enable jenkins.service --now,设置Jenkins开机启动,--now表示马上启动。
#查看是否自启动
systemctl is-enabled jenkins
# 查看状态:systemctl status jenkins
# 启动服务:systemctl start jenkins
# 重启服务:systemctl restart jenkins
二、配置Jenkins
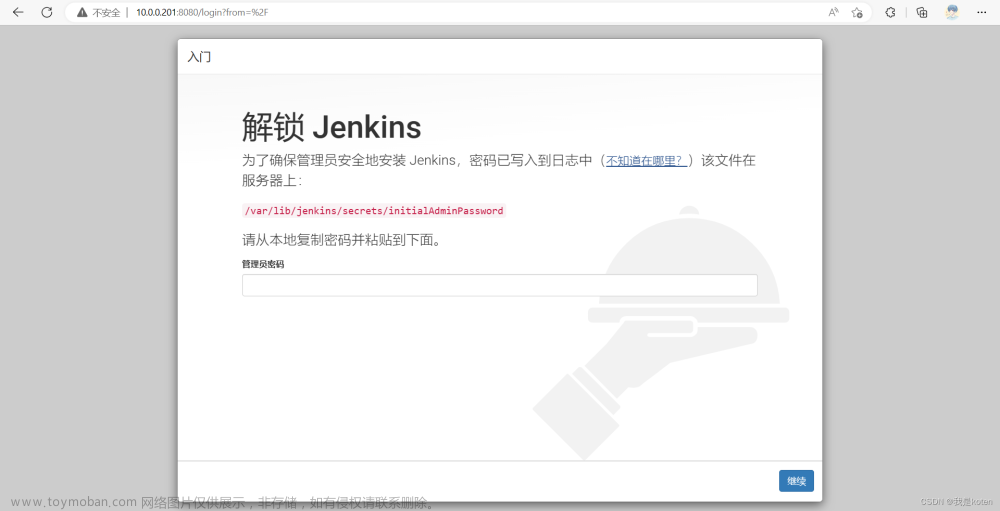
1、访问jenkins,并设置管理员账号和密码
访问:http://ip:8080

输入密码,通过命令查到的密码
$cat /var/lib/jenkins/secrets/initialAdminPassword
b3d0838884ce4c4b91828a4c88e9a2d9
2、安装插件和配置用户等

选择:安装推荐的插件(jenkins2.426无需修改源也可安装插件)
创建管理员用户


三、其他命令:
1、防火墙端口设置的一些命令
sudo systemctl status firewalld
sudo systemctl stop firewalld
sudo systemctl disable firewalld
或
firewall-cmd —zone=public —add-port=8888/tcp —permanent
firewall-cmd —reload
2、#查看是否自启动
systemctl is-enabled jenkins
3、#查询端口
netstat -lntp |grep 8080
4、卸载jenkins:
rpm -e --nodeps jenkins-2.426.2-1.1.noarch文章来源:https://www.toymoban.com/news/detail-807948.html
如果不知道安装的是什么版本,可以rpm -qa | grep jenkins查询文章来源地址https://www.toymoban.com/news/detail-807948.html
到了这里,关于rpm安装jenkins-2.426(插件可安装)的文章就介绍完了。如果您还想了解更多内容,请在右上角搜索TOY模板网以前的文章或继续浏览下面的相关文章,希望大家以后多多支持TOY模板网!


