前言:最近写项目,发现了一些很有意思的功能,想写文章,录视频把这些内容记录下。但这些功能太零碎,如果为每个功能都单独搭建一个项目,这明显不合适。于是我想,就搭建一个项目,把那些我想将的小功能全部整合到一起。实现 搭一次环境,处处使用。
本文主要实现一下两个功能
- 富文本
- 图片上传+下载
环境搭建
文章链接
已录制视频
视频链接
仓库地址https://github.com/xuhuafeifei/fgbg-font-and-back.git
fullText富文本
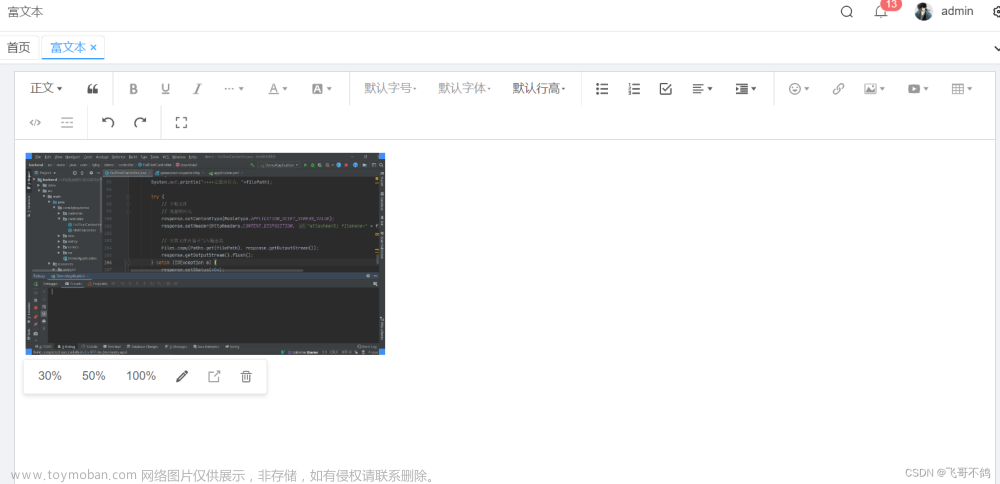
使用wangEditor(vue3) + springboot实现富文本功能
效果图:
1. 后端接口
图片存储的逻辑:
- 接收前端传递图片数据
- 将图片下载到后端本地
- 返回图片访问URL
图片下载的逻辑:
- 提供下载文件的名字
- 在后端服务器根据文件名寻找文件所在位置
- 将文件以流数据形式导出,并通过HttpServletResponse返回
tip: 图片访问URL,本质上是访问下载文件接口URL
1.1 定义常量
/**
* 文件访问域名(请求下载的接口)
* DOMAIN本质是访问图片下载接口
*/
private static final String DOMAIN = "http://localhost:9005/api_demo/fullText/file/download/";

/**
* 文件物理存储位置
*/
private static final String STORE_DIR = "E:\\B站视频创作\\前后端项目构建-小功能实现\\代码\\backend\\src\\main\\resources\\pict\\";
1.2 定义返回实体类
    static class Success {
        public final int errno;
        public final Object data;
        public Success(String url) {
            this.errno = 0;
            HashMap<String, String> map = new HashMap<>();
            map.put("url", url);
            this.data = map;
        }
    }
tip: 后端接口返回的图片需要按照一定的格式返回,具体可以参考文档[图片上传](菜单配置 | wangEditor)
- 上传成功
{
    "errno": 0, // 注意:值是数字,不能是字符串
    "data": {
        "url": "xxx", // 图片 src ,必须
        "alt": "yyy", // 图片描述文字,非必须
        "href": "zzz" // 图片的链接,非必须
    }
}
- 上传失败
{
    "errno": 1, // 只要不等于 0 就行
    "message": "失败信息"
}
1.3 上传图片接口
    /**
     * 获取后缀
     */
    public static String getFileSuffix(String fileName) {
        // 检查文件名是否为null或空
        if (fileName == null || fileName.isEmpty()) {
            return "";
        }

        // 查找最后一个点(.)的位置
        int dotIndex = fileName.lastIndexOf('.');

        // 检查是否找到点,且不是在字符串开头
        if (dotIndex > 0) {
            // 从点开始截取,直到字符串末尾
            return fileName.substring(dotIndex);
        }

        // 如果没有找到点,或点在字符串开头,则返回空字符串
        return "";
    }

    /**
     * 上传文件接口
     * @param file
     * @return
     * @throws IOException
     */
    @RequestMapping("/file/upload")
    public Object uploadPict(@RequestParam("image") MultipartFile file) throws IOException {
        // 获取文件流
        InputStream is = file.getInputStream();
        // 获取文件真实名字
        String fileName = UUID.randomUUID().toString().substring(0, 10) + getFileSuffix(file.getOriginalFilename());
        // 在服务器中存储文件
        FileUtils.copyInputStreamToFile(is, new File(STORE_DIR + fileName));
        // 返回图片url
        String url = DOMAIN + fileName;
        return new Success(url);
    }
1.4 下载图片接口
    /**
     * 文件下载接口
     * @param fileName 文件名
     * @param request
     * @param response
     */
    @GetMapping("/file/download/{fileName}")
    public void download(@PathVariable("fileName") String fileName, HttpServletRequest request, HttpServletResponse response) {
        // 获取真实的文件路径
        String filePath = STORE_DIR + fileName;
        System.out.println("++++完整路径为:"+filePath);

        try {
            // 下载文件
            // 设置响应头
            response.setContentType(MediaType.APPLICATION_OCTET_STREAM_VALUE);
            response.setHeader(HttpHeaders.CONTENT_DISPOSITION, "attachment; filename=" + fileName);

            // 读取文件内容并写入输出流
            Files.copy(Paths.get(filePath), response.getOutputStream());
            response.getOutputStream().flush();
        } catch (IOException e) {
            response.setStatus(404);
        }
    }
2. 前端代码编写
2.1 安装
pnpm install @wangeditor/editor --save

pnpm install @wangeditor/editor-for-vue@next --save
2.2 快速使用
模板
<template>
  <div style="border: 1px solid #ccc">
    <Toolbar
      style="border-bottom: 1px solid #ccc"
      :editor="editorRef"
      :mode="mode"
    />
    <Editor
      style="height: 500px; overflow-y: hidden"
      v-model="valueHtml"
      :defaultConfig="editorConfig"
      :mode="mode"
      @onCreated="handleCreated"
    />
  </div>
</template>
script
使用setup语法糖
<script setup lang="ts">
import "@wangeditor/editor/dist/css/style.css";
import { Editor, Toolbar } from "@wangeditor/editor-for-vue";
import { IEditorConfig } from "@wangeditor/editor";
import { shallowRef, ref } from "vue";

// 初始化 MENU_CONF 属性
const editorConfig: Partial<IEditorConfig> = {
  MENU_CONF: {}
};
const mode = "default";

// 编辑器实例,必须用 shallowRef,重要!
const editorRef = shallowRef();

const handleCreated = editor => {
  console.log("created", editor);
  editorRef.value = editor; // 记录 editor 实例,重要!
};

// 绑定数据
const valueHtml = ref("");

// 组件销毁时,也及时销毁编辑器,重要!
onBeforeUnmount(() => {
  const editor = editorRef.value;
  if (editor == null) return;

  editor.destroy();
});
</script>
3. 配置富文本图片上传地址
3.1 配置图片上传配置
<script>
// 配置上传地址
editorConfig.MENU_CONF["uploadImage"] = {
  // form-data fieldName ,默认值 'wangeditor-uploaded-image'
  fieldName: "image",
  server: baseUrlApi("fullText/file/upload"),
  // 小于该值就插入 base64 格式(而不上传),默认为 0
  base64LimitSize: 5 * 1024 // 5kb
};
</script>
tip: fieldName对应的是后端的文件上传接口:@RequestParam(“xxx”) MultipartFile中xxx的内容
4. 全部代码展示
-
前端文章来源:https://www.toymoban.com/news/detail-809217.html
<script setup lang="ts"> import "@wangeditor/editor/dist/css/style.css"; import { Editor, Toolbar } from "@wangeditor/editor-for-vue"; import { IEditorConfig } from "@wangeditor/editor"; import { shallowRef, ref, onBeforeUnmount } from "vue"; import { baseUrlApi } from "@/api/utils"; // 初始化 MENU_CONF 属性 const editorConfig: Partial<IEditorConfig> = { MENU_CONF: {} }; const mode = "default"; // 编辑器实例,必须用 shallowRef,重要! const editorRef = shallowRef(); const handleCreated = editor => { console.log("created", editor); editorRef.value = editor; // 记录 editor 实例,重要! }; // 绑定数据 const valueHtml = ref(""); // 组件销毁时,也及时销毁编辑器,重要! onBeforeUnmount(() => { const editor = editorRef.value; if (editor == null) return; editor.destroy(); }); // 配置上传地址 editorConfig.MENU_CONF["uploadImage"] = { // form-data fieldName ,默认值 'wangeditor-uploaded-image' fieldName: "image", server: baseUrlApi("fullText/file/upload"), // 小于该值就插入 base64 格式(而不上传),默认为 0 base64LimitSize: 5 * 1024 // 5kb }; const handleChange = editor => { // TS 语法 console.log("content", editor.getHtml()); }; </script> <template> <div style="border: 1px solid #ccc; margin-top: 10px"> <Toolbar style="border-bottom: 1px solid #ccc" :editor="editorRef" :mode="mode" /> <Editor style="height: 500px; overflow-y: hidden" v-model="valueHtml" :defaultConfig="editorConfig" :mode="mode" @onCreated="handleCreated" @onChange="handleChange" /> </div> </template> <style lang="scss" scoped></style> -
后端文章来源地址https://www.toymoban.com/news/detail-809217.html
@RequestMapping("/fullText")
@RestController
public class FullTextController {
    /**
     * 文件访问域名(请求下载的接口)
     */
    private static final String DOMAIN = "http://localhost:9005/api_demo/fullText/file/download/";

    /**
     * 文件物理存储位置
     */
    private static final String STORE_DIR = "E:\\B站视频创作\\前后端项目构建-小功能实现\\代码\\backend\\src\\main\\resources\\pict\\";

    static class Success {
        public final int errno;
        public final Object data;
        public Success(String url) {
            this.errno = 0;
            HashMap<String, String> map = new HashMap<>();
            map.put("url", url);
            this.data = map;
        }
    }

    /**
     * 获取后缀
     */
    public static String getFileSuffix(String fileName) {
        // 检查文件名是否为null或空
        if (fileName == null || fileName.isEmpty()) {
            return "";
        }

        // 查找最后一个点(.)的位置
        int dotIndex = fileName.lastIndexOf('.');

        // 检查是否找到点,且不是在字符串开头
        if (dotIndex > 0) {
            // 从点开始截取,直到字符串末尾
            return fileName.substring(dotIndex);
        }

        // 如果没有找到点,或点在字符串开头,则返回空字符串
        return "";
    }

    /**
     * 上传文件接口
     * @param file
     * @return
     * @throws IOException
     */
    @RequestMapping("/file/upload")
    public Object uploadPict(@RequestParam("image") MultipartFile file) throws IOException {
        // 获取文件流
        InputStream is = file.getInputStream();
        // 获取文件真实名字
        String fileName = UUID.randomUUID().toString().substring(0, 10) + getFileSuffix(file.getOriginalFilename());
        // 在服务器中存储文件
        FileUtils.copyInputStreamToFile(is, new File(STORE_DIR + fileName));
        // 返回图片url
        String url = DOMAIN + fileName;
        return new Success(url);
    }

    /**
     * 文件下载接口
     * @param fileName 文件名
     * @param request
     * @param response
     */
    @GetMapping("/file/download/{fileName}")
    public void download(@PathVariable("fileName") String fileName, HttpServletRequest request, HttpServletResponse response) {
        // 获取真实的文件路径
        String filePath = STORE_DIR + fileName;
        System.out.println("++++完整路径为:"+filePath);

        try {
            // 下载文件
            // 设置响应头
            response.setContentType(MediaType.APPLICATION_OCTET_STREAM_VALUE);
            response.setHeader(HttpHeaders.CONTENT_DISPOSITION, "attachment; filename=" + fileName);

            // 读取文件内容并写入输出流
            Files.copy(Paths.get(filePath), response.getOutputStream());
            response.getOutputStream().flush();
        } catch (IOException e) {
            response.setStatus(404);
        }
    }
}
到了这里,关于【前后端的那些事】开源!快速上手富文本+富文本图片上传的文章就介绍完了。如果您还想了解更多内容,请在右上角搜索TOY模板网以前的文章或继续浏览下面的相关文章,希望大家以后多多支持TOY模板网!


