目录
1、Mat对象与IplImage对象
2、Mat对象使用
3、Mat定义数组
4、相关的代码演示
1、Mat对象与IplImage对象
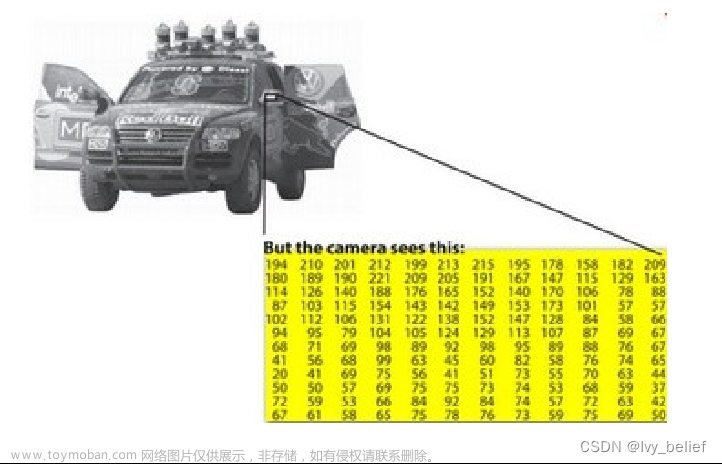
先看看Mat对象:图片在计算机眼里都是一个二维数组;
在OpenCV中,
Mat是一个非常重要的类,用于表示图像或矩阵数据。

(1)Mat对象OpenCV2.0之后引进的图像数据结构、自动分配内存、不存在内存泄漏的问题,是面向对象的数据结构。分了两个部分,头部与数据部分
(2)IplImage是从2001年OpenCV发布之后就一直存在,是C语言风格的数据结构,需要开发者自己分配与管理内存,对大的程序使用它容易导致内存泄漏问题
(3)Mat对象构造函数与常用方法
构造函数:
Mat(): 默认构造函数,创建一个空的Mat对象。Mat(int rows, int cols, int type): 创建指定行数、列数和类型的Mat对象。Mat(Size size, int type): 创建指定尺寸和类型的Mat对象。Mat(int rows, int cols, int type, Scalar scalar): 创建指定行数、列数、类型和初始值的Mat对象。常用方法:
rows(): 返回Mat对象的行数。cols(): 返回Mat对象的列数。size(): 返回Mat对象的尺寸(行数和列数)。type(): 返回Mat对象的数据类型。empty(): 检查Mat对象是否为空。at<T>(int row, int col): 返回指定位置的元素值,其中T是元素的数据类型。ptr<T>(int row): 返回指定行的指针,其中T是元素的数据类型。clone(): 复制Mat对象并返回副本。convertTo(Mat& dst, int type, double alpha=1, double beta=0): 将Mat对象转换为指定类型,并可选地进行缩放和偏移。reshape(int cn, int rows=0): 改变Mat对象的通道数和行数。int channels(): 返回Mat对象的通道int depth(): 返回Mat对象深度
2、Mat对象使用
(1)复制
1)部分复制:一般情况下只会复制Mat对象的头和指针
部分,不会复制数据部分
Mat A= imread(imgFilePath);
Mat B(A) // 只复制
2)完全复制:如果想把Mat对象的头部和数据部分一起
复制,可以通过如下两个API实现
Mat F = A.clone();
或 Mat G; A.copyTo(G);
(2)Mat对象使用-四个要点
1)输出图像的内存是自动分配的
2)使用OpenCV的C++接口,不需要考虑内存分配问题
3)赋值操作和拷贝构造函数只会复制头部分
4)使用clone与copyTo两个函数实现数据完全复制
(3)Mat对象创建
1)cv::Mat::Mat构造函数

Mat M(2,2,CV_8UC3, Scalar(0,0,255))其中前两个参数分别表示行(row)跟列(column)、第三个CV_8UC3中的8表示每个通道占8位、U表示无符号、C表示Char类型、3表示通道数目是3,第四个参数是向量表示初始化每个像素值是多少,向量长度对应通道数目一致
2)创建多维数组cv::Mat::create
int sz[3] = {2,2,2};
Mat  L(3,sz, CV_8UC1, Scalar::all(0));
3)cv::Mat::create实现
Mat M;
M.create(4, 3, CV_8UC2);
M = Scalar(127,127);
cout << "M = " << endl << " " << M << endl << endl;
uchar* firstRow = M.ptr<uchar>(0);
printf("%d", *firstRow);
文章来源:https://www.toymoban.com/news/detail-809335.html
3、Mat定义数组
(1)定义小数组文章来源地址https://www.toymoban.com/news/detail-809335.html
Mat C = (Mat_<double>(3,3) << 0, -1, 0, -1, 5, -1, 0, -1, 0);
cout << "C = " << endl << " " << C << endl << endl;
4、相关的代码演示
#include <opencv2/opencv.hpp>
#include <iostream>

using namespace std;
using namespace cv;

int main(int argc, char** argv) {
	Mat src;
	src = imread("D:/vcprojects/images/test.png");
	if (src.empty()) {
		cout << "could not load image..." << endl;
		return -1;
	}
	namedWindow("input", CV_WINDOW_AUTOSIZE);
	imshow("input", src);

	/*Mat dst;
	dst = Mat(src.size(), src.type());
	dst = Scalar(127, 0, 255);
	namedWindow("output", CV_WINDOW_AUTOSIZE);
	imshow("output", dst);*/
	Mat dst;
	//src.copyTo(dst);
	namedWindow("output", CV_WINDOW_AUTOSIZE);

	cvtColor(src, dst, CV_BGR2GRAY);
	printf("input image channels : %d\n", src.channels());
	printf("output image channels : %d\n", dst.channels());

	int cols = dst.cols;
	int rows = dst.rows;

	printf("rows : %d cols : %d\n", rows, cols);
	const uchar* firstRow = dst.ptr<uchar>(0);
	printf("fist pixel value : %d\n", *firstRow);

	Mat M(100, 100, CV_8UC1, Scalar(127));
	//cout << "M =" << endl << M << endl;

	Mat m1;
	m1.create(src.size(), src.type());
	m1 = Scalar(0, 0, 255);

	Mat csrc;
	Mat kernel = (Mat_<char>(3, 3) << 0, -1, 0, -1, 5, -1, 0, -1, 0);
	filter2D(src, csrc, -1, kernel);

	Mat m2 = Mat::eye(2, 2, CV_8UC1);
	cout << "m2 =" << endl << m2 << endl;

	imshow("output", m2);
	waitKey(0);
	return 0;
}
到了这里,关于04- OpenCV:Mat对象简介和使用的文章就介绍完了。如果您还想了解更多内容,请在右上角搜索TOY模板网以前的文章或继续浏览下面的相关文章,希望大家以后多多支持TOY模板网!

![[C++] opencv - Mat::convertTo函数介绍和使用场景](https://imgs.yssmx.com/Uploads/2024/01/802524-1.png)
![C# - Opencv应用(2) 之矩阵Mat使用[矩阵创建、图像显示、像素读取与赋值]](https://imgs.yssmx.com/Uploads/2024/02/776564-1.png)


