【ElasticSearch】docker部署ElasticSearch、常用Restful API的使用(一)
前言
Elaticsearch,简称为es,es是一个开源的高扩展的分布式全文检索引擎,它可以近乎实时的存储、检索数据;本身扩展性很好,可以扩展到上百台服务器,处理PB级别(大数据时代)的数据。es也使用java开发并使用Lucene作为其核心来实现所有索引和搜索的功能,但是它的目的是通过简单的RESTful API来隐藏Lucene的复杂性,从而让全文搜索变得简单。
一、docker部署ElasticSearch
1.1 配置ElasticSearch容器
docker pull elasticsearch:7.4.0

mkdir -p /home/elasticsearch/plugins
mkdir -p /home/elasticsearch/data

docker run -d \
	--name es \
	--restart=always \
	-p 9200:9200 \
    -p 9300:9300 \
    -e "discovery.type=single-node" \
    -e "ES_JAVA_OPTS=-Xms512m -Xmx512m" \
    -v /home/elasticsearch/data:/usr/share/elasticsearch/data \
    -v /home/elasticsearch/plugins:/usr/share/elasticsearch/plugins \
    --privileged \
elasticsearch:7.4.0
命令参数解释:
-e “cluster.name=es-docker-cluster”:设置集群名称
-e “http.host=0.0.0.0”:监听的地址,可以外网访问
-e “ES_JAVA_OPTS=-Xms512m -Xmx512m”:内存大小
-e “discovery.type=single-node”:非集群模式
-v /home/elasticsearch/data:/usr/share/elasticsearch/data:挂载逻辑卷,绑定es的数据目录
-v /home/elasticsearch/es-logs:/usr/share/elasticsearch/logs:挂载逻辑卷,绑定es的日志目录
-v /home/elasticsearch/plugins:/usr/share/elasticsearch/plugins:挂载逻辑卷,绑定es的插件目录
–privileged:授予逻辑卷访问权
–network es-net :加入一个名为es-net的网络中
-p 9200:9200:端口映射配置
在浏览器中输入:http://ip:9200 即可看到elasticsearch的响应结果
bug:docker logs es发现报错: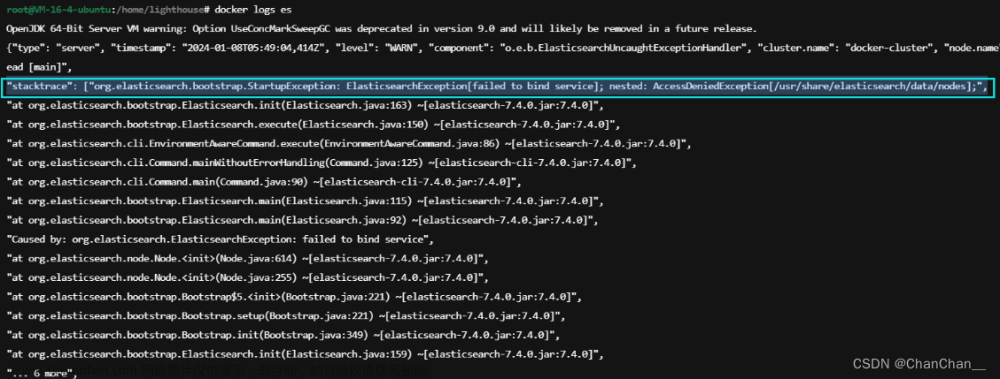
原因:数据卷挂载的时候宿主机上创建的目录权限不够
chmod 777 /home/elasticsearch/plugins
chmod 777 /home/elasticsearch/data

1.2 配置ik中文分词器
在创建elasticsearch容器的时候,映射了插件目录·(-v /home/elasticsearch/plugins:/usr/share/elasticsearch/plugins),所以将ik分词器插件直接复制到映射目录中;将elasticsearch-analysis-ik-7.4.0.zip上传到服务器上,将解压好的文件放在/home/elasticsearch/plugins/analysis-ik下
注意:ik分词器版本需要和elasticsearch的版本匹配
bug:ik分词器出现 “reason“: “failed to find global analyzer [ik_max_word]“ 报错
解决:上传插件后重启一下容器
二、常用Restful API的使用
2.1 基本Rest命令说明
| method | url地址 | 描述 |
|---|---|---|
| PUT(创建,修改) | localhost:9200/索引名称/类型名称/文档id | 创建文档(指定文档id) |
| POST(创建) | localhost:9200/索引名称/类型名称 | 创建文档(随机文档id) |
| POST(修改) | localhost:9200/索引名称/类型名称/文档id/_update | 修改文档 |
| DELETE(删除) | localhost:9200/索引名称/类型名称/文档id | 删除文档 |
| GET(查询) | localhost:9200/索引名称/类型名称/文档id | 查询文档通过文档ID |
| POST(查询) | localhost:9200/索引名称/类型名称/文档id/_search | 查询所有数据 |
2.2 索引操作
创建索引
创建索引类似于关系型数据库中的创建数据库
在 Postman 中,向 ES 服务器发 PUT 请求 :http://127.0.0.1:9200/friend
PUT friend
响应:
{
 "acknowledged": true, # 响应结果: true 操作成功
 "shards_acknowledged": true, # 分片结果:分片操作成功
 "index": "friend" # 索引名称
}
# 注意:创建索引库的分片数默认 1 片,在 7.0.0 之前的 Elasticsearch 版本中,默认 5 片
如果重复添加索引,会返回错误信息
{
    "error": {
        "root_cause": [
            {
                "type": "resource_already_exists_exception",
                "reason": "index [friend/OftUkabOT3eWGQ6QhXcliQ] already exists",
                "index_uuid": "OftUkabOT3eWGQ6QhXcliQ",
                "index": "friend"
            }
        ],
        "type": "resource_already_exists_exception",
        "reason": "index [friend/OftUkabOT3eWGQ6QhXcliQ] already exists",
        "index_uuid": "OftUkabOT3eWGQ6QhXcliQ",
        "index": "friend"
    },
    "status": 400
}
查看所有索引
在 Postman 中,向 ES 服务器发 GET 请求 :http://127.0.0.1:9200/_cat/indices?v
GET /_cat/indices?v
这里请求路径中的_cat 表示查看的意思,indices 表示索引,所以整体含义就是查看当前 ES服务器中的所有索引,就好像 MySQL 中的 show tables 的感觉,服务器响应结果如下:

查看单个索引
在 Postman 中,向 ES 服务器发 GET 请求 :http://127.0.0.1:9200/friend
服务器响应结果如下:
{
    "friend": { # 索引名
        "aliases": {}, # 别名
        "mappings": {}, # 映射
        "settings": { # 设置
            "index": { # 设置——索引
                "creation_date": "1704785323704", # 设置 - 索引 - 创建时间
                "number_of_shards": "1", # 设置 - 索引 - 主分片数量
                "number_of_replicas": "1", # 设置 - 索引 - 副分片数量
                "uuid": "OftUkabOT3eWGQ6QhXcliQ", # 设置 - 索引 - 唯一标识
                "version": { # 设置 - 索引 - 版本
                    "created": "7040099"
                },
                "provided_name": "friend" # 设置 - 索引 - 名称
            }
        }
    }
}
删除索引
在 Postman 中,向 ES 服务器发 DELETE 请求 :http://127.0.0.1:9200/friend
服务器响应结果如下:
{
    "acknowledged": true
}
重新访问索引时,服务器返回响应:索引不存在
{
    "error": {
        "root_cause": [
            {
                "type": "index_not_found_exception",
                "reason": "no such index [friend]",
                "resource.type": "index_or_alias",
                "resource.id": "friend",
                "index_uuid": "_na_",
                "index": "friend"
            }
        ],
        "type": "index_not_found_exception",
        "reason": "no such index [friend]",
        "resource.type": "index_or_alias",
        "resource.id": "friend",
        "index_uuid": "_na_",
        "index": "friend"
    },
    "status": 404
}
2.3 文档操作
创建文档
索引已经创建好了,接下来我们来创建文档,并添加数据。这里的文档可以类比为关系型数据库中的表数据,添加的数据格式为 JSON 格式
在 Postman 中,向 ES 服务器发 POST 请求 :http://127.0.0.1:9200/friend/_doc(数据创建后,由于没有指定数据唯一性标识(ID),默认情况下,ES 服务器会随机生成一个)
注意:此处发送请求的方式必须为 POST,不能是 PUT,否则会发生错误(PUT具有幂等性,而id是随机生成的),此处使用post方式同样的请求可多次发送,生成的id不一样
请求体内容为:
{
    "name": "chandler",
    "age": 27
}
服务器返回:
{
    "_index": "friend", # 索引
    "_type": "_doc", # 类型-文档
    "_id": "M9Ex7YwBc3wEkvsQvLgp", # 唯一标识,可以类比为 MySQL 中的主键,随机生成
    "_version": 1, # 版本
    "result": "created", # 结果
    "_shards": { # 分片
        "total": 2, # 分片-总数
        "successful": 1, # 分片-成果
        "failed": 0 # 分片-失败
    },
    "_seq_no": 0,
    "_primary_term": 1
}
如果想要自定义唯一性标识,需要在创建时指定:http://127.0.0.1:9200/friend/_doc/1
此处需要注意:如果增加数据时明确数据主键,那么请求方式也可以为 PUT
{
    "_index": "friend",
    "_type": "_doc",
    "_id": "1",
    "_version": 1,
    "result": "created",
    "_shards": {
        "total": 2,
        "successful": 1,
        "failed": 0
    },
    "_seq_no": 1,
    "_primary_term": 1
}
查看文档
查看文档时,需要指明文档的唯一性标识,类似于 MySQL 中数据的主键查询
在 Postman 中,向 ES 服务器发 GET 请求 :http://127.0.0.1:9200/friend/_doc/1
_doc表示文档数据
{
    "_index": "friend", # 索引
    "_type": "_doc", # 文档类型
    "_id": "1",
    "_version": 1,
    "_seq_no": 1,
    "_primary_term": 1,
    "found": true, # 查询结果: true 表示查找到,false 表示未查找到
    "_source": {
        "name": "monica",
        "age": 27
    }
}
查看索引下的所有文档
在 Postman 中,向 ES 服务器发 GET 请求 :http://127.0.0.1:9200/friend/_search
{
    "took": 2,
    "timed_out": false,
    "_shards": {
        "total": 1,
        "successful": 1,
        "skipped": 0,
        "failed": 0
    },
    "hits": {
        "total": {
            "value": 0,
            "relation": "eq"
        },
        "max_score": null,
        "hits": []
    }
}
修改文档(全覆盖)
和新增文档一样,输入相同的 URL 地址请求,如果请求体变化,会将原有的数据内容覆盖
在 Postman 中,向 ES 服务器发 POST 请求 :http://127.0.0.1:9200/friend/_doc/1
请求体内容为:
{
    "name": "monica" #注意:此时请求体中相比于原来的数据少了age字段
}
响应:
{
    "_index": "friend",
    "_type": "_doc",
    "_id": "1",
    "_version": 2, # 注意版本变为了2
    "result": "updated", # 结果: updated 表示数据被更新
    "_shards": {
        "total": 2,
        "successful": 1,
        "failed": 0
    },
    "_seq_no": 2,
    "_primary_term": 1
}
再次查询,发现文档只有name字段
{
    "_index": "friend",
    "_type": "_doc",
    "_id": "1",
    "_version": 2,
    "_seq_no": 2,
    "_primary_term": 1,
    "found": true,
    "_source": {
        "name": "monica"
    }
}
修改字段(更新局部信息)
修改数据时,也可以只修改某一给条数据的局部信息,在 Postman 中,向 ES 服务器发 POST 请求 :http://127.0.0.1:9200/friend/_doc/1/_update
请求体:
{
"doc": {
    "hobby": "cooking"
 }
}
响应结果:
{
    "_index": "friend",
    "_type": "_doc",
    "_id": "1",
    "_version": 3,
    "result": "updated",
    "_shards": {
        "total": 2,
        "successful": 1,
        "failed": 0
    },
    "_seq_no": 3,
    "_primary_term": 1
}
再次查询该文档:
{
    "_index": "friend",
    "_type": "_doc",
    "_id": "1",
    "_version": 5,
    "_seq_no": 5,
    "_primary_term": 1,
    "found": true,
    "_source": {
        "name": "monica",
        "hobby": "cooking" # 新增的hobby
    }
}
删除文档
删除一个文档不会立即从磁盘上移除,它只是被标记成已删除(逻辑删除)。
在 Postman 中,向 ES 服务器发 DELETE 请求 :http://127.0.0.1:9200/friend/_doc/1
响应:
{
    "_index": "friend",
    "_type": "_doc",
    "_id": "1",
    "_version": 6, #对数据的操作,都会更新版本
    "result": "deleted", # deleted 表示数据被标记为删除
    "_shards": {
        "total": 2,
        "successful": 1,
        "failed": 0
    },
    "_seq_no": 6,
    "_primary_term": 1
}
删除后再查询当前文档信息
{
    "_index": "friend",
    "_type": "_doc",
    "_id": "1",
    "found": false
}
果删除一个并不存在的文档 DELETE http://127.0.0.1:9200/friend/_doc/2,结果返回not found
{
    "_index": "friend",
    "_type": "_doc",
    "_id": "2",
    "_version": 1,
    "result": "not_found",  # not_found 表示未查找到
    "_shards": {
        "total": 2,
        "successful": 1,
        "failed": 0
    },
    "_seq_no": 7,
    "_primary_term": 1
}
条件删除文档
一般删除数据都是根据文档的唯一性标识进行删除,实际操作时,也可以根据条件对多条数据进行删除
首先分别增加多条数据:
http://111.229.80.188:9200/friend/_doc/1
{
    "name": "chandler",
    "age": 27
}

http://111.229.80.188:9200/friend/_doc/2
{
    "name": "monica",
    "age": 27
}


http://111.229.80.188:9200/friend/_doc/3
{
    "name": "joey",
    "age": 27
}
向 ES 服务器发 POST 请求 :http://127.0.0.1:9200/friend/_delete_by_query
请求体:
{
 "query":{
     "match":{
     "age": 27
     }
 }
}
响应
{
    "took": 419, # 耗时
    "timed_out": false, # 是否超时
    "total": 3, # 数据总数
    "deleted": 3, # 删除数量
    "batches": 1,
    "version_conflicts": 0,
    "noops": 0,
    "retries": {
        "bulk": 0,
        "search": 0
    },
    "throttled_millis": 0,
    "requests_per_second": -1.0,
    "throttled_until_millis": 0,
    "failures": []
}
2.4 映射操作
有了索引库,等于有了数据库中的 database。接下来就需要建索引库(index)中的映射了,类似于数据库(database)中的表结构(table)。创建数据库表需要设置字段名称,类型,长度,约束等;索引库也一样,需要知道这个类型下有哪些字段,每个字段有哪些约束信息,这就叫做映射(mapping)。
创建映射
在 Postman 中,向 ES 服务器发 PUT 请求 :http://127.0.0.1:9200/article/_mapping
注意:先创建索引—— PUT 请求 :http://127.0.0.1:9200/article
请求体:
{
 "properties": {
     "name":{ # 字段名
         "type": "keyword", # 字段类型
         "index": true
     },
     "author":{
         "type": "text",
         "index": true
     },
     "prices":{
         "type": "long",
         "index": false
     }
 }
}
返回:
{
    "acknowledged": true
}
映射数据说明:
-
字段名:任意填写,下面指定许多属性,例如:title、subtitle、images、price
-
type:类型,Elasticsearch 中支持的数据类型非常丰富:
- String 类型,又分两种:
- text:可分词
- keyword:不可分词,数据会作为完整字段进行匹配
- Numerical:数值类型,分两类
- 基本数据类型:long、integer、short、byte、double、float、half_float
- 浮点数的高精度类型:scaled_float
- Date:日期类型
- Array:数组类型
- Object:对象
- String 类型,又分两种:
-
index:是否索引,默认为 true,也就是说你不进行任何配置,所有字段都会被索引。
- true:字段会被索引,则可以用来进行搜索
- false:字段不会被索引,不能用来搜索
-
store:是否将数据进行独立存储,默认为 false
原始的文本会存储在_source 里面,默认情况下其他提取出来的字段都不是独立存储的,是从_source 里面提取出来的。当然你也可以独立的存储某个字段,只要设置"store": true 即可,获取独立存储的字段要比从_source 中解析快得多,但是也会占用更多的空间,所以要根据实际业务需求来设置。 -
analyzer:分词器
"fields name": {
	"type":  "text", //文本类型

	"index": "analyzed"// 决定倒排索引的构建,控制在get/search请求时可不可用该字段作为请求体条件。分词器使用的是指定的字段或者索引的分词器。
       		 analyzed:字段被索引,会做分词,可搜索。反过来,如果需要根据某个字段进搜索,index属性就应该设置为analyzed。
  		 	 not_analyzed:字段值不分词,会被原样写入索引。反过来,如果某些字段需要完全匹配,比如人名、地名,index属性设置为not_analyzed为佳。
 			 no:字段不写入索引,当然也就不能搜索。以该字段作为请求体时会报错。

	"enabled" : true, #是否会被索引,但都会存储;可以针对一整个_doc

    分词器是对text类型配置的,keyword不支持分词器
	"analyzer" : "ik_max_word", 			#指定写入分词器,比如默认的空格分词器等
	"search_analyzer" : "ik_max_word" ,	#查询时分词器;一般情况和analyzer对应

	copy_to:将多个字段连接到一个字段中存储方便查询,他是复制字段中的值。查询时可以指定该字段查询
	"copy_to" : "field_name", #自定义_all字段,

	index_option:存储倒排索引的哪些信息
 		4个可选参数:
     		 docs:索引文档号
     		 freqs:文档号+词频
    		 positions:文档号+词频+位置,通常用来距离查询
    		 offsets:文档号+词频+位置+偏移量,通常被使用在高亮字段
  				分词字段默认是positions,其他默认时docs
	"index_options": "docs"
	"store":false//是否单独设置此字段的是否存储,于_source字段之外单独再存储一份,设置true时查询该字段从store获取值而不是source属性,查询更快

	"boost":1/2/3		//字段级别的分数加权

	"doc_values":false//对not_analyzed字段,默认都是开启,analyzed字段不能使用,排序聚合必须开启
     对排序和聚合能提升较大性能,数据存储在磁盘中,不占用内存空间,不会oom。如果不需要对字段进行排序或聚合,或者从script访问字段值,
     则可以禁用doc值以节省磁盘空间:如果需要排序,比如range查询则必须开启

	"fielddata":{"loading" : "eager" }//es加载内存 fielddata 的默认行为是延迟加载 ,查询一次既被存储。占用内存的缓存空间,不存在磁盘中。
	当 Elasticsearch 第一次查询某个字段时,它将会完整加载这个字段所有 Segment 中的倒排索引到内存中,
	以便于以后的查询能够获取更好的性能。

	"fields":{"keyword": {"type": "keyword","ignore_above": 256}} //可以对一个字段提供多种索引模式,同一个字段的值,一个分词,一个不分词

	"ignore_above":100 //超过100个字符的文本,将会被忽略,不被索引

	"include_in_all":ture//设置是否此字段包含在_all字段中,默认是true,除非index设置成no选项

	"norms":{"enable":true,"loading":"lazy"}//分词字段默认配置,不分词字段:默认{"enable":false},
	存储长度因子和索引时boost,建议对需要参与评分字段使用 ,会额外增加内存消耗量

	"null_value":"NULL"//设置一些缺失字段的初始化值,只有string可以使用,分词字段的null值也会被分词

	"position_increament_gap":0//影响距离查询或近似查询,可以设置在多值字段的数据上火分词字段上,查询时可指定slop间隔,默认值是100

	"search_analyzer":"ik"//设置搜索时的分词器,默认跟ananlyzer是一致的,比如index时用standard+ngram,搜索时用standard用来完成自动提示功能

	"similarity":"BM25"//默认是TF/IDF算法,指定一个字段评分策略,仅仅对字符串型和分词类型有效

	"term_vector":"no"//默认不存储向量信息,支持参数yes(term存储),with_positions(term+位置),with_offsets(term+偏移量),
	with_positions_offsets(term+位置+偏移量) 对快速高亮fast vector highlighter能提升性能,
	但开启又会加大索引体积,不适合大数据量用
}
详细介绍博客地址:(六:2)elasticsearch索引的mapping详解
查看映射
在 Postman 中,向 ES 服务器发 GET 请求 :http://127.0.0.1:9200/article/_mapping
响应:
{
    "article": {
        "mappings": {
            "properties": {
                "author": {
                    "type": "text"
                },
                "name": {
                    "type": "text"
                },
                "prices": {
                    "type": "long",
                    "index": false
                }
            }
        }
    }
}
测试text、keyword、index类型
插入一条数据: PUT /article/_create/1
{
    "name": "时间简史",
    "author": "路人甲",
    "prices": "29.9"
}
根据name(keyword, 不可分)查询:
GET /article/_search
{
    "query": {
        "match": {
            "name": "时间" # name 为keyword, 不可拆分
        }
    }
}

响应:查询不到
{
    "took": 1,
    "timed_out": false,
    "_shards": {
        "total": 1,
        "successful": 1,
        "skipped": 0,
        "failed": 0
    },
    "hits": {
        "total": {
            "value": 0,
            "relation": "eq"
        },
        "max_score": null,
        "hits": []
    }
}
根据author(text, 可分)查询
GET /article/_search
{
    "query": {
        "match": {
            "author": "甲" #author为text, 可拆分
        }
    }
}

{
    "took": 50,
    "timed_out": false,
    "_shards": {
        "total": 1,
        "successful": 1,
        "skipped": 0,
        "failed": 0
    },
    "hits": {
        "total": {
            "value": 1,
            "relation": "eq"
        },
        "max_score": 0.2876821,
        "hits": [
            {
                "_index": "article",
                "_type": "_doc",
                "_id": "1",
                "_score": 0.2876821,
                "_source": {
                    "name": "时间简史",
                    "author": "路人甲",
                    "prices": "29.9"
                }
            }
        ]
    }
}
根据prices(index=false)进行查询
GET /article/_search
{
    "query": {
        "match": {
            "prices": 29.9 # index=false,不是索引,不支持查询
        }
    }
}

#报错
{
    "error": {
        "root_cause": [
            {
                "type": "query_shard_exception",
                "reason": "failed to create query: {\n  \"match\" : {\n    \"prices\" : {\n      \"query\" : 29.9,\n      \"operator\" : \"OR\",\n      \"prefix_length\" : 0,\n      \"max_expansions\" : 50,\n      \"fuzzy_transpositions\" : true,\n      \"lenient\" : false,\n      \"zero_terms_query\" : \"NONE\",\n      \"auto_generate_synonyms_phrase_query\" : true,\n      \"boost\" : 1.0\n    }\n  }\n}",
                "index_uuid": "JxyObp0uTAiijCRocOD2vA",
                "index": "article"
            }
        ],
        "type": "search_phase_execution_exception",
        "reason": "all shards failed",
        "phase": "query",
        "grouped": true,
        "failed_shards": [
            {
                "shard": 0,
                "index": "article",
                "node": "l07VX9xeTzicai0eswz7ag",
                "reason": {
                    "type": "query_shard_exception",
                    "reason": "failed to create query: {\n  \"match\" : {\n    \"prices\" : {\n      \"query\" : 29.9,\n      \"operator\" : \"OR\",\n      \"prefix_length\" : 0,\n      \"max_expansions\" : 50,\n      \"fuzzy_transpositions\" : true,\n      \"lenient\" : false,\n      \"zero_terms_query\" : \"NONE\",\n      \"auto_generate_synonyms_phrase_query\" : true,\n      \"boost\" : 1.0\n    }\n  }\n}",
                    "index_uuid": "JxyObp0uTAiijCRocOD2vA",
                    "index": "article",
                    "caused_by": {
                        "type": "illegal_argument_exception",
                        "reason": "Cannot search on field [prices] since it is not indexed."
                    }
                }
            }
        ]
    },
    "status": 400
}
2.5 查询操作
Elasticsearch 提供了基于 JSON 提供完整的查询 DSL 来定义查询
初始化数据:
# POST /student/_doc/1001
{
    "name":"zhangsan",
    "nickname":"zhangsan",
     "sex":"男",
     "age":30
}
# POST /student/_doc/1002
{
    "name":"lisi",
    "nickname":"lisi",
     "sex":"男",
     "age":20
}
# POST /student/_doc/1003
{
    "name":"wangwu",
     "nickname":"wangwu",
     "sex":"女",
     "age":40
}
# POST /student/_doc/1004
{
    "name":"zhangsan1",
    "nickname":"zhangsan1",
     "sex":"女",
     "age":50
}
# POST /student/_doc/1005
{
    "name":"zhangsan2",
    "nickname":"zhangsan2",
     "sex":"女",
     "age":30
}
查询所有文档
在 Postman 中,向 ES 服务器发 GET 请求 :http://127.0.0.1:9200/student/_search
{
     "query": {
        "match_all": {}
     }
}
# "query":这里的 query 代表一个查询对象,里面可以有不同的查询属性
# "match_all":查询类型,例如:match_all(代表查询所有), match,term , range 等等
# {查询条件}:查询条件会根据类型的不同,写法也有差异
{
    "took": 786, # 查询花费时间,单位毫秒
    "timed_out": false, # 是否超时
    "_shards": { # 分片信息
        "total": 1, # 总数
        "successful": 1, # 成功
        "skipped": 0, # 忽略
        "failed": 0 # 失败
    },
    "hits": { # 搜索命中结果
        "total": { # 搜索条件匹配的文档总数
            "value": 5, # 总命中计数的值
            "relation": "eq" # 计数规则: eq 表示计数准确, gte 表示计数不准确
        },
        "max_score": 1.0, # 匹配度分值
        "hits": [ # 命中结果集合
            {
                "_index": "student",
                "_type": "_doc",
                "_id": "1001",
                "_score": 1.0,
                "_source": {
                    "name": "zhangsan",
                    "nickname": "zhangsan",
                    "sex": "男",
                    "age": 30
                }
            },
            {
                "_index": "student",
                "_type": "_doc",
                "_id": "1002",
                "_score": 1.0,
                "_source": {
                    "name": "lisi",
                    "nickname": "lisi",
                    "sex": "男",
                    "age": 20
                }
            },
            ...
        ]
    }
}
匹配查询
match 匹配类型查询,会把查询条件进行分词,然后进行查询,多个词条之间是 or 的关系
在 Postman 中,向 ES 服务器发 GET 请求 :http://127.0.0.1:9200/student/_search文章来源:https://www.toymoban.com/news/detail-809602.html
{
     "query": {
         "match": {
          	"name":"zhangsan"
         }
     }
}
响应:
{
    "took": 2,
    "timed_out": false,
    "_shards": {
        "total": 1,
        "successful": 1,
        "skipped": 0,
        "failed": 0
    },
    "hits": {
        "total": {
            "value": 1,
            "relation": "eq"
        },
        "max_score": 1.3862944,
        "hits": [
            {
                "_index": "student",
                "_type": "_doc",
                "_id": "1001",
                "_score": 1.3862944,
                "_source": {
                    "name": "zhangsan",
                    "nickname": "zhangsan",
                    "sex": "男",
                    "age": 30
                }
            }
        ]
    }
}
字段匹配查询
multi_match 与 match 类似,不同的是它可以在多个字段中查询。
在 Postman 中,向 ES 服务器发 GET 请求 :http://127.0.0.1:9200/student/_search
{
     "query": {
         "multi_match": {
             "query": "zhangsan",
             "fields": ["name","nickname"]
         }
     }
}
响应:
{
    "took": 258,
    "timed_out": false,
    "_shards": {
        "total": 1,
        "successful": 1,
        "skipped": 0,
        "failed": 0
    },
    "hits": {
        "total": {
            "value": 1,
            "relation": "eq"
        },
        "max_score": 1.3862944,
        "hits": [
            {
                "_index": "student",
                "_type": "_doc",
                "_id": "1001",
                "_score": 1.3862944,
                "_source": {
                    "name": "zhangsan",
                    "nickname": "zhangsan",
                    "sex": "男",
                    "age": 30
                }
            }
        ]
    }
}
关键字精确查询
term 查询,精确的关键词匹配查询,不对查询条件进行分词。
在 Postman 中,向 ES 服务器发 GET 请求 :http://127.0.0.1:9200/student/_search
{
    "query": {
        "term": {
            "name": {
                "value": "zhangsan"
            }
        }
    }
}
响应:命中了name为zhangsan的文档
{
    "took": 1,
    "timed_out": false,
    "_shards": {
        "total": 1,
        "successful": 1,
        "skipped": 0,
        "failed": 0
    },
    "hits": {
        "total": {
            "value": 1,
            "relation": "eq"
        },
        "max_score": 1.3862944,
        "hits": [
            {
                "_index": "student",
                "_type": "_doc",
                "_id": "1001",
                "_score": 1.3862944,
                "_source": {
                    "name": "zhangsan",
                    "nickname": "zhangsan",
                    "sex": "男",
                    "age": 30
                }
            }
        ]
    }
}
多关键字精确查询
terms 查询和 term 查询一样,但它允许你指定多值进行匹配。
如果这个字段包含了指定值中的任何一个值,那么这个文档满足条件,类似于 mysql 的 in
在 Postman 中,向 ES 服务器发 GET 请求 :http://127.0.0.1:9200/student/_search
{
     "query": {
         "terms": {
         	"name": ["zhangsan","lisi"]
         }
     }
}
响应:命中了name为zhangsan或lisi的文档
{
    "took": 185,
    "timed_out": false,
    "_shards": {
        "total": 1,
        "successful": 1,
        "skipped": 0,
        "failed": 0
    },
    "hits": {
        "total": {
            "value": 2,
            "relation": "eq"
        },
        "max_score": 1.0,
        "hits": [
            {
                "_index": "student",
                "_type": "_doc",
                "_id": "1001",
                "_score": 1.0,
                "_source": {
                    "name": "zhangsan",
                    "nickname": "zhangsan",
                    "sex": "男",
                    "age": 30
                }
            },
            {
                "_index": "student",
                "_type": "_doc",
                "_id": "1002",
                "_score": 1.0,
                "_source": {
                    "name": "lisi",
                    "nickname": "lisi",
                    "sex": "男",
                    "age": 20
                }
            }
        ]
    }
}
指定查询字段
默认情况下,Elasticsearch 在搜索的结果中,会把文档中保存在_source 的所有字段都返回。
如果我们只想获取其中的部分字段,我们可以添加_source 的过滤
在 Postman 中,向 ES 服务器发 GET 请求 :http://127.0.0.1:9200/student/_search
{
     "_source": ["name","nickname"],
     "query": {
         "terms": {
         	"nickname": ["zhangsan"]
         }
     }
}
响应:
{
    "took": 26,
    "timed_out": false,
    "_shards": {
        "total": 1,
        "successful": 1,
        "skipped": 0,
        "failed": 0
    },
    "hits": {
        "total": {
            "value": 1,
            "relation": "eq"
        },
        "max_score": 1.0,
        "hits": [
            {
                "_index": "student",
                "_type": "_doc",
                "_id": "1001",
                "_score": 1.0,
                "_source": {
                    "name": "zhangsan",
                    "nickname": "zhangsan"
                }
            }
        ]
    }
}
过滤字段
我们也可以通过:
- includes:来指定想要显示的字段
- excludes:来指定不想要显示的字段
在 Postman 中,向 ES 服务器发 GET 请求 :http://127.0.0.1:9200/student/_search
测试includes
{
     "_source": {
     	"includes": ["name","nickname"]
     },
     "query": {
         "terms": {
         	"nickname": ["zhangsan"]
         }
     }
}
响应
{
    "took": 1,
    "timed_out": false,
    "_shards": {
        "total": 1,
        "successful": 1,
        "skipped": 0,
        "failed": 0
    },
    "hits": {
        "total": {
            "value": 1,
            "relation": "eq"
        },
        "max_score": 1.0,
        "hits": [
            {
                "_index": "student",
                "_type": "_doc",
                "_id": "1001",
                "_score": 1.0,
                "_source": {
                    "name": "zhangsan",
                    "nickname": "zhangsan"
                }
            }
        ]
    }
}
测试excludes
{
     "_source": {
     	"excludes": ["sex","age"]
     },
     "query": {
         "terms": {
         	"nickname": ["zhangsan"]
         }
     }
}


{
    "took": 2,
    "timed_out": false,
    "_shards": {
        "total": 1,
        "successful": 1,
        "skipped": 0,
        "failed": 0
    },
    "hits": {
        "total": {
            "value": 1,
            "relation": "eq"
        },
        "max_score": 1.0,
        "hits": [
            {
                "_index": "student",
                "_type": "_doc",
                "_id": "1001",
                "_score": 1.0,
                "_source": {
                    "name": "zhangsan",
                    "nickname": "zhangsan"
                }
            }
        ]
    }
}
组合查询
bool把各种其它查询通过must(必须 )、must_not(必须不)、should(应该)的方式进行组合
bool 子元素区别:
1、must (must字段对应的是个列表,也就是说可以有多个并列的查询条件,一个文档满足各个子条件后才最终返回)
2、should (只要符合其中一个条件就返回)
3、must_not (与must相反,也就是说可以有多个并列的查询条件,一个文档各个子条件后才最终的结果都不满足)
4、filter(条件过滤查询,过滤条件的范围用range表示gt表示大于、lt表示小于、gte表示大于等于、lte表示小于等于)
在 Postman 中,向 ES 服务器发 GET 请求 :http://127.0.0.1:9200/student/_search
{
     "query": {
         "bool": {
             "must": [
                 {
                     "match": {
                        "name": "zhangsan"
                     }
                 }
             ],
             "must_not": [
                 {
                     "match": {
                     	"age": "40"
                     }
                 }
             ],
             "should": [
                {
                     "match": {
                     "sex": "女"
                     }
                }
            ]
         }
     }
}
响应:找到name为张三 && age不为40 或者 sex为女
{"took":109,"timed_out":false,"_shards":{"total":1,"successful":1,"skipped":0,"failed":0},"hits":{"total":{"value":1,"relation":"eq"},"max_score":2.261763,"hits":[{"_index":"student","_type":"_doc","_id":"1001","_score":2.261763,"_source":{
    "name":"zhangsan",
    "nickname":"zhangsan",
     "sex":"男",
     "age":30
}}]}}
范围查询
range 查询找出那些落在指定区间内的数字或者时间。range 查询允许以下字符
- gte −大于等于
- gt −大于
- lte −小于等于
- lt −小于
在 Postman 中,向 ES 服务器发 GET 请求 :http://127.0.0.1:9200/student/_search
{
     "query": {
         "range": {
             "age": {
                 "gte": 30,
                 "lte": 35
             }
         }
     }
}
响应:
{"took":96,"timed_out":false,"_shards":{"total":1,"successful":1,"skipped":0,"failed":0},"hits":{"total":{"value":2,"relation":"eq"},"max_score":1.0,"hits":[{"_index":"student","_type":"_doc","_id":"1001","_score":1.0,"_source":{
    "name":"zhangsan",
    "nickname":"zhangsan",
     "sex":"男",
     "age":30
}},{"_index":"student","_type":"_doc","_id":"1005","_score":1.0,"_source":{
    "name":"zhangsan2",
    "nickname":"zhangsan2",
     "sex":"女",
     "age":30
}}]}}
模糊查询
返回包含与搜索字词相似的字词的文档。
编辑距离是将一个术语转换为另一个术语所需的一个字符更改的次数。这些更改可以包括:
- 更改字符(box → fox)
- 删除字符(black → lack)
- 插入字符(sic → sick)
- 转置两个相邻字符(act → cat)
为了找到相似的术语,fuzzy 查询会在指定的编辑距离内创建一组搜索词的所有可能的变体或扩展。然后查询返回每个扩展的完全匹配。
通过 fuzziness 修改编辑距离。一般使用默认值 AUTO,根据术语的长度生成编辑距离。
在 Postman 中,向 ES 服务器发 GET 请求 :http://127.0.0.1:9200/student/_search
{
     "query": {
         "fuzzy": {
             "title": {
             	"value": "zhangsan"
             }
         }
     }
}
{
     "query": {
         "fuzzy": {
             "title": {
                 "value": "zhangsan",
                "fuzziness": 2
             }
         }
     }
}
单字段排序
sort 可以让我们按照不同的字段进行排序,并且通过 order 指定排序的方式。desc 降序,asc升序。
在 Postman 中,向 ES 服务器发 GET 请求 :http://127.0.0.1:9200/student/_search
{
     "sort": [{
         "age": {
         "order":"desc"
         }
     }]
}
{"took":1,"timed_out":false,"_shards":{"total":1,"successful":1,"skipped":0,"failed":0},"hits":{"total":{"value":5,"relation":"eq"},"max_score":null,"hits":[{"_index":"student","_type":"_doc","_id":"1004","_score":null,"_source":{
    "name":"zhangsan1",
    "nickname":"zhangsan1",
     "sex":"女",
     "age":50
},"sort":[50]},{"_index":"student","_type":"_doc","_id":"1003","_score":null,"_source":{
    "name":"wangwu",
     "nickname":"wangwu",
     "sex":"女",
     "age":40
},"sort":[40]},{"_index":"student","_type":"_doc","_id":"1001","_score":null,"_source":{
    "name":"zhangsan",
    "nickname":"zhangsan",
     "sex":"男",
     "age":30
},"sort":[30]},{"_index":"student","_type":"_doc","_id":"1005","_score":null,"_source":{
    "name":"zhangsan2",
    "nickname":"zhangsan2",
     "sex":"女",
     "age":30
},"sort":[30]},{"_index":"student","_type":"_doc","_id":"1002","_score":null,"_source":{
    "name":"lisi",
    "nickname":"lisi",
     "sex":"男",
     "age":20
},"sort":[20]}]}}
多字段排序
假定我们想要结合使用 age 和 _score 进行查询,并且匹配的结果首先按照年龄排序,然后按照相关性得分排序
在 Postman 中,向 ES 服务器发 GET 请求 :http://127.0.0.1:9200/student/_search
{
"query": {
     "match_all": {}
     },
     "sort": [{
             "age": {
             	"order": "desc"
             }
     	},
     	{
             "_score":{
             	"order": "desc"
             }
    }]
}
{"took":7,"timed_out":false,"_shards":{"total":1,"successful":1,"skipped":0,"failed":0},"hits":{"total":{"value":5,"relation":"eq"},"max_score":null,"hits":[{"_index":"student","_type":"_doc","_id":"1004","_score":1.0,"_source":{
    "name":"zhangsan1",
    "nickname":"zhangsan1",
     "sex":"女",
     "age":50
},"sort":[50,1.0]},{"_index":"student","_type":"_doc","_id":"1003","_score":1.0,"_source":{
    "name":"wangwu",
     "nickname":"wangwu",
     "sex":"女",
     "age":40
},"sort":[40,1.0]},{"_index":"student","_type":"_doc","_id":"1001","_score":1.0,"_source":{
    "name":"zhangsan",
    "nickname":"zhangsan",
     "sex":"男",
     "age":30
},"sort":[30,1.0]},{"_index":"student","_type":"_doc","_id":"1005","_score":1.0,"_source":{
    "name":"zhangsan2",
    "nickname":"zhangsan2",
     "sex":"女",
     "age":30
},"sort":[30,1.0]},{"_index":"student","_type":"_doc","_id":"1002","_score":1.0,"_source":{
    "name":"lisi",
    "nickname":"lisi",
     "sex":"男",
     "age":20
},"sort":[20,1.0]}]}}
高亮查询
在进行关键字搜索时,搜索出的内容中的关键字会显示不同的颜色,称之为高亮。
Elasticsearch 可以对查询内容中的关键字部分,进行标签和样式(高亮)的设置。
在使用 match 查询的同时,加上一个 highlight 属性:
- pre_tags:前置标签
- post_tags:后置标签
- fields:需要高亮的字段
- title:这里声明 title 字段需要高亮,后面可以为这个字段设置特有配置,也可以空
在 Postman 中,向 ES 服务器发 GET 请求 :http://127.0.0.1:9200/student/_search
{
     "query": {
         "match": {
         	"name": "zhangsan"
         }
     },
     "highlight": {
         "pre_tags": "<font color='red'>",
         "post_tags": "</font>",
             "fields": {
             	"name": {}
             }
     }
}
响应:
{"took":411,"timed_out":false,"_shards":{"total":1,"successful":1,"skipped":0,"failed":0},"hits":{"total":{"value":1,"relation":"eq"},"max_score":1.3862944,"hits":[{"_index":"student","_type":"_doc","_id":"1001","_score":1.3862944,"_source":{
    "name":"zhangsan",
    "nickname":"zhangsan",
     "sex":"男",
     "age":30
},"highlight":{"name":["<font color='red'>zhangsan</font>"]}}]}}
分页查询
from:当前页的起始索引,默认从 0 开始。 from = (pageNum - 1) * size
size:每页显示多少条
在 Postman 中,向 ES 服务器发 GET 请求 :http://127.0.0.1:9200/student/_search
{
     "query": {
     	"match_all": {}
     },
     "sort": [{
         "age": {
         	"order": "desc"
         }
     }],
     "from": 0,
     "size": 2
}
响应:按照年龄降序排列后只展示了两条数据
{"took":2,"timed_out":false,"_shards":{"total":1,"successful":1,"skipped":0,"failed":0},"hits":{"total":{"value":5,"relation":"eq"},"max_score":null,"hits":[{"_index":"student","_type":"_doc","_id":"1004","_score":null,"_source":{
    "name":"zhangsan1",
    "nickname":"zhangsan1",
     "sex":"女",
     "age":50
},"sort":[50]},{"_index":"student","_type":"_doc","_id":"1003","_score":null,"_source":{
    "name":"wangwu",
     "nickname":"wangwu",
     "sex":"女",
     "age":40
},"sort":[40]}]}}
聚合查询
聚合允许使用者对 es 文档进行统计分析,类似与关系型数据库中的 group by,当然还有很多其他的聚合,例如取最大值、平均值等等。
- 对某个字段取最大值 max
在 Postman 中,向 ES 服务器发 GET 请求 :http://127.0.0.1:9200/student/_search
{
     "aggs":{
         "max_age":{
         	"max":{"field":"age"}
         }
     },
     "size":0
}
{"took":65,"timed_out":false,"_shards":{"total":1,"successful":1,"skipped":0,"failed":0},"hits":{"total":{"value":5,"relation":"eq"},"max_score":null,"hits":[]},"aggregations":{"max_age":{"value":50.0}}}
- 对某个字段取最小值 min
在 Postman 中,向 ES 服务器发 GET 请求 :http://127.0.0.1:9200/student/_search
{
     "aggs":{
         "min_age":{
         	"min":{"field":"age"}
         }
     },
     "size":0
}
{"took":5,"timed_out":false,"_shards":{"total":1,"successful":1,"skipped":0,"failed":0},"hits":{"total":{"value":5,"relation":"eq"},"max_score":null,"hits":[]},"aggregations":{"min_age":{"value":20.0}}}
- 对某个字段求和 sum
在 Postman 中,向 ES 服务器发 GET 请求 :http://127.0.0.1:9200/student/_search
{
     "aggs":{
         "sum_age":{
         	"sum":{"field":"age"}
         }
     },
     "size":0
}
{"took":21,"timed_out":false,"_shards":{"total":1,"successful":1,"skipped":0,"failed":0},"hits":{"total":{"value":5,"relation":"eq"},"max_score":null,"hits":[]},"aggregations":{"sum_age":{"value":170.0}}}
- 对某个字段取平均值 avg
在 Postman 中,向 ES 服务器发 GET 请求 :http://127.0.0.1:9200/student/_search
{
     "aggs":{
         "avg_age":{
         	"avg":{"field":"age"}
         }
     },
     "size":0
}
{"took":5,"timed_out":false,"_shards":{"total":1,"successful":1,"skipped":0,"failed":0},"hits":{"total":{"value":5,"relation":"eq"},"max_score":null,"hits":[]},"aggregations":{"avg_age":{"value":34.0}}}
- 对某个字段的值进行去重之后再取总数
在 Postman 中,向 ES 服务器发 GET 请求 :http://127.0.0.1:9200/student/_search
{
     "aggs":{
         "distinct_age":{
         	"cardinality":{"field":"age"}
         }
     },
     "size":0
}
{"took":534,"timed_out":false,"_shards":{"total":1,"successful":1,"skipped":0,"failed":0},"hits":{"total":{"value":5,"relation":"eq"},"max_score":null,"hits":[]},"aggregations":{"distinct_age":{"value":4}}}
- State 聚合
stats 聚合,对某个字段一次性返回 count,max,min,avg 和 sum 五个指标
在 Postman 中,向 ES 服务器发 GET 请求 :http://127.0.0.1:9200/student/_search
{
     "aggs":{
         "stats_age":{
         	"stats":{"field":"age"}
         }
     },
     "size":0
}
{"took":6,"timed_out":false,"_shards":{"total":1,"successful":1,"skipped":0,"failed":0},"hits":{"total":{"value":5,"relation":"eq"},"max_score":null,"hits":[]},"aggregations":{"stats_age":{"count":5,"min":20.0,"max":50.0,"avg":34.0,"sum":170.0}}}
桶聚合查询
桶聚和相当于 sql 中的 group by 语句
- terms 聚合,分组统计
在 Postman 中,向 ES 服务器发 GET 请求 :http://127.0.0.1:9200/student/_search
{
     "aggs":{
         "age_groupby":{
         	"terms":{"field":"age"}
         }
     },
     "size":0
}
{"took":36,"timed_out":false,"_shards":{"total":1,"successful":1,"skipped":0,"failed":0},"hits":{"total":{"value":5,"relation":"eq"},"max_score":null,"hits":[]},"aggregations":{"age_groupby":{"doc_count_error_upper_bound":0,"sum_other_doc_count":0,"buckets":[{"key":30,"doc_count":2},{"key":20,"doc_count":1},{"key":40,"doc_count":1},{"key":50,"doc_count":1}]}}}
- 在 terms 分组下再进行聚合
{
     "aggs":{
         "age_groupby":{
         	"terms":{"field":"age"},
         	"aggs":{
                 "sum_age":{
                    "sum":{"field":"age"}
                 }
             }
         }
     },
     "size":0
}
{"took":12,"timed_out":false,"_shards":{"total":1,"successful":1,"skipped":0,"failed":0},"hits":{"total":{"value":5,"relation":"eq"},"max_score":null,"hits":[]},"aggregations":{"age_groupby":{"doc_count_error_upper_bound":0,"sum_other_doc_count":0,"buckets":[{"key":30,"doc_count":2,"sum_age":{"value":60.0}},{"key":20,"doc_count":1,"sum_age":{"value":20.0}},{"key":40,"doc_count":1,"sum_age":{"value":40.0}},{"key":50,"doc_count":1,"sum_age":{"value":50.0}}]}}}
总结
本文总结了使用docker部署ElasticSearch、配置ik分词器,以及常用ElasticSearch的Restful API的使用,包含常用的索引、文档、映射以及查询操作。常用索引操作包含创建索引、查看所有索引、查看单个索引、删除索引;常用文档操作包含创建文档、查看文档、查看索引下的所有文档、修改文档(全覆盖)、修改字段(更新局部信息)、删除文档、条件删除文档;常用映射操作包含创建映射、查看映射、测试text、keyword、index类型;常用查询操作包含查询所有文档、匹配查询、字段匹配查询、关键字精确查询、多关键字精确查询、指定查询字段、过滤字段、组合查询、范围查询、模糊查询、单字段排序、多字段排序、高亮查询、分页查询、聚合查询、桶聚合查询。文章来源地址https://www.toymoban.com/news/detail-809602.html
到了这里,关于【ElasticSearch】docker部署ElasticSearch、常用Restful API的使用(一)的文章就介绍完了。如果您还想了解更多内容,请在右上角搜索TOY模板网以前的文章或继续浏览下面的相关文章,希望大家以后多多支持TOY模板网!