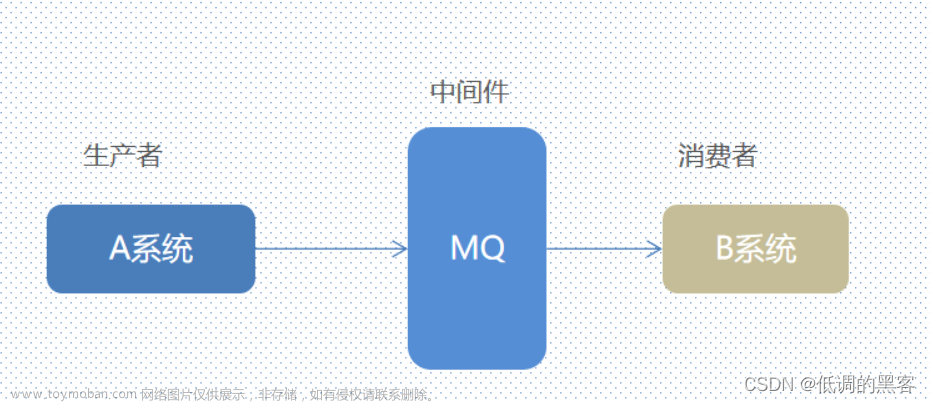
MQ
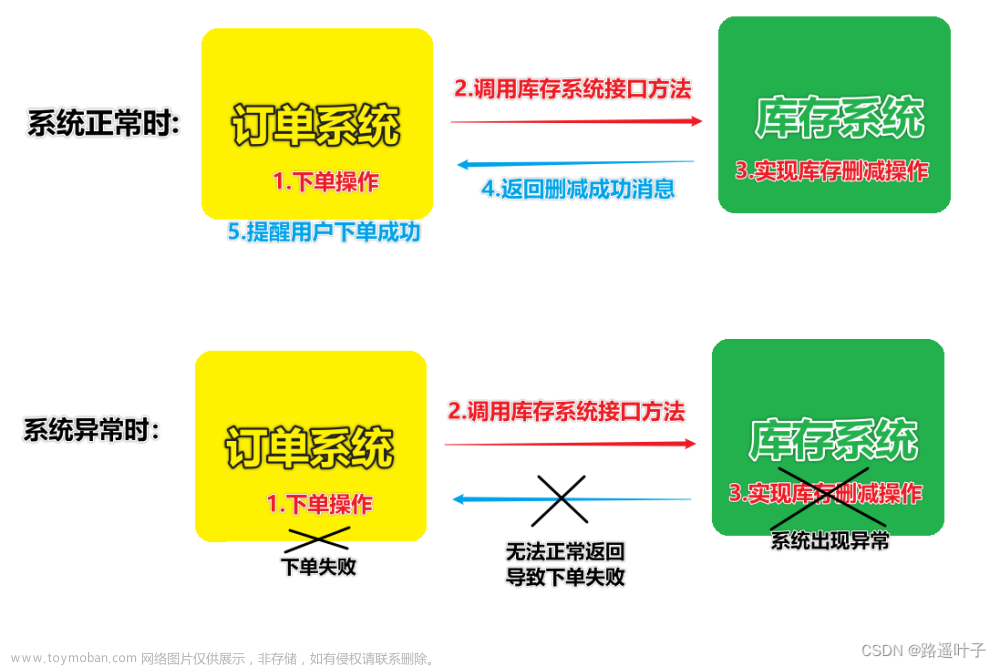
同步调用和异步调用
同步调用优点:
时效性强,立即得到结果
缺点:
- 耦合度高 新业务新需求到来时,需要修改代码
- 性能和吞吐能力下降 调用服务的响应时间为所有服务的时间之和
- 资源浪费 调用链中的服务在等待时不会释放请求占用的资源
- 级联失败 一个服务执行失败会导致调用链后续所有服务失败
异步调用优点:
- 服务解耦 便于扩展
- 性能提高 吞吐量提高
- 不会级联失败
- 流量削峰
RabbitMQ
基础概念
- channel: 操作MQ工具
- exchange: 交换机, 将消息路由到队列中
- queue: 保存消息的队列
- virtual host: 虚拟主机, 相当于namespace,隔离的环境,对queue和exchange的逻辑分组
模型
基于 Spring Amqp
引入依赖
<dependency>
    <groupId>org.springframework.boot</groupId>
    <artifactId>spring-boot-starter-amqp</artifactId>
</dependency>
简单队列 (Hello-World)

消息发送者和接收者都需要以下配置:
spring:
  rabbitmq:
    port: 5672
    host: localhost
    virtual-host: /
    username: guest
    password: guest
发送消息:
@SpringBootTest
@RunWith(SpringRunner.class)
public class SpringAmqpTest {

    @Autowired
    private RabbitTemplate rabbitTemplate;

    @Test
    public void helloWorldModel(){
        String queueName="zbq.queue1";
        String message="hello, spring amqp";
        rabbitTemplate.convertAndSend(queueName,message);
    }
}
消息接受:
@Component
@Slf4j
public class SpringRabbitListener {
    @RabbitListener(queues = "zbq.queue1")
    public void listenSimpleQueue(String msg){
        log.info("收到消息: "+msg);
    }
}

工作队列 (Work Queue)

发送者:
@Test
    public void workQueueModel(){
        String queueName="zbq.work.queue";
        String msg="hello, amqp ";
        for(int i=0;i<1000;i++){
            rabbitTemplate.convertAndSend(queueName,msg+i);
        }
    }
接收者:
@RabbitListener(queues = "zbq.work.queue")
public void listenWorkQueue1(String msg) throws InterruptedException {
    log.info("消费者1号接收到消息: "+msg);
    Thread.sleep(20);
}

@RabbitListener(queues = "zbq.work.queue")
public void listenWorkQueue2(String msg) throws InterruptedException {
    log.info("消费者2号接收到消息: "+msg);
    Thread.sleep(100);
}

Pub/Sub (Fanout exchange)

Fanout交换将将消息发送到每一个绑定到它的队列中
- 声明一个FanoutExchange,声明2个队列, 绑定队列到FanoutExchange上
@Configuration
public class FanoutConfig {
    @Bean
    public FanoutExchange fanoutExchange(){
        return new FanoutExchange("zbq.fanout");
    }

    @Bean
    public Queue fanoutQueue1(){
        return new Queue("zbq.fanout.queue1");
    }

    @Bean
    public Binding bindingQueue1(Queue fanoutQueue1,FanoutExchange fanoutExchange){
        return BindingBuilder.bind(fanoutQueue1).to(fanoutExchange);
    }

    @Bean
    public Queue fanoutQueue2(){
        return new Queue("zbq.fanout.queue2");
    }

    @Bean
    public Binding bindingQueue2(Queue fanoutQueue2,FanoutExchange fanoutExchange){
        return BindingBuilder.bind(fanoutQueue2).to(fanoutExchange);
    }
}
2.消费者监听这两个队列
@RabbitListener(queues = "zbq.fanout.queue1")
public void listenFanoutQueue1(String msg){
    log.info("消费者1收到Fanout消息: "+msg);
}

@RabbitListener(queues = "zbq.fanout.queue2")
public void listenFanoutQueue2(String msg){
    log.info("消费者2收到Fanout消息: "+msg);
}
3.发消息到fanoutexchange
@Test
public void fanoutModel(){
    String exchangeName="zbq.fanout";
    String msg="hello, fanout ";
    for(int i=0;i<10;i++){
        rabbitTemplate.convertAndSend(exchangeName,"",msg+i);
    }
}
查看消费者输出信息

Direct Exchange
Direct交换机会将消息按照路由规则发送到指定的队列

1.声明交换机, 队列,并绑定,添加routingkey
@RabbitListener(bindings = @QueueBinding(
    value = @Queue(name = "zbq.direct.queue1"),
    exchange = @Exchange(name="zbq.direct",type = ExchangeTypes.DIRECT),
    key = {"girlfriend","family"}
))
public void listenDirectQueue1(String msg){
    log.info("消费者1收到Direct消息: "+msg);
}

@RabbitListener(bindings = @QueueBinding(
    value = @Queue(name = "zbq.direct.queue2"),
    exchange = @Exchange(name="zbq.direct",type = ExchangeTypes.DIRECT),
    key = {"friend","family"}
))
public void listenDirectQueue2(String msg){
    log.info("消费者2收到Direct消息: "+msg);
}
2.发送消息
@Test
public void directModel(){
    String exchangeName="zbq.direct";
    String msg="晚上回去吃饭 ";
    for (int i = 0; i < 10; i++) {
        rabbitTemplate.convertAndSend(exchangeName,"family",msg+i);
    }
}

@Test
public void directModel2(){
    String exchangeName="zbq.direct";
    String msg="hello, direct";
    for (int i = 0; i < 10; i++) {
        rabbitTemplate.convertAndSend(exchangeName,"girlfriend",msg+i);
    }
}


Topic Exchange
话题交换机的routingkey 必须是多个单词的列表,并以.分隔
可以使用通配符#和*
#:代表0个或者多个单词
*:代表1个单词

1.定义
@RabbitListener(bindings = @QueueBinding(
    value = @Queue(name = "zbq.topic.queue1"),
    exchange = @Exchange(name="zbq.topic",type = ExchangeTypes.TOPIC),
    key = "China.#"
))
public void listenTopicQueue1(String msg){
    log.info("消费者1收到Topic消息: "+msg);
}

@RabbitListener(bindings = @QueueBinding(
    value = @Queue(name = "zbq.topic.queue2"),
    exchange = @Exchange(name="zbq.topic",type = ExchangeTypes.TOPIC),
    key = "#.weather"
))
public void listenTopicQueue2(String msg){
    log.info("消费者2收到Topic消息: "+msg);
}
2.发消息
@Test
public void topicModel(){
    String exchangeName="zbq.topic";
    String msg="首都北京,今日气温10摄氏度";
    rabbitTemplate.convertAndSend(exchangeName,"China.weather",msg);
}

序列化方式
@Test
public void test(){
    Map<String,Object> map=new HashMap<>();
    map.put("hair","long");
    map.put("eyes","big");
    rabbitTemplate.convertAndSend("zbq.queue1",map);
}
发送对象类型过去, 查看序列化后的值

RabbitMQ默认使用JDK自带序列化
引入以下依赖修改序列化方法:
<dependency>
    <groupId>com.fasterxml.jackson.core</groupId>
    <artifactId>jackson-databind</artifactId>
</dependency>
注入Bean文章来源:https://www.toymoban.com/news/detail-810928.html
@Bean
public MessageConverter customMC(){
    return new Jackson2JsonMessageConverter();
}
 文章来源地址https://www.toymoban.com/news/detail-810928.html
到了这里,关于RabbitMQ 消息队列使用的文章就介绍完了。如果您还想了解更多内容,请在右上角搜索TOY模板网以前的文章或继续浏览下面的相关文章,希望大家以后多多支持TOY模板网!


