harbor
harbor是一个开源的容器镜像仓库,可用于存储和分发docker镜像。它提供了安全性、标签、注释、审核和访问控制等高级功能。 harbor旨在帮助用户管理和分发docker镜像,并使其更具可信度和可管理性。
harbor安装
- 下载并安装docker和docker compose,没有下载的可以看这篇文章docker安装启动。
- 下载harbor的安装包,可以从(官网)或(GitHUb)上下载。
- 新建目录,上传下载好的harbor软件包
[root@xia harbor]# ls
harbor-offline-installer-v2.7.2.tgz
- 解压
[root@xia harbor]# tar xzvf harbor-offline-installer-v2.7.2.tgz
harbor/harbor.v2.7.2.tar.gz
harbor/prepare
harbor/LICENSE
harbor/install.sh
harbor/common.sh
harbor/harbor.yml.tmpl
[root@xia harbor]# ls
harbor  harbor-offline-installer-v2.7.2.tgz
- 进入解压目录,修改配置文件,复制一份配置文件
[root@xia harbor]# cp harbor.yml.tmpl harbor.yml
[root@xia harbor]# vim harbor.yml
# Configuration file of Harbor

# The IP address or hostname to access admin UI and registry service.
# DO NOT use localhost or 127.0.0.1, because Harbor needs to be accessed by external clients.
hostname: 192.168.40.138

# http related config
http:
  # port for http, default is 80. If https enabled, this port will redirect to https port
  port: 8888

# https related config
#https:
  # https port for harbor, default is 443
 # port: 443
  # The path of cert and key files for nginx
  #certificate: /your/certificate/path
 # private_key: /your/private/key/path
 .....
 harbor_admin_password: Harbor12345
- 执行
./prepare命令,准备 Harbor 部署所需的一些配置和依赖项
[root@nfs harbor]# ./prepare
- 执行安装脚本
./install.sh
[root@nfs harbor]# ./install.sh

[Step 0]: checking if docker is installed ...

Note: docker version: 23.0.4

[Step 1]: checking docker-compose is installed ...

Note: Docker Compose version v2.17.2

[Step 2]: loading Harbor images ...
……


[Step 3]: preparing environment ...

[Step 4]: preparing harbor configs ...
……

[Step 5]: starting Harbor ...
[+] Running 10/10
 ✔ Network harbor_harbor        Created                                                                                                         0.7s
 ✔ Container harbor-log         Started                                                                                                         1.1s
 ✔ Container harbor-portal      Started                                                                                                         3.4s
 ✔ Container redis              Started                                                                                                         3.4s
 ✔ Container registryctl        Started                                                                                                         3.7s
 ✔ Container harbor-db          Started                                                                                                         3.8s
 ✔ Container registry           Started                                                                                                         3.7s
 ✔ Container harbor-core        Started                                                                                                         4.5s
 ✔ Container nginx              Started                                                                                                         6.7s
 ✔ Container harbor-jobservice  Started                                                                                                         6.4s
✔ ----Harbor has been installed and started successfully.----
- 浏览器访问,用户名为
admin,密码是Harbor12345,登录成功后看到如下界面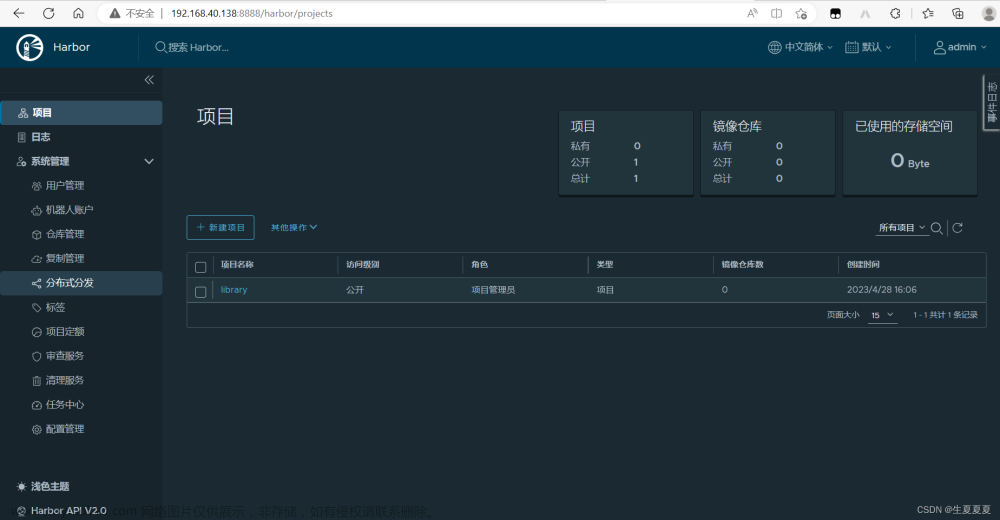
harbor上传和拉取镜像
上传
1. 登录Harbor
docker login 192.168.40.138:8888
但是在这里登录会直接报错,提示Error response from daemon: Get “https://192.168.40.138:8888/v2/”: http: server gave HTTP response to HTTPS client。
解决:
进入/etc/docker/daemon.json,添加如下内容,允许 docker 守护程序使用 HTTP 连接到注册表。
{
    "insecure-registries": [
        "192.168.40.138:8888"
    ]
}
重启docker服务
systemctl restart docker
登录成功
[root@xia harbor]# docker login http://192.168.40.138:8888
Username: admin
Password:
WARNING! Your password will be stored unencrypted in /root/.docker/config.json.
Configure a credential helper to remove this warning. See
https://docs.docker.com/engine/reference/commandline/login/#credentials-store

Login Succeeded
2. 打标签
在上传镜像前,需要为镜像打上标签,命令如下:
docker tag <image_name> <harbor_host>/<project_name>/<image_name>:<tag>
其中,image_name是要上传的镜像名称,project_name是Harbor中的项目名称,tag是镜像的版本号。
在harbor上新建一个images项目,如图所示
打上包含images项目的标签
[root@xia harbor]# docker tag nginx 192.168.40.138:8888/images/nginx
3. 上传镜像
docker push <harbor_host>/<project_name>/<image_name>:<tag>
[root@xia harbor]# docker push 192.168.40.138:8888/images/nginx
Using default tag: latest
The push refers to repository [192.168.40.138:8888/images/nginx]
ff4557f62768: Pushed
4d0bf5b5e17b: Pushed
95457f8a16fd: Pushed
a0b795906dc1: Pushed
af29ec691175: Pushed
3af14c9a24c9: Pushed
latest: digest: sha256:bfb112db4075460ec042ce13e0b9c3ebd982f93ae0be155496d050bb70006750 size: 1570
查看

拉取
1. 登录Harbor
docker login 192.168.40.138:8888
2. 拉取镜像
命令如下:文章来源:https://www.toymoban.com/news/detail-815808.html
docker pull <harbor_host>/<project_name>/<image_name>:<tag>
其中,image_name是要拉取的镜像名称,project_name是Harbor中的项目名称,tag是镜像的版本号。
拉取成功文章来源地址https://www.toymoban.com/news/detail-815808.html
[root@xia harbor]# docker pull 192.168.40.138:8888/images/mysql:5.7.39
5.7.39: Pulling from images/mysql
Digest: sha256:b39b95329c868c3875ea6eb23c9a2a27168c3531f83c96c24324213f75793636
Status: Image is up to date for 192.168.40.138:8888/images/mysql:5.7.39
192.168.40.138:8888/images/mysql:5.7.39
到了这里,关于docker harbor的安装使用以及镜像上传和拉取的文章就介绍完了。如果您还想了解更多内容,请在右上角搜索TOY模板网以前的文章或继续浏览下面的相关文章,希望大家以后多多支持TOY模板网!