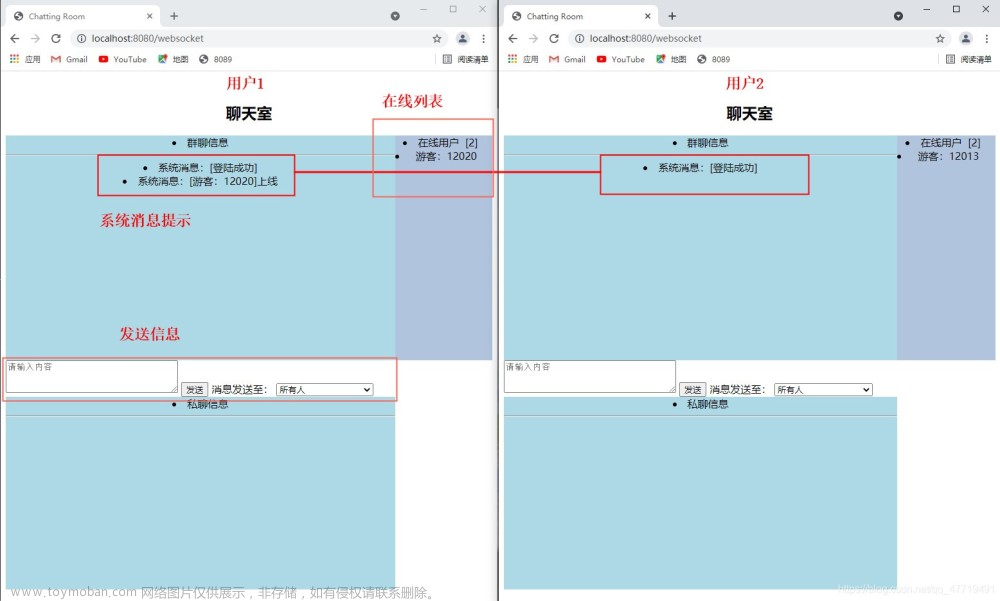
SpringBoot和Vue2集成WebSocket,实现聊天室功能
1.加入依赖
2.后端建立socket服务端
3.前端建立客户端
后端
<!-- websocket -->
        <dependency>
            <groupId>org.springframework.boot</groupId>
            <artifactId>spring-boot-starter-websocket</artifactId>
        </dependency>
		<dependency>
            <groupId>com.alibaba</groupId>
            <artifactId>fastjson</artifactId>
            <version>1.2.76</version>
        </dependency>
// 配置开启WebSocket
@Configuration
public class WebSocketConfig {

    @Bean
    public ServerEndpointExporter serverEndpointExporter() {
        return new ServerEndpointExporter();
    }

}
/**
 * @author websocket服务
 */
@ServerEndpoint(value = "/imserver/{userId}")
@Component
public class WebSocketServer {


    private static UserService userService;

    private static RedisTemplate redisTemplate;

    public static void setUserService(ApplicationContext context){
        userService = context.getBean(UserServiceImpl.class);
        redisTemplate = (RedisTemplate) context.getBean("redisTemplate");
    }


    private static final Logger log = LoggerFactory.getLogger(WebSocketServer.class);
    /**
     * 记录当前在线连接数
     */
    public static final Map<String, Session> sessionMap = new ConcurrentHashMap<>();
    /**
     * 连接建立成功调用的方法
     */
    // 当前用户
    private UserVo userVo;
    // 连接上服务端触发的方法
    @OnOpen
    public void onOpen(Session session, @PathParam("userId") String userId) {
        if (StringUtils.hasText(userId)){
            // 加入新用户
            if (sessionMap.containsKey(userId)){
                sessionMap.remove(userId);
            }
            sessionMap.put(userId, session);
            this.userVo = userService.findById(Long.valueOf(userId));
            // 统计所有在线用户
            List<UserVo> list = new LinkedList<>();
            sessionMap.forEach((userId1,session1) -> {
                UserVo userVo = userService.findById(Long.valueOf(userId1));
                list.add(userVo);
            });
            try {
                // 发送给所有在线的用户,更新在线人数
                sendAllMessage(JSON.toJSONString(list));
            } catch (Exception e) {
                e.printStackTrace();
            }
            log.info("有新用户加入,userId={}, 当前在线人数为:{}", userId, sessionMap.size());
        }

    }
    /**
     * 连接关闭调用的方法
     */
    @OnClose
    public void onClose(Session session, @PathParam("userId") String userId) {
        sessionMap.remove(userId);
        // 统计所有在线用户
        List<UserVo> list = new LinkedList<>();
        sessionMap.forEach((userId1,session1) -> {
            UserVo userVo = userService.findById(Long.valueOf(userId1));
            list.add(userVo);
        });
        sendAllMessage(JSON.toJSONString(list));
        log.info("有一连接关闭,移除userId={}的用户session, 当前在线人数为:{}", userId, sessionMap.size());
    }
    /**
     * 收到客户端消息后调用的方法
     * 后台收到客户端发送过来的消息
     * onMessage 是一个消息的中转站
     * 接受 浏览器端 socket.send 发送过来的 json数据
     * @param message 客户端发送过来的消息
     */
    @OnMessage
    public void onMessage(String message, Session session, @PathParam("userId") String userId) {
        userVo = userService.findById(Long.valueOf(userId));
        log.info("服务端收到用户username={},id={}的消息:{}", userVo.getNickname(),userId, message);
        // 解析消息
        JSONObject jsonObject1 = JSON.parseObject(message);
        String toUserId = jsonObject1.getString("toUserId");
        String text = jsonObject1.getString("text");
        // 判断是给指定人发,还是群发
        if (StringUtils.hasText(toUserId)){
            // {"to": "admin", "text": "聊天文本"}
            Session toSession = sessionMap.get(toUserId); // 根据 to用户名来获取 session,再通过session发送消息文本
            if (toSession != null) {
                // 服务器端 再把消息组装一下,组装后的消息包含发送人和发送的文本内容
                // {"from": "zhang", "text": "hello"}
                JSONObject jsonObject = new JSONObject();
                jsonObject.put("fromUser",userVo);
                jsonObject.put("toUser",userService.findById(Long.valueOf(toUserId)));
                jsonObject.put("text",text);
                this.sendMessage(jsonObject.toJSONString(), toSession);
                log.info("发送给用户userId={},消息:{}", toUserId, jsonObject.toJSONString());
            } else {
                log.info("发送失败,未找到用户username={}的session", toUserId);
            }
        }else{
            JSONObject jsonObject = new JSONObject();
            jsonObject.put("fromUser",userVo);
            jsonObject.put("text",text);
            this.sendAllMessage(jsonObject.toJSONString());
            // 将消息存入redis
            redisTemplate.opsForList().rightPush("messageList",jsonObject.toJSONString());
            redisTemplate.expire("messageList",60*60, TimeUnit.SECONDS); // 过期时间

            log.info("发送给所有用户,消息:{}", toUserId, jsonObject.toJSONString());

        }
    }
    @OnError
    public void onError(Session session, Throwable error) {
        log.error("发生错误");
        error.printStackTrace();
    }
    /**
     * 服务端发送消息给客户端
     */
    private void sendMessage(String message, Session toSession) {
        try {
            log.info("服务端给客户端[{}]发送消息{}", toSession.getId(), message);
            toSession.getBasicRemote().sendText(message);
        } catch (Exception e) {
            log.error("服务端发送消息给客户端失败", e);
        }
    }
    /**
     * 服务端发送消息给所有客户端
     */
    private void sendAllMessage(String message) {
        try {
            for (Session session : sessionMap.values()) {
                log.info("服务端给客户端[{}]发送消息{}", session.getId(), message);
                session.getBasicRemote().sendText(message);

            }
        } catch (Exception e) {
            log.error("服务端发送消息给客户端失败", e);
        }
    }
}

// WebSocket服务类无法进行bean的注入,所以要自己调用ApplicationContext获取bean再注入

@SpringBootApplication
public class BlogApplication {

    public static void main(String[] args) {
        ConfigurableApplicationContext applicationContext = SpringApplication.run(BlogApplication.class, args);
        WebSocketServer.setUserService(applicationContext);
    }
}
前端
<template>
  <div class="socket">
    <el-row>
      <el-col :span="6" class="online">
          <h3 style="background:linear-gradient(to left,#cae9ff,#c7d8ff);text-align:center;padding:5px;">在线用户</h3>
          <el-scrollbar style="height:280px">
          <div v-for="user in onlineUser" :key="user.id" style="padding:5px" class="onlineUser">
            <el-avatar shape="square" size="medium" :src="user.avatar"></el-avatar>
            <span style="margin-left:8px">{{user.account}}</span>
          </div>
          </el-scrollbar>
      </el-col>
      <el-col :span="17" class="container">
          <h3 style="background:linear-gradient(to left,#cae9ff,#c7d8ff);text-align:center;padding:5px;">当前用户(<span style="color:#66b1ff">{{user.account}}</span>)</h3>
          <el-scrollbar style="height:420px" ref="scroll">
          <div class="content">
            <div class="message" v-for="item,index in messageList" :key="index" style="margin-top:5px;margin-left:5px;position:relative" :style="{justifyContent: item.fromUser.id == user.id ? 'flex-end' : 'flex-start'}">
              <el-avatar shape="square" size="medium" :src="item.fromUser.avatar" :style="{order:user.id == item.fromUser.id ? '1':'0'}"></el-avatar>
              <span style="margin-left:8px;" class="text">{{item.text}}</span>
            </div>
          </div>
          </el-scrollbar>
          <div style="margin-top: 15px;" class="write">
            <el-input placeholder="请输入内容" maxlength="100" clearable v-model="text" class="input-with-select">
              <el-button slot="append" type="primary" @click="sendMessage">发送</el-button>
            </el-input>
          </div>
      </el-col>
    </el-row>
  </div>
</template>

<script>
  import config from '@/utils/config'
  import {getCacheMessage} from '@/api/socket'
  import {mapState} from 'vuex'
  export default {
    name:'lm',
    data(){
      return {
        text:'',
        onlineUser:[],
        messageList:[],
        socket:'',
        baseUrl:config.socketUrl
      }
    },
    computed:{
      ...mapState(['user'])
    },
    methods:{
      // 连接socket
      onOpen(){
        if (typeof WebSocket == 'undefined'){
          console.log('你的浏览器不支持webSocket')
          return;
        }
        const url = this.baseUrl+this.user.id

        this.socket = new WebSocket(url);

        this.socket.onopen = ()=>{
          console.log('websocket打开了,'+this.user.id+'连接成功')
        }
        this.socket.onmessage = (data)=>{
          var message = JSON.parse(data.data)
          if(message.hasOwnProperty("text")){
            this.messageList.push(message)
            this.text = ''
            let scroll = this.$refs['scroll'].$refs['wrap']
            this.$nextTick(() =>{
              scroll.scrollTop = scroll.scrollHeight
            })
          }else{
            // 统计在线人数
            this.onlineUser = message

          }
        }
        this.socket.onclose = function(){
          console.log('断开连接成功')
        }
      },
      sendMessage(){
        const message = {
          text:this.text,
          userId:this.user.id
        }
        if(this.text == ''||this.text == null){
          this.$message.warning('请输入内容')
        }else{
          this.socket.send(JSON.stringify(message))
        }
      },
      // 初始化,缓存的消息
      getCacheMessage(){
        getCacheMessage().then(
          res => {
            const data = res.data
            for(var i in data){
              this.messageList.push(JSON.parse(data[i]))
            }
          }
        )
      }
    },
    mounted(){
      this.getCacheMessage()
      this.onOpen()
    },
    beforeDestroy(){
      this.socket.close() // 关闭socket
    }

  }
</script>

<style scoped>
  .socket{
    width: 1200px;
    height: 600px;
    padding:26px;
    background-color: #fff;
    border-radius: 5px;
  }
  .socket .online{
    background-color: #f5f5f5;
    height: 300px;
    border-radius: 5px;
    overflow: hidden;
  }
  .socket .online .onlineUser{
    display: flex;
    justify-content: flex-start;
    align-items: flex-start;
  }
  .socket .container{
    position: relative;
    margin-left: 26px;
    background-color: #f5f5f5;
    height: 500px;
    border-radius: 5px;
  }
  .socket .el-button--primary{
    background-color: #66b1ff;
    color: #fff;
  }
  .socket .container .content{
    min-height: 400px;
    border: 1px solid #d6d6d6;
    border-radius: 4px;
  }
  .socket .container .content .message{
    display: flex;
    align-content: flex-start;
  }
  .socket .write{
    position:absolute;
    bottom: 10px;
    width: 500px;
    right: 50%;
    transform: translateX(50%);
  }

  .socket .text{
    min-height: 24px;
    line-height: 20px;
    padding: 8px;
    font-size: 16px;
    background-color: #fff;
    border-radius: 5px;
    max-width: 280px;
    overflow-wrap:break-word;
    word-wrap:break-word;
    word-break: bread-all;
    white-space:pre-wrap;
    overflow: hidden;
  }
</style>
springboot集成websocket实现聊天室的功能。如有不足之处,还望大家斧正。文章来源地址https://www.toymoban.com/news/detail-817554.html
文章来源:https://www.toymoban.com/news/detail-817554.html
到了这里,关于SpringBoot和Vue2集成WebSocket,实现聊天室功能的文章就介绍完了。如果您还想了解更多内容,请在右上角搜索TOY模板网以前的文章或继续浏览下面的相关文章,希望大家以后多多支持TOY模板网!