目录
1、简介
2、实验环境
3、拓扑图
4、需求及其代码
4.1、测试连通性
4.2、远程登陆
4.3、配置loopback
4.4、监控内存使用率
4.5、自动化巡检内存使用率
4.6、自动化配置snmp服务
4.7、提取分析字符串
🍃作者介绍:双非本科大三网络工程专业在读,阿里云专家博主,专注于Java领域学习,擅长web应用开发、数据结构和算法,初步涉猎Python人工智能开发和前端开发。
🦅主页:@逐梦苍穹
🍔您的一键三连,是我创作的最大动力🌹
1、简介
这部分实验是属于python自动化管理拓扑、配置拓扑的实验。模拟企业配置中,使用python自动化批量管理网络设备,减少人力物力时间成本的场景。
2、实验环境
ensp软件+centos。
ensp中需要配置好cloud,连接本地的vmnet8虚拟网卡,centos需要设置nat。
cloud:

centos8:
centos8需要能ping同vmnet8的网关和拓扑里面的192.168.99.254/24的ip地址。


3、拓扑图

4、需求及其代码
4.1、测试连通性
在centos8虚拟机上,测试是否能够ping通实验拓扑中设备(RT、CoreSW1、CoreSW2、AccessSW1、AccessSW2)的管理IP地址:
Ping AccessSW1管理IP地址:

Ping AccessSW2管理IP地址截图:

Ping CoreSW1管理IP地址截图:

Ping CoreSW2管理IP地址截图:

Ping RT 管理IP地址截图:

4.2、远程登陆
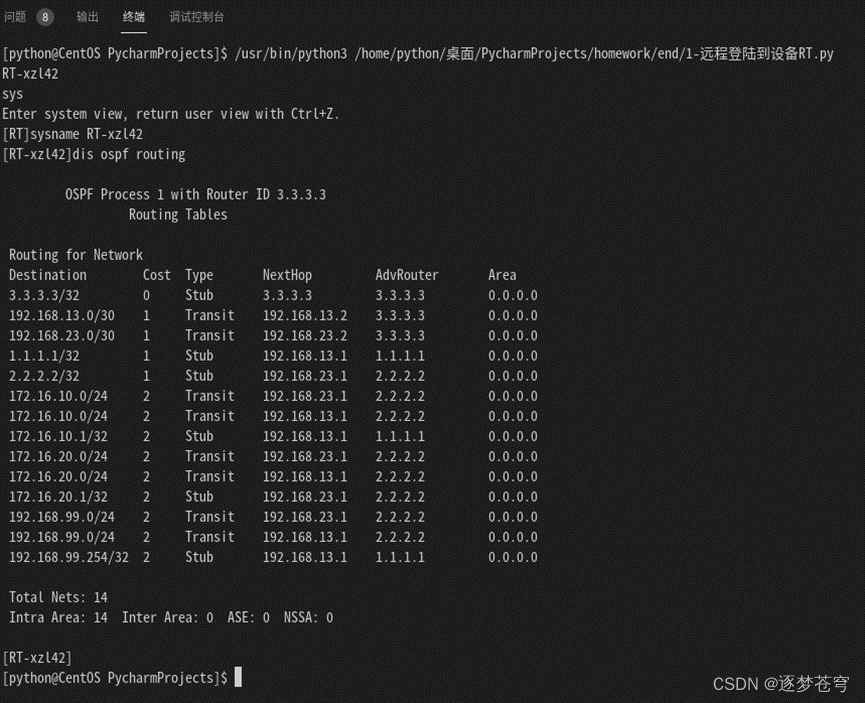
远程登陆到设备RT:
代码:
import paramiko
import time

ip = "3.3.3.3"
user = "python"
passwd = "123456"

ssh_client = paramiko.SSHClient()
ssh_client.set_missing_host_key_policy(paramiko.AutoAddPolicy())
ssh_client.connect(hostname=ip, username=user, password=passwd,look_for_keys=False)

command = ssh_client.invoke_shell()

command.send("dis version\n")
time.sleep(1)
output = command.recv(65535).decode("ascii")
name = output.split("<")[-1][:-1]
name = name + "-xzl42"
print(name)

command.send("sys\n")
command.send("sysname " + name + "\n")
time.sleep(1)

command.send("dis ospf routing\n")
time.sleep(1)

output = command.recv(65535)
print(output.decode("ascii"))
ssh_client.close()
输出结果:
4.3、配置loopback
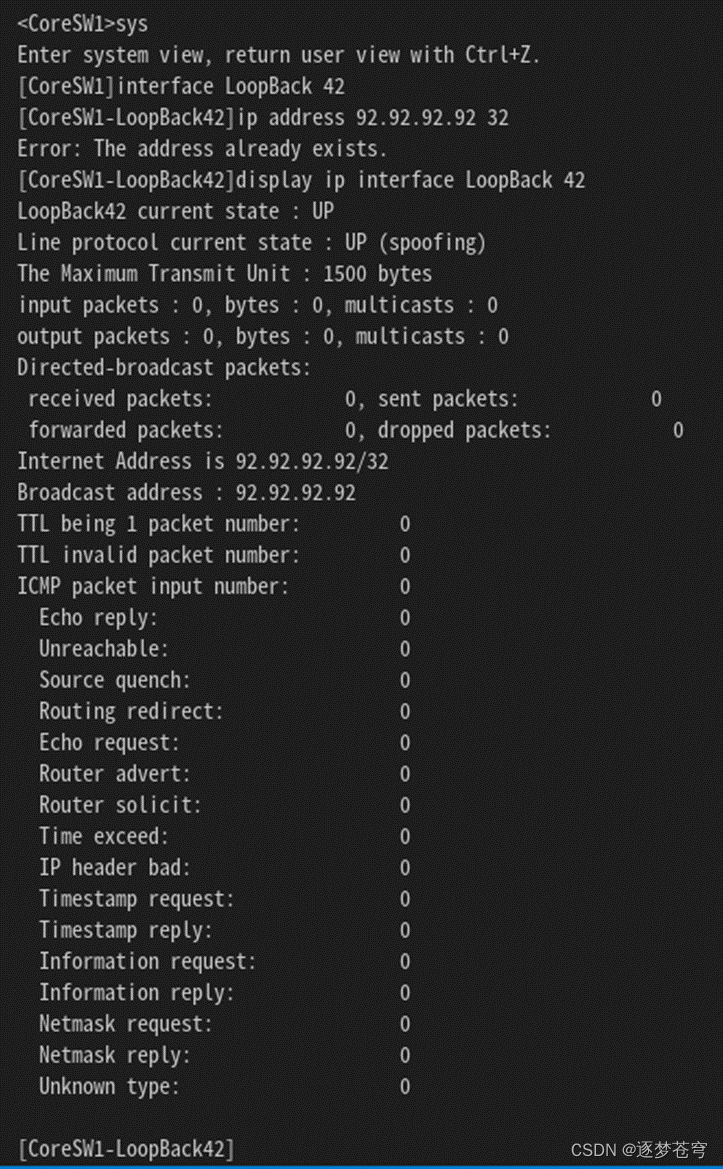
需求:远程登陆到设备Core SW1和Core SW2上配置loopback42,设置IP地址为92.92.92.92/32并保存配置。并输出该接口的IP配置信息.
代码:
import paramiko
import re
import time

ips = ["1.1.1.1", "2.2.2.2"]
user = "python"
passwd = "123456"

for ip in ips:
    ssh_client = paramiko.SSHClient()
    ssh_client.set_missing_host_key_policy(paramiko.AutoAddPolicy())
    try:
        ssh_client.connect(hostname=ip, username=user, password=passwd)

        command = ssh_client.invoke_shell()
        command.send("screen-length 0 temporary\n")
        time.sleep(1)
        command.send("sys\n")
        command.send("interface LoopBack 42\n")
        command.send("ip address 92.92.92.92 32\n")
        time.sleep(1)
        command.send("display ip interface LoopBack 42\n")
        time.sleep(1)
        output = command.recv(65535).decode("utf-8")
        print(output)
    except Exception as e:
        print(f"无法连接或配置设备: {str(e)}")
    finally:
        ssh_client.close()
输出结果:
①设备Core SW1输出:
②设备Core SW2输出:

4.4、监控内存使用率
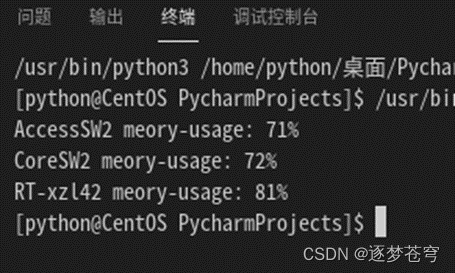
要求:查看实验拓扑中3台设备(RT、CoreSW2、AccessSW2)的内存使用率情况。
这里使用多线程+正则表达式来实现:
代码:
import paramiko
import time
from multiprocessing import Process
import re

def internalStorage(ip):
    ssh_client = paramiko.SSHClient()
    ssh_client.set_missing_host_key_policy(paramiko.AutoAddPolicy())
    ssh_client.connect(hostname=ip, username="python", password="123456")

    cmd = ssh_client.invoke_shell()
    cmd.send("screen-length 0 temporary\n")
    cmd.send("dis memory-usage\n")
    time.sleep(1)
    result = b''
    recv_ready_status = True
    while recv_ready_status:
        output = cmd.recv(65535)
        result += output
        time.sleep(1)
        recv_ready_status = cmd.recv_ready()
    output_end = result.decode("ascii")
    name = output_end.split("<")[-1][:-1]

    lines = output_end.split("\n")
    for line in lines:
        result = re.search(r'Memory Using Percentage Is: (\d+)%', line)
        if result != None:
            output_end = result.group(1)
            break

    print("{} meory-usage: {}%".format(name,output_end))
    ssh_client.close
if __name__ == '__main__':
    ips = ["3.3.3.3", "2.2.2.2", "192.168.99.20"]
    ls = []
    for i in ips:
        p=Process(target=internalStorage,args=(i,))
        ls.append(p)
    for i in ls:
        i.start()
输出:
4.5、自动化巡检内存使用率
在4.3的基础上实现对三台设备的自动化巡检内存使用率并输出,每隔20秒巡检一次:
import paramiko
import time
from multiprocessing import Process
import re

def internalStorage(ip):
    ssh_client = paramiko.SSHClient()
    ssh_client.set_missing_host_key_policy(paramiko.AutoAddPolicy())
    ssh_client.connect(hostname=ip, username="python", password="123456")

    cmd = ssh_client.invoke_shell()
    cmd.send("screen-length 0 temporary\n")
    cmd.send("dis memory-usage\n")
    time.sleep(1)
    result = b''
    recv_ready_status = True
    while recv_ready_status:
        output = cmd.recv(65535)
        result += output
        time.sleep(1)
        recv_ready_status = cmd.recv_ready()
    output_end = result.decode("ascii")
    name = output_end.split("<")[-1][:-1]

    lines = output_end.split("\n")
    for line in lines:
        result = re.search(r'Memory Using Percentage Is: (\d+)%', line)
        if result != None:
            output_end = result.group(1)
            break

    print("{} meory-usage: {}%".format(name,output_end))
    ssh_client.close
if __name__ == '__main__':
    while True:
        ips = ["3.3.3.3", "2.2.2.2", "192.168.99.20"]
        ls = []
        for i in ips:
            p=Process(target=internalStorage,args=(i,))
            ls.append(p)
        for i in ls:
            i.start()
        time.sleep(20)
4.6、自动化配置snmp服务
需求:通过python脚本,在设备CoreSW1上配置snmp服务,只允许win10-vscode作为网管平台访问其snmp服务:
代码:
import paramiko
import time
from multiprocessing import Process

def sshLogin(ip):
    ssh_client = paramiko.SSHClient()
    ssh_client.set_missing_host_key_policy(paramiko.AutoAddPolicy())
    ssh_client.connect(hostname=ip, username="python", password="123456")

    cmd = ssh_client.invoke_shell()
    try:
        cmd.send("sy\n")

        cmd.send("acl 2000\n")

        cmd.send("rule 5 permit source 192.168.99.101 0.0.0.0\n")
        time.sleep(1)
        cmd.send("rule 100 deny\n")
        cmd.send("quit\n")
        cmd.send("dis acl all\n")
        cmd.send("snmp-agent\n")
        time.sleep(1)
        cmd.send("snmp-agent community read pub-xzl-42 acl 2000\n")
        time.sleep(1)
        cmd.send("snmp-agent community write prv-xzl-42 acl 2000\n")
        time.sleep(1)
        cmd.send("snmp-agent sys-info version v1 v2c\n")
        time.sleep(1)
        cmd.send("dis snmp-agent community\n")
        output = cmd.recv(65535).decode("utf-8")
        print(output)
    except:
        print("出错")
    ssh_client.close()

if __name__ == '__main__':
    ips = ["1.1.1.1"]

    ls = []
    for i in ips:
        p=Process(target=sshLogin,args=(i,))
        ls.append(p)
    for i in ls:
        i.start()
输出:
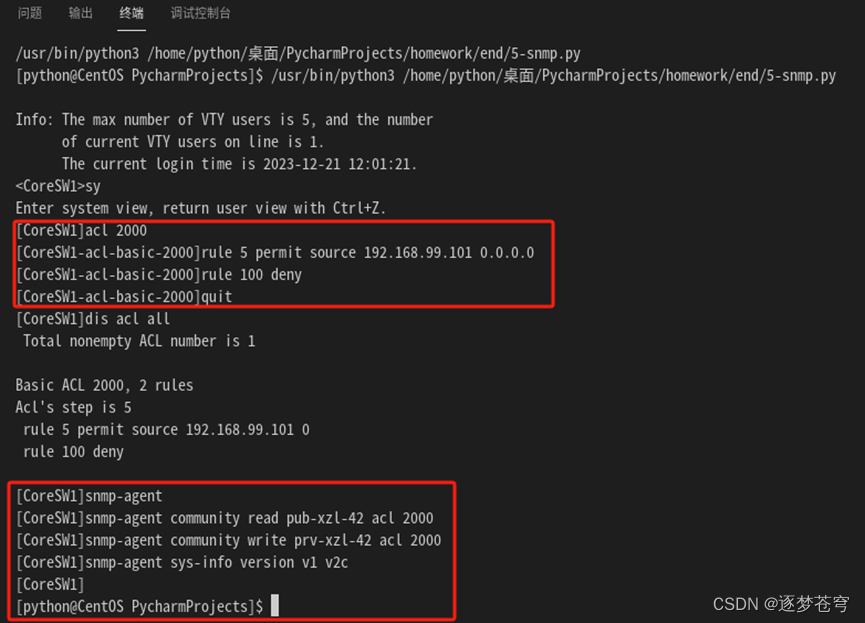
测试snmp服务正常,开启抓包抓取到平台获取到的system组信息:
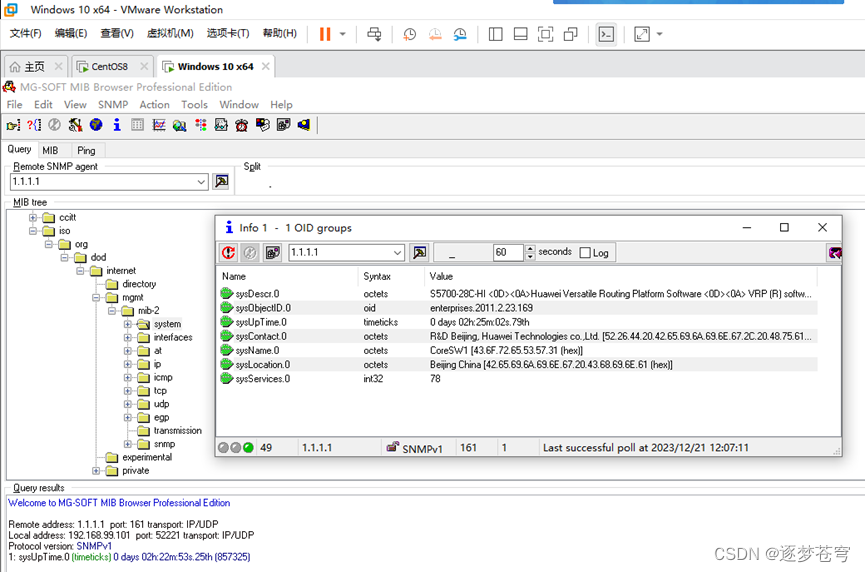
抓包截图:

4.7、提取分析字符串
从如下字符串中提取相应信息并保存到json文件,读出保存的json文件并打印出来。
字符串:
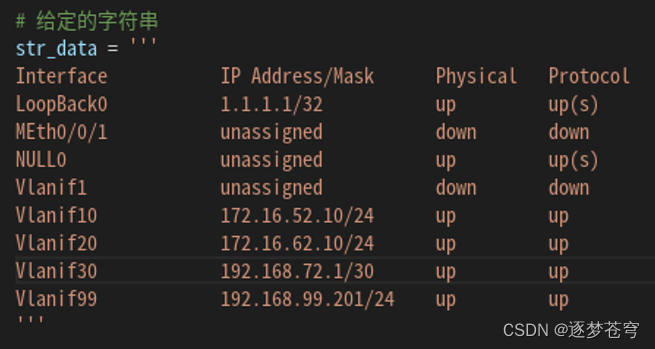
代码:
import re
import json

def convert_prefix_to_subnet_mask(prefix):
    # 将子网掩码的位数转换为字符串
    subnet_mask = '1' * prefix + '0' * (32 - prefix)

    # 将字符串转换为四段十进制数字
    octets = [int(subnet_mask[i:i+8], 2) for i in range(0, 32, 8)]

    # 将数字转换为点分十进制格式
    subnet_mask_str = '.'.join(map(str, octets))

    return subnet_mask_str

# 给定的字符串
str_data = '''
Interface           IP Address/Mask      Physical   Protocol
LoopBack0           1.1.1.1/32           up         up(s)
MEth0/0/1           unassigned           down       down
NULL0               unassigned           up         up(s)
Vlanif1             unassigned           down       down
Vlanif10            172.16.52.10/24      up         up
Vlanif20            172.16.62.10/24      up         up
Vlanif30            192.168.72.1/30      up         up
Vlanif99            192.168.99.201/24    up         up
'''

# 提取接口信息的正则表达式
interface_regex = re.compile(r'(\S+)\s+([\d.]+(?:\+\S+)?)/(\d+)\s+\S+\s+\S+')

# 提取接口信息
interface_matches = interface_regex.findall(str_data)

# 创建 JSON 数据
json_data = {
    "文件描述": "本json文件保存网络设备接口IP信息",
    "创建者": "xzl42",
    "接口IP信息": [{"接口名": name, "IP地址": ip, "子网掩码": convert_prefix_to_subnet_mask(int(prefix))} for name, ip, prefix in interface_matches]
}

# 将 JSON 数据保存到文件
with open('jsonData.json', 'w', encoding='utf-8') as json_file:
    json.dump(json_data, json_file, indent=4, ensure_ascii=False)

# 读取 JSON 文件并打印
with open('jsonData.json', 'r', encoding='utf-8') as json_file:
    loaded_data = json.load(json_file)
    print(json.dumps(loaded_data, indent=4, ensure_ascii=False))
输出:
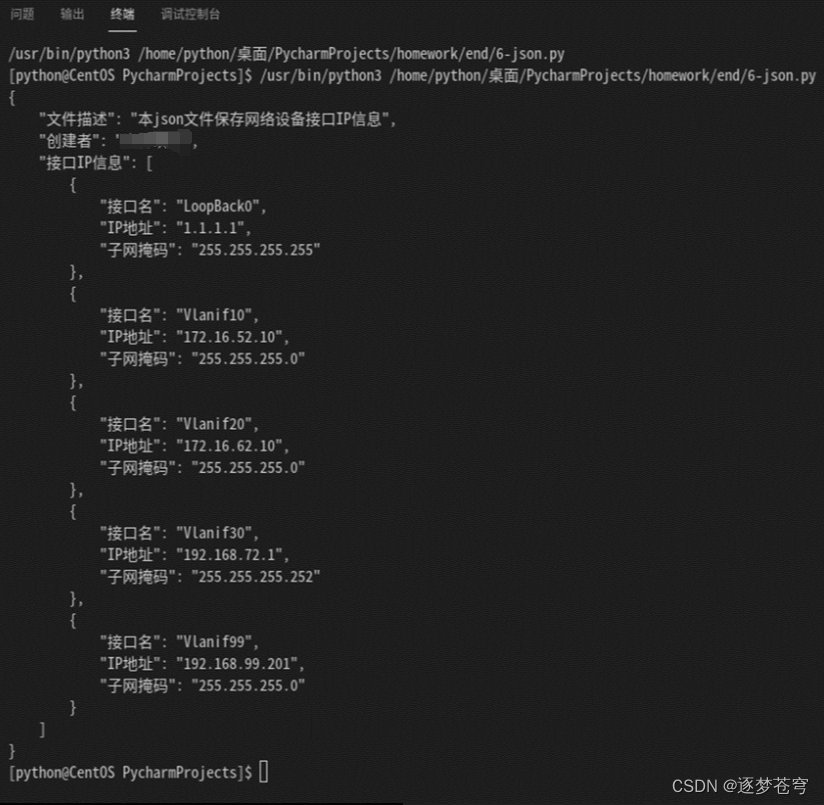
json文件:文章来源:https://www.toymoban.com/news/detail-818725.html
{
  "文件描述": "本json文件保存网络设备接口IP信息",
  "创建者": "xzl42",
  "接口IP信息": [
    {
      "接口名": "LoopBack0",
      "IP地址": "1.1.1.1",
      "子网掩码": "255.255.255.255"
    },
    {
      "接口名": "Vlanif10",
      "IP地址": "172.16.52.10",
      "子网掩码": "255.255.255.0"
    },
    {
      "接口名": "Vlanif20",
      "IP地址": "172.16.62.10",
      "子网掩码": "255.255.255.0"
    },
    {
      "接口名": "Vlanif30",
      "IP地址": "192.168.72.1",
      "子网掩码": "255.255.255.252"
    },
    {
      "接口名": "Vlanif99",
      "IP地址": "192.168.99.201",
      "子网掩码": "255.255.255.0"
    }
  ]
}
文章来源地址https://www.toymoban.com/news/detail-818725.html
到了这里,关于python自动化运维管理拓扑的文章就介绍完了。如果您还想了解更多内容,请在右上角搜索TOY模板网以前的文章或继续浏览下面的相关文章,希望大家以后多多支持TOY模板网!


