资料下载地址:Proteus仿真stm32f103r6输出PWM/正弦波
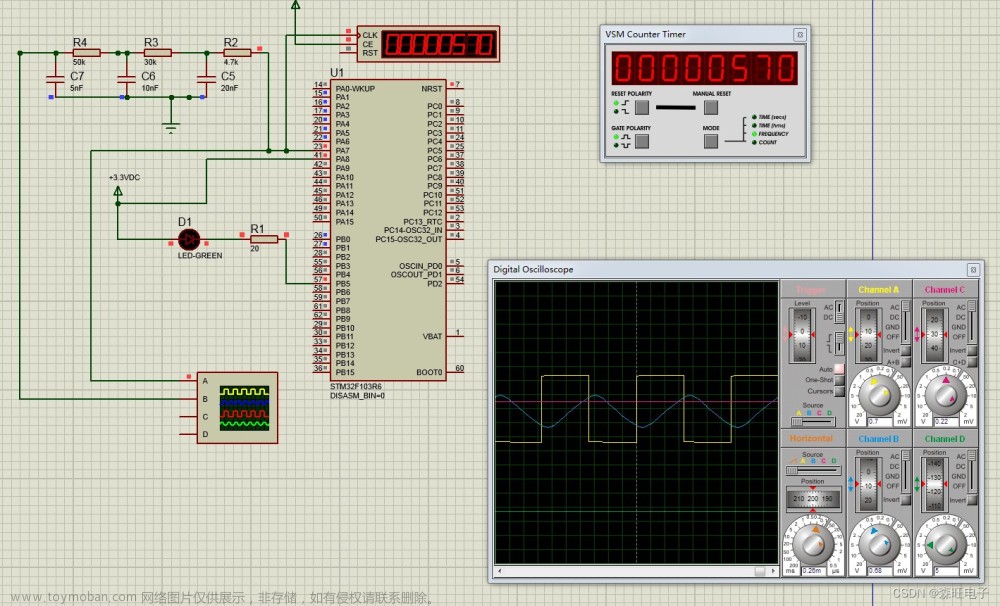
一、仿真图
Proteus仿真stm32f103r6输出PWM/正弦波
文章来源:https://www.toymoban.com/news/detail-819407.html
 文章来源地址https://www.toymoban.com/news/detail-819407.html
二、程序
#include "pbdata.h"

u16 fre;
void RCC_Configuration(void);
void GPIO_Configuration(void);
void TIM3_Configuration();

void  Delay (uint32_t nCount)
{
  for(; nCount != 0; nCount--);
}

int main(void)
{
     u16 arr=42000;
     u16 led_dt = arr/2;

                 RCC_Configuration();        //系统时钟初始化
                 GPIO_Configuration();//端口初始化
                 TIM3_Configuration(arr);//定时器和pwm配置

                 while(1)
                 {
                                TIM_SetCompare2(TIM3,led_dt); //用的是TIM3的通道2,输出PWM         送到相应的寄存器中   //满占空比为900


                                                GPIO_SetBits(GPIOB,GPIO_Pin_5);        //LED 发光
                                                        Delay(0x2ffff);
                                                GPIO_ResetBits(GPIOB,GPIO_Pin_5);//LED 熄灭
                                                        Delay(0x2ffff);


//                                        if(GPIO_ReadInputDataBit(GPIOC,GPIO_Pin_7)== Bit_RESET)
//                                                        {
//                                                                //LED 发光
//                                                                GPIO_SetBits(GPIOB,GPIO_Pin_5);
//                                                         }
//                                        else
//                                                        {
//                                                                //LED 熄灭
//                                                                GPIO_ResetBits(GPIOB,GPIO_Pin_5);
//                                                         }
                 }
}

void RCC_Configuration(void)
{
  SystemInit();

        RCC_APB2PeriphClockCmd(RCC_APB2Periph_TIM1,ENABLE);//这个是必须的,仿真软件必须的
        RCC_APB1PeriphClockCmd(RCC_APB1Periph_TIM3,ENABLE);
        RCC_APB2PeriphClockCmd(RCC_APB2Periph_AFIO,ENABLE);//端口复用,一定在APB2的时钟线
  RCC_APB2PeriphClockCmd(RCC_APB2Periph_GPIOA,ENABLE);
        RCC_APB2PeriphClockCmd(RCC_APB2Periph_GPIOB,ENABLE);
        RCC_APB2PeriphClockCmd(RCC_APB2Periph_GPIOC,ENABLE);
}

void GPIO_Configuration(void)
{
  GPIO_InitTypeDef GPIO_InitStructure;

//PWM
        GPIO_InitStructure.GPIO_Pin= GPIO_Pin_7;
        GPIO_InitStructure.GPIO_Speed=GPIO_Speed_50MHz;
        GPIO_InitStructure.GPIO_Mode=GPIO_Mode_AF_PP;      //通过PWM控制,端口为复用方式输出
        GPIO_Init(GPIOA,&GPIO_InitStructure);

//LED
        GPIO_InitStructure.GPIO_Pin= GPIO_Pin_5;
        GPIO_InitStructure.GPIO_Speed=GPIO_Speed_50MHz;
        GPIO_InitStructure.GPIO_Mode=GPIO_Mode_Out_PP;
        GPIO_Init(GPIOB,&GPIO_InitStructure);

//BUTTON
        GPIO_InitStructure.GPIO_Pin=GPIO_Pin_7;
        GPIO_InitStructure.GPIO_Mode=GPIO_Mode_IPD;
        GPIO_Init(GPIOC,&GPIO_InitStructure);
}

void TIM3_Configuration(arr)
{
        TIM_TimeBaseInitTypeDef TIM_TimeBaseStruct;
        TIM_OCInitTypeDef TIM_OCInitStructure;             //PWM的结构体

        GPIO_PinRemapConfig(GPIO_PartialRemap_TIM3,ENABLE);//TIM3 复用功能部分映射,可以此找到对应的管脚
        //关于部分映射可以参考“STM32参考手册”119面
        //定时器初始化

        TIM_TimeBaseStruct.TIM_Period=arr;//初值
        TIM_TimeBaseStruct.TIM_Prescaler=2;//预分频
        //不分频,在晶振为72MHz的情况下,定时器执行到899后即会溢出,表示计数满
        TIM_TimeBaseStruct.TIM_ClockDivision=0;
        TIM_TimeBaseStruct.TIM_CounterMode=TIM_CounterMode_Up;//向上
        TIM_TimeBaseInit(TIM3,&TIM_TimeBaseStruct);


        //pwm初始化
        TIM_OCInitStructure.TIM_OCMode=TIM_OCMode_PWM1;             //使用模式1
        TIM_OCInitStructure.TIM_OutputState=TIM_OutputState_Enable; //使能位
        TIM_OCInitStructure.TIM_OCPolarity=TIM_OCPolarity_High;     //设置输出极性,一定注意


        TIM_OC2Init(TIM3,&TIM_OCInitStructure);
  TIM_OC2PreloadConfig(TIM3,TIM_OCPreload_Enable);            //与装载使能,不会说执行一次后就不执行了
        TIM_Cmd(TIM3,ENABLE);

}
/*PWM不是中断,所以不需要设置中断优先级 */
到了这里,关于Proteus仿真stm32f103r6输出PWM/正弦波的文章就介绍完了。如果您还想了解更多内容,请在右上角搜索TOY模板网以前的文章或继续浏览下面的相关文章,希望大家以后多多支持TOY模板网!



![[嵌入式软件][启蒙篇][仿真平台] STM32F103实现串口输出输入、ADC采集](https://imgs.yssmx.com/Uploads/2024/01/814721-1.gif)

