工具类文章来源:https://www.toymoban.com/news/detail-819491.html
from PIL.Image import Image, fromarray
import PIL.ImageDraw as ImageDraw
import PIL.ImageFont as ImageFont
from PIL import ImageColor
import numpy as np

STANDARD_COLORS = [
    'AliceBlue', 'Chartreuse', 'Aqua', 'Aquamarine', 'Azure', 'Beige', 'Bisque',
    'BlanchedAlmond', 'BlueViolet', 'BurlyWood', 'CadetBlue', 'AntiqueWhite',
    'Chocolate', 'Coral', 'CornflowerBlue', 'Cornsilk', 'Crimson', 'Cyan',
    'DarkCyan', 'DarkGoldenRod', 'DarkGrey', 'DarkKhaki', 'DarkOrange',
    'DarkOrchid', 'DarkSalmon', 'DarkSeaGreen', 'DarkTurquoise', 'DarkViolet',
    'DeepPink', 'DeepSkyBlue', 'DodgerBlue', 'FireBrick', 'FloralWhite',
    'ForestGreen', 'Fuchsia', 'Gainsboro', 'GhostWhite', 'Gold', 'GoldenRod',
    'Salmon', 'Tan', 'HoneyDew', 'HotPink', 'IndianRed', 'Ivory', 'Khaki',
    'Lavender', 'LavenderBlush', 'LawnGreen', 'LemonChiffon', 'LightBlue',
    'LightCoral', 'LightCyan', 'LightGoldenRodYellow', 'LightGray', 'LightGrey',
    'LightGreen', 'LightPink', 'LightSalmon', 'LightSeaGreen', 'LightSkyBlue',
    'LightSlateGray', 'LightSlateGrey', 'LightSteelBlue', 'LightYellow', 'Lime',
    'LimeGreen', 'Linen', 'Magenta', 'MediumAquaMarine', 'MediumOrchid',
    'MediumPurple', 'MediumSeaGreen', 'MediumSlateBlue', 'MediumSpringGreen',
    'MediumTurquoise', 'MediumVioletRed', 'MintCream', 'MistyRose', 'Moccasin',
    'NavajoWhite', 'OldLace', 'Olive', 'OliveDrab', 'Orange', 'OrangeRed',
    'Orchid', 'PaleGoldenRod', 'PaleGreen', 'PaleTurquoise', 'PaleVioletRed',
    'PapayaWhip', 'PeachPuff', 'Peru', 'Pink', 'Plum', 'PowderBlue', 'Purple',
    'Red', 'RosyBrown', 'RoyalBlue', 'SaddleBrown', 'Green', 'SandyBrown',
    'SeaGreen', 'SeaShell', 'Sienna', 'Silver', 'SkyBlue', 'SlateBlue',
    'SlateGray', 'SlateGrey', 'Snow', 'SpringGreen', 'SteelBlue', 'GreenYellow',
    'Teal', 'Thistle', 'Tomato', 'Turquoise', 'Violet', 'Wheat', 'White',
    'WhiteSmoke', 'Yellow', 'YellowGreen'
]

"""
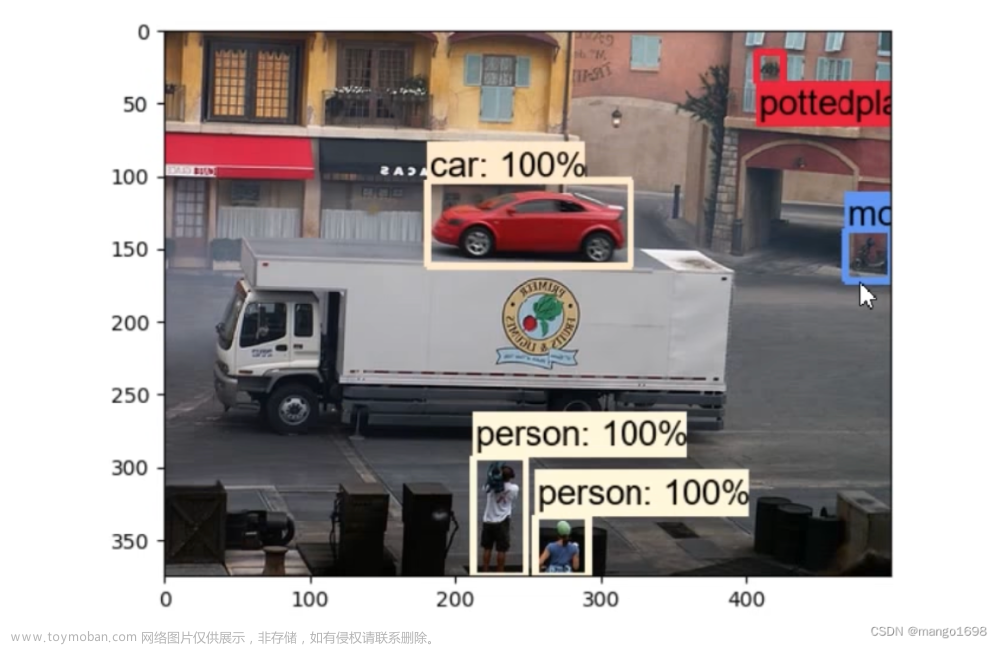
将目标边界框和类别信息绘制到图片上
"""
def draw_text(draw,
              box: list,
              cls: int,
              score: float,
              category_index: dict,
              color: str,
              font: str = 'arial.ttf',
              font_size: int = 24):

    try:
        font = ImageFont.truetype(font, font_size)
    except IOError:
        font = ImageFont.load_default()

    left, top, right, bottom = box
    display_str = f"{category_index[str(cls)]}: {int(100 * score)}%"
    display_str_heights = [font.getsize(ds)[1] for ds in display_str]
    display_str_height = (1 + 2 * 0.05) * max(display_str_heights)

    if top > display_str_height:
        text_top = top - display_str_height
        text_bottom = top
    else:
        text_top = bottom
        text_bottom = bottom + display_str_height

    for ds in display_str:
        text_width, text_height = font.getsize(ds)
        margin = np.ceil(0.05 * text_width)
        draw.rectangle([(left, text_top),
                        (left + text_width + 2 * margin, text_bottom)], fill=color)
        draw.text((left + margin, text_top),
                  ds,
                  fill='black',
                  font=font)
        left += text_width


def draw_masks(image, masks, colors, thresh: float = 0.7, alpha: float = 0.5):
    np_image = np.array(image)
    masks = np.where(masks > thresh, True, False)

    # colors = np.array(colors)
    img_to_draw = np.copy(np_image)
    # TODO: There might be a way to vectorize this
    for mask, color in zip(masks, colors):
        img_to_draw[mask] = color

    out = np_image * (1 - alpha) + img_to_draw * alpha
    return fromarray(out.astype(np.uint8))

"""
调用该函数进行绘制,传入图像,边界框信息,类别信息,置信度,类别索引,字体等信息。
将目标边界框信息,类别信息,mask信息绘制在图片上
Args:
    image: 需要绘制的图片
    boxes: 目标边界框信息
    classes: 目标类别信息
    scores: 目标概率信息
    masks: 目标mask信息
    category_index: 类别与名称字典
    box_thresh: 过滤的概率阈值
    mask_thresh:
    line_thickness: 边界框宽度
    font: 字体类型
    font_size: 字体大小
    draw_boxes_on_image:
    draw_masks_on_image:

Returns:
"""
def draw_objs(image: Image,
              boxes: np.ndarray = None,
              classes: np.ndarray = None,
              scores: np.ndarray = None,
              masks: np.ndarray = None,
              category_index: dict = None,
              box_thresh: float = 0.1,
              mask_thresh: float = 0.5,
              line_thickness: int = 8,
              font: str = 'arial.ttf',
              font_size: int = 24,
              draw_boxes_on_image: bool = True,
              draw_masks_on_image: bool = False):


    # 过滤掉低概率的目标
    idxs = np.greater(scores, box_thresh)
    boxes = boxes[idxs]
    classes = classes[idxs]
    scores = scores[idxs]
    if masks is not None:
        masks = masks[idxs]
    if len(boxes) == 0:
        return image

    colors = [ImageColor.getrgb(STANDARD_COLORS[cls % len(STANDARD_COLORS)]) for cls in classes]

    if draw_boxes_on_image:
        draw = ImageDraw.Draw(image)
        for box, cls, score, color in zip(boxes, classes, scores, colors):
            left, top, right, bottom = box
            # 绘制目标边界框
            draw.line([(left, top), (left, bottom), (right, bottom),
                       (right, top), (left, top)], width=line_thickness, fill=color)
            # 绘制类别和概率信息
            draw_text(draw, box.tolist(), int(cls), float(score), category_index, color, font, font_size)

    if draw_masks_on_image and (masks is not None):
        image = draw_masks(image, masks, colors, mask_thresh)

    return image
 文章来源地址https://www.toymoban.com/news/detail-819491.html
到了这里,关于目标检测 - 绘制bounding box的文章就介绍完了。如果您还想了解更多内容,请在右上角搜索TOY模板网以前的文章或继续浏览下面的相关文章,希望大家以后多多支持TOY模板网!


