用途
- 实时获取服务端的最新数据
- 查看调度任务的进度和执行状态
- 用户感知:修改数据后,相关用户收到信息
- 提升用户体验:耗时业务异步处理(Excel导入导出,复杂计算)
前端轮询
这种方式实现简单,前端通过setInterval定时去请求接口来获取最新的数据,当实时性要求不高,更新频率低的情况下可以使用这种方式。但是当实时性很高的时候,我们的请求会很频繁,服务器的消耗非常大,而且每次请求的时候服务端的数据可能还没有改变,导致很多请求都是没有意义的。
javascript
复制代码
setInterval(function () { // 请求接口操作 // 。。。 }, 3000 );
webSocket
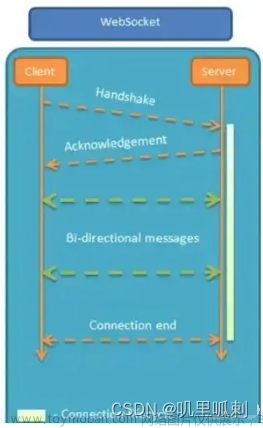
WebSocket是基于TCP协议的,它是全双工通信的,服务端可以向客户端发送信息,客户端同样可以向服务器发送指令,常用于聊天应用中。
pom.xml
SpringBoot提供了websocket的starter
xml
复制代码
<dependency> <groupId>org.springframework.boot</groupId> <artifactId>spring-boot-starter-websocket</artifactId> </dependency>
config类
注入ServerEndpointExporter,这个bean会自动注册使用了@ServerEndpoint注解声明的Websocket endpoint
typescript
复制代码
@Configuration public class WebSocketConfig { @Bean public ServerEndpointExporter serverEndpointExporter() { return new ServerEndpointExporter(); } }
server类
创建一个服务类:
- 加上
@ServerEndpoint注解,设置WebSocket连接点的服务地址。 - 创建
AtomicInteger用于记录连接数 - 创建
ConcurrentHashMap用于存放连接信息 -
@OnOpen注解表明该方法在建立连接后调用 -
@OnClose注解表明该方法在断开连接后调用 -
@OnError注解表明该方法在连接异常调用 -
@OnMessage注解表明该方法在收到客户端消息后调用 - 创建推送信息的方法
- 创建移除连接的方法
typescript
复制代码
@ServerEndpoint("/websocket/{userId}") @Component public class WebSocketServer { private final static Logger logger = LoggerFactory.getLogger(WebSocketServer.class); /** * 当前连接数 */ private static AtomicInteger count = new AtomicInteger(0); /** * 使用map对象,便于根据userId来获取对应的WebSocket,或者放redis里面 */ private static Map<String, WebSocketServer> websocketMap = new ConcurrentHashMap<>(); /** * 与某个客户端的连接会话,需要通过它来给客户端发送数据 */ private Session session; /** * 对应的用户ID */ private String userId = ""; /** * 连接建立成功调用的方法 */ @OnOpen public void onOpen(Session session, @PathParam("userId") String userId) { try { this.session = session; this.userId = userId; websocketMap.put(userId, this); // 数量+1 count.getAndIncrement(); logger.info("websocket 新连接:{}", userId); } catch (Exception e) { logger.error("websocket 新建连接 IO异常"); } } /** * 连接关闭调用的方法 */ @OnClose public void onClose() { // 删除 websocketMap.remove(this.userId); // 数量-1 count.getAndDecrement(); logger.info("close websocket : {}", this.userId); } /** * 收到客户端消息后调用的方法 * * @param message 客户端发送过来的消息 */ @OnMessage public void onMessage(String message) { logger.info("来自客户端{}的消息:{}", this.userId, message); } @OnError public void onError(Throwable error) { logger.info("websocket 发生错误,移除当前websocket:{},err:{}", this.userId, error.getMessage()); websocketMap.remove(this.userId); // 数量-1 count.getAndDecrement(); } /** * 发送消息 (异步发送) * * @param message 消息主题 */ private void sendMessage(String message) { this.session.getAsyncRemote().sendText(message); } /** * 向指定用户发送信息 * * @param userId 用户id * @param wsInfo 信息 */ public static void sendInfo(String userId, String wsInfo) { if (websocketMap.containsKey(userId)) { websocketMap.get(userId).sendMessage(wsInfo); } } /** * 群发消息 */ public static void batchSendInfo(String wsInfo, List<String> ids) { ids.forEach(userId -> sendInfo(userId, wsInfo)); } /** * 群发所有人 */ public static void batchSendInfo(String wsInfo) { websocketMap.forEach((k, v) -> v.sendMessage(wsInfo)); } /** * 获取当前连接信息 */ public static List<String> getIds() { return new ArrayList<>(websocketMap.keySet()); } /** * 获取当前连接数量 */ public static int getUserCount() { return count.intValue(); } }
测试接口
less
复制代码
@RestController @RequestMapping("/ws") public class WebSocketController { @GetMapping("/push/{message}") public ResponseEntity<String> push(@PathVariable(name = "message") String message) { WebSocketServer.batchSendInfo(message); return ResponseEntity.ok("WebSocket 推送消息给所有人"); } }
html
在resources/static下创建ws.html,将WebSocket的地址设为服务类中@ServerEndpoint注解所配置的地址
xml
复制代码
<!DOCTYPE html> <html lang="en"> <head> <meta charset="UTF-8"> <title>WebSocket</title> </head> <body> <div id="message"></div> </body> <script> let websocket = null; // 用时间戳模拟登录用户 const username = new Date().getTime(); // alert(username) //判断当前浏览器是否支持WebSocket if ('WebSocket' in window) { console.log("浏览器支持Websocket"); websocket = new WebSocket('ws://localhost:8080/websocket/' + username); } else { alert('当前浏览器 不支持 websocket'); } //连接发生错误的回调方法 websocket.onerror = function () { setMessageInnerHTML("WebSocket连接发生错误"); }; //连接成功建立的回调方法 websocket.onopen = function () { setMessageInnerHTML("WebSocket连接成功"); }; //接收到消息的回调方法 websocket.onmessage = function (event) { setMessageInnerHTML(event.data); }; //连接关闭的回调方法 websocket.onclose = function () { setMessageInnerHTML("WebSocket连接关闭"); }; //监听窗口关闭事件,当窗口关闭时,主动去关闭websocket连接,防止连接还没断开就关闭窗口,server端会抛异常。 window.onbeforeunload = function () { closeWebSocket(); }; //关闭WebSocket连接 function closeWebSocket() { websocket.close(); } //将消息显示在网页上 function setMessageInnerHTML(innerHTML) { document.getElementById('message').innerHTML += innerHTML + '<br/>'; } </script> </html>
测试文章来源:https://www.toymoban.com/news/detail-819507.html
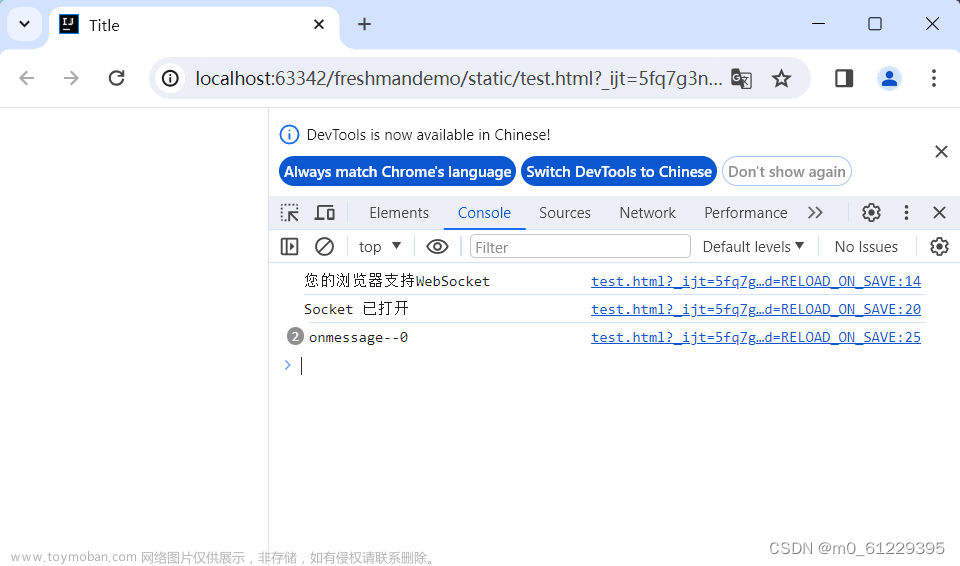
启动项目,访问http://localhost:8080/ws.html,开启连接。调用消息推送接口http://localhost:8080/ws/push/hello,查看网页显示信息。
SseEmitter
SseEmitter是SpringMVC(4.2+)提供的一种技术,它是基于Http协议的,相比WebSocket,它更轻量,但是它只能从服务端向客户端单向发送信息。在SpringBoot中我们无需引用其他jar就可以使用。
创建服务类
- 创建
AtomicInteger用于记录连接数 - 创建
ConcurrentHashMap用于存放连接信息 - 建立连接:创建并返回一个带有超时时间的
SseEmitter给前端。超时间设为0表示永不过期 - 设置连接结束的回调方法
completionCallBack - 设置连接超时的回调方法
timeoutCallBack - 设置连接异常的回调方法
errorCallBack - 创建推送信息的方法
SseEmitter.send() - 创建移除连接的方法
scss
复制代码
public class SseEmitterServer { private static final Logger logger = LoggerFactory.getLogger(SseEmitterServer.class); /** * 当前连接数 */ private static AtomicInteger count = new AtomicInteger(0); /** * 使用map对象,便于根据userId来获取对应的SseEmitter,或者放redis里面 */ private static Map<String, SseEmitter> sseEmitterMap = new ConcurrentHashMap<>(); /** * 创建用户连接并返回 SseEmitter * * @param userId 用户ID * @return SseEmitter */ public static SseEmitter connect(String userId) { // 设置超时时间,0表示不过期。默认30秒,超过时间未完成会抛出异常:AsyncRequestTimeoutException SseEmitter sseEmitter = new SseEmitter(0L); // 注册回调 sseEmitter.onCompletion(completionCallBack(userId)); sseEmitter.onError(errorCallBack(userId)); sseEmitter.onTimeout(timeoutCallBack(userId)); sseEmitterMap.put(userId, sseEmitter); // 数量+1 count.getAndIncrement(); logger.info("创建新的sse连接,当前用户:{}", userId); return sseEmitter; } /** * 给指定用户发送信息 */ public static void sendMessage(String userId, String message) { if (sseEmitterMap.containsKey(userId)) { try { // sseEmitterMap.get(userId).send(message, MediaType.APPLICATION_JSON); sseEmitterMap.get(userId).send(message); } catch (IOException e) { logger.error("用户[{}]推送异常:{}", userId, e.getMessage()); removeUser(userId); } } } /** * 群发消息 */ public static void batchSendMessage(String wsInfo, List<String> ids) { ids.forEach(userId -> sendMessage(wsInfo, userId)); } /** * 群发所有人 */ public static void batchSendMessage(String wsInfo) { sseEmitterMap.forEach((k, v) -> { try { v.send(wsInfo, MediaType.APPLICATION_JSON); } catch (IOException e) { logger.error("用户[{}]推送异常:{}", k, e.getMessage()); removeUser(k); } }); } /** * 移除用户连接 */ public static void removeUser(String userId) { sseEmitterMap.remove(userId); // 数量-1 count.getAndDecrement(); logger.info("移除用户:{}", userId); } /** * 获取当前连接信息 */ public static List<String> getIds() { return new ArrayList<>(sseEmitterMap.keySet()); } /** * 获取当前连接数量 */ public static int getUserCount() { return count.intValue(); } private static Runnable completionCallBack(String userId) { return () -> { logger.info("结束连接:{}", userId); removeUser(userId); }; } private static Runnable timeoutCallBack(String userId) { return () -> { logger.info("连接超时:{}", userId); removeUser(userId); }; } private static Consumer<Throwable> errorCallBack(String userId) { return throwable -> { logger.info("连接异常:{}", userId); removeUser(userId); }; } }
测试接口
less
复制代码
@RestController @RequestMapping("/sse") public class SseEmitterController { /** * 用于创建连接 */ @GetMapping("/connect/{userId}") public SseEmitter connect(@PathVariable String userId) { return SseEmitterServer.connect(userId); } @GetMapping("/push/{message}") public ResponseEntity<String> push(@PathVariable(name = "message") String message) { SseEmitterServer.batchSendMessage(message); return ResponseEntity.ok("WebSocket 推送消息给所有人"); } }
html
在resources/static下创建ws.html,将EventSource的地址设为创建连接的地址
xml
复制代码
<!DOCTYPE html> <html lang="en"> <head> <meta charset="UTF-8"> <title>SseEmitter</title> </head> <body> <button onclick="closeSse()">关闭连接</button> <div id="message"></div> </body> <script> let source = null; // 用时间戳模拟登录用户 const userId = new Date().getTime(); if (!!window.EventSource) { // 建立连接 source = new EventSource('http://localhost:8080/sse/connect/' + userId); /** * 连接一旦建立,就会触发open事件 * 另一种写法:source.onopen = function (event) {} */ source.addEventListener('open', function (e) { setMessageInnerHTML("建立连接。。。"); }, false); /** * 客户端收到服务器发来的数据 * 另一种写法:source.onmessage = function (event) {} */ source.addEventListener('message', function (e) { setMessageInnerHTML(e.data); }); /** * 如果发生通信错误(比如连接中断),就会触发error事件 * 或者: * 另一种写法:source.onerror = function (event) {} */ source.addEventListener('error', function (e) { if (e.readyState === EventSource.CLOSED) { setMessageInnerHTML("连接关闭"); } else { console.log(e); } }, false); } else { setMessageInnerHTML("你的浏览器不支持SSE"); } // 监听窗口关闭事件,主动去关闭sse连接,如果服务端设置永不过期,浏览器关闭后手动清理服务端数据 window.onbeforeunload = function () { closeSse(); }; // 关闭Sse连接 function closeSse() { source.close(); const httpRequest = new XMLHttpRequest(); httpRequest.open('GET', 'http://localhost:8080/sse/close/' + userId, true); httpRequest.send(); console.log("close"); } // 将消息显示在网页上 function setMessageInnerHTML(innerHTML) { document.getElementById('message').innerHTML += innerHTML + '<br/>'; } </script> </html>
测试
启动项目,访问网页http://localhost:8080/sse.html建立连接。调用发送信息接口http://localhost:8080/sse/push/hello,查看网页显示信息。文章来源地址https://www.toymoban.com/news/detail-819507.html
到了这里,关于javaWEB消息推送之 WebSocket和SseEmitter的文章就介绍完了。如果您还想了解更多内容,请在右上角搜索TOY模板网以前的文章或继续浏览下面的相关文章,希望大家以后多多支持TOY模板网!


