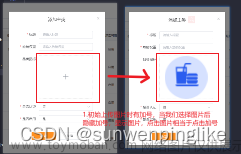
用到的技术栈:
- vue2
- element Ui
- vue-dragging
如何使用:
第一步: 安装
npm install awe-dnd --save
第二步: 引入
main.js 文件
// 引入组件
import VueDND from 'awe-dnd'
// 添加至全局
Vue.use(VueDND)
具体项目代码
<el-form-item label="封面图" prop="region">
    <div style="width: 100%;display: flex;">
       <div class="imgs">
             <!-- 上传后的图片显示在这里 -->
             <!-- : v-dragging="{ item: item, list: coverFileList, group: 'cover' }"
                这种形式进行指令绑定,其中 item 就是单个对象,而 list 则是数据列表,group 则是用来声明一个组,来保证可以在一个页面中进行多个数据源的操作。 -->
             <div :style="{ backgroundImage: 'url(' + item.url + ')' }" v-for="(item, index) in coverFileList"
                v-dragging="{ item: item, list: coverFileList, group: 'cover' }" :key="index">
                <i class="el-icon-circle-close" @click="coverDelete(index)"></i>
             </div>
             <!-- 调用element ui上传组件 -->
             <!-- show-file-list	是否显示已上传文件列表 -->
             <!-- 这里不用组件的显示,用我们自己写的,便于实现拖住 -->
             <el-upload drag :action="action" multiple :name="file_name" :show-file-list="false"
                list-type="picture-card" :on-success="handleAvatarSuccess" :before-upload="beforeAvatarUpload"
                accept=".jpg,.png,.jpeg" :on-error="coverError">
                <span>上传图片</span>
             </el-upload>
         </div>
      </div>
    <div style="font-size: 14px;color: #909399;">注:最多可上传9张图片,单张大小需限制在10M以内,拖动可进行排序</div>
</el-form-item>
<script>
	export default{
		name: 'addResource',
		data(){
			retutn{
				coverFileList: [], //封面图图片集
			}
		},
		methods:{
			//上传成功
			handleAvatarSuccess(res, file){
				if (res.status == 0) {
            		this.$message.error('上传失败');
            		return
         		}
         		let item = Object.assign({ 'name': file.name, 'url': res.data.url })
         		this.coverFileList.push(item);
			},
			//上传文件之前 根据自己业务补充
			 beforeAvatarUpload (file){
			 	//判断上传有没有超过次数限制
			 	//验证图片格式和大小等逻辑
			 },
			 //上传失败函数
			 coverError (err, file, fileList){
			 	this.$message.error('上传失败');
			 },
			 //删除上传的图片
			 coverDelete (index) {
			 	this.coverFileList.splice(index, 1);
			 }
		}
	}
</script>
<style lang="scss" scoped>
 .imgs {
         display: flex;
         flex-wrap: wrap;

         div {
            width: 148px;
            height: 148px;
            border-radius: 6px;
            margin-right: 10px;
            background-size: cover;
            background-repeat: no-repeat;
            // border: 1px solid #c0ccda;
            position: relative;
            margin-bottom: 20px;

            i {
               font-size: 20px;
               position: absolute;
               right: -5px;
               top: -5px;

               &:hover {
                  cursor: pointer;
                  color: #409EFF;
               }
            }
         }
      }
</style>
效果展示:
Video_23-11-13_10-17-30
end~~~文章来源:https://www.toymoban.com/news/detail-821593.html
如有错误或观点不一致的请评论留言共同讨论,本人前端小白一枚,根据自己实际项目遇到的问题进行总结分享,谢谢大家的阅读!文章来源地址https://www.toymoban.com/news/detail-821593.html
到了这里,关于vue+element ui实现图片上传并拖拽进行图片排序的文章就介绍完了。如果您还想了解更多内容,请在右上角搜索TOY模板网以前的文章或继续浏览下面的相关文章,希望大家以后多多支持TOY模板网!


