springboot项目开发,使用thymeleaf前端框架的简单案例!我们看一下,如何在springboot项目里面简单的构建一个thymeleaf的前端页面。来完成动态数据的渲染效果。
第一步,我们在上一小节,已经提前预下载了对应的组件了。
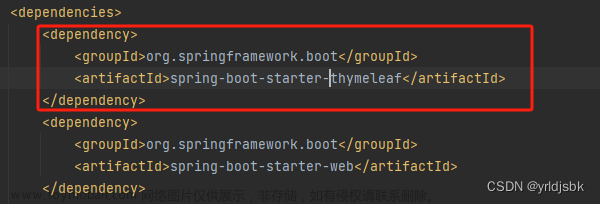
如图,springboot的强大之处就在于,它有一套完整的版本依赖关系。管理很方便。插件彼此之间的依赖,不需要我们再去思考了。它自己会下载所需的依赖包。

在依赖项里面可以看见这个选项,就是下载成功了。
第二步,我们设计一下自己的前端页面的存档路径。
如图,我们在templates文件夹下面新建了一个index的文件夹,里面新建立一个index.html文件。
<!DOCTYPE html>
<html lang="en" xmlns:th="http://www.thymeleaf.org">
<head>
    <meta charset="UTF-8">
    <title>index</title>
</head>
<body>
<div>
    <p>
        <span>用户名字:张三</span>
        <span>用户年龄:21</span>
        <span>用户爱好:骑车,爬山,健身</span>
    </p>

</div>
</body>
</html>
暂时是静态的内容。等会我们会把它改成动态熏染的。
第三步,我们配置一下,thymeleaf基础的参数信息。告诉我们的springboot去哪里渲染我们的内容。
server.port= 8080

#Thymeleaf 基础配置参数
spring.thymeleaf.cache = false
spring.thymeleaf.encoding=UTF-8
spring.thymeleaf.mode=HTML5
spring.thymeleaf.suffix=.html
spring.thymeleaf.prefix=classpath:/templates/
如上内容,这个就是基础的。application.properties里面的thymeleaf参数配置。我们选择了不开启缓存。
第四步,我们提前准备好一个user实体类,存储我们的动态数据,
package com.example.demo.bean;

import java.util.ArrayList;

public class User {
    private String id;
    private String name;
    private String age;
    private ArrayList<String> hobby;

    public String getId() {
        return id;
    }

    public void setId(String id) {
        this.id = id;
    }

    public String getName() {
        return name;
    }

    public void setName(String name) {
        this.name = name;
    }

    public String getAge() {
        return age;
    }

    public void setAge(String age) {
        this.age = age;
    }

    public ArrayList<String> getHobby() {
        return hobby;
    }

    public void setHobby(ArrayList<String> hobby) {
        this.hobby = hobby;
    }

    @Override
    public String toString() {
        return "User{" +
                "id='" + id + '\'' +
                ", name='" + name + '\'' +
                ", age='" + age + '\'' +
                ", hobby=" + hobby +
                '}';
    }
}
第五步,我们新增了一个UserController控制器。还是一个简单的get请求路径。
测试一下。我们的内容能不能渲染到前端页面内。
package com.example.demo.controller;

import com.example.demo.bean.User;
import org.springframework.stereotype.Controller;
import org.springframework.ui.ModelMap;
import org.springframework.web.bind.annotation.GetMapping;
import org.springframework.web.bind.annotation.RequestMapping;
import org.springframework.web.bind.annotation.RestController;

import java.util.ArrayList;

@Controller
@RequestMapping("/user")
public class UserController {
    @GetMapping("/index")
    public String  index(ModelMap model){
        User user = new User();
        user.setId("201212001");
        user.setAge("24");
        user.setName("老刘");
        ArrayList<String> hobbyList = new ArrayList();
        hobbyList.add("瑜伽");
        hobbyList.add("骑马");
        hobbyList.add("看电影");
        user.setHobby(hobbyList);
        model.addAttribute("user",user);
        //输入对应的前端页面的名字index
        return "/index/index";
    }
}
借助于官方提供的ui.modelMap插件可以完成数据的绑定。在前端页面就可以拿到这个数据来渲染了。
<!DOCTYPE html>
<html lang="en" xmlns:th="http://www.thymeleaf.org">
<head>
    <meta charset="UTF-8">
    <title>index</title>
</head>
<body>
<div>
    <p>
        <span th:text="${user.name}"></span>
        <span th:text="${user.age}"></span>
        <span th:text="${user.hobby}"></span>
    </p>

</div>
</body>
</html>
如图,我们已经采取了动态渲染的方式。
看看能不能正常获取到数据。

如图,确实是拿到了数据信息。至此为止,一个简单的thymeleaf前端框架的使用案例就完成了。文章来源:https://www.toymoban.com/news/detail-823150.html
后续我们会分享,如何让springboot配合mysql数据库渲染数据。 文章来源地址https://www.toymoban.com/news/detail-823150.html
到了这里,关于springboot项目开发,使用thymeleaf前端框架的简单案例的文章就介绍完了。如果您还想了解更多内容,请在右上角搜索TOY模板网以前的文章或继续浏览下面的相关文章,希望大家以后多多支持TOY模板网!

