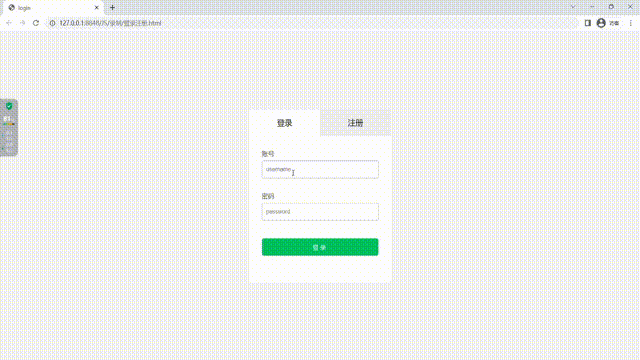
效果演示

实现了一个登录注册页面的切换效果,当用户点击登录或注册按钮时,会出现一个叠加层,其中包含一个表单,用户可以在表单中输入用户名和密码,然后点击提交按钮进行登录或注册。当用户点击返回按钮时,会将叠加层隐藏,并将登录或注册表单显示在主体区域。这个效果可以提高用户体验,让用户更加方便地登录或注册。
Code
<div class="container">
    <!-- 注册 -->
    <div class="container-form container-signup">
        <form action="#" class="form" id="form1">
            <h2 class="form-title">注册账号</h2>
            <input type="text" placeholder="User" class="input" />
            <input type="email" placeholder="Email" class="input" />
            <input type="password" placeholder="Password" class="input" />
            <button type="button" class="btn">点击注册</button>
        </form>
    </div>

    <!-- 登录 -->
    <div class="container-form container-signin">
        <form action="#" class="form" id="form2">
            <h2 class="form-title">欢迎登录</h2>
            <input type="email" placeholder="Email" class="input" />
            <input type="password" placeholder="Password" class="input" />
            <a href="#" class="link">忘记密码?</a>
            <button type="button" class="btn">登录</button>
        </form>
    </div>

    <!-- 叠加层部分 -->
    <div class="container-overlay">
        <div class="overlay">
            <div class="overlay-panel overlay-left">
                <button class="btn" id="signIn">
                    已有账号,直接登录
                </button>
            </div>
            <div class="overlay-panel overlay-right">
                <button class="btn" id="signUp">
                    没有账号,点击注册
                </button>
            </div>
        </div>
    </div>
</div>
body {
    height: 100vh;
    background: #e7e7e7 url("./img/background.jpg") center no-repeat fixed;
    background-size: cover;
    backdrop-filter: blur(5px);
    display: flex;
    justify-content: center;
    align-items: center;
}

/* 主体 div 样式 */
.container {
    background-color: #e7e7e7;
    border-radius: 0.7rem;
    box-shadow: 0 0.9rem 1.7rem rgba(0, 0, 0, 0.25),
        0 0.7rem 0.7rem rgba(0, 0, 0, 0.22);
    height: 420px;
    max-width: 750px;
    overflow: hidden;
    position: relative;
    width: 100%;
}


/* 登录、注册框部分 */
.container-form {
    height: 100%;
    position: absolute;
    top: 0;
    transition: all 0.6s ease-in-out;
}

/* 登录框 - 默认层级高 */
.container-signin {
    left: 0;
    width: 50%;
    z-index: 2;
}

/* 注册框 - 默认层级低 - 透明度 0 */
.container-signup {
    left: 0;
    opacity: 0;
    width: 50%;
    z-index: 1;
}


/* 表单样式 */
.form {
    background-color: #e7e7e7;
    display: flex;
    align-items: center;
    justify-content: center;
    flex-direction: column;
    padding: 0 3rem;
    height: 100%;
    text-align: center;
}

.form-title {
    font-weight: 300;
    margin: 0;
    margin-bottom: 1.25rem;
}


.link {
    color: #333;
    font-size: 0.9rem;
    margin: 1.5rem 0;
    text-decoration: none;
}

.input {
    width: 100%;
    background-color: #fff;
    padding: 0.9rem 0.9rem;
    margin: 0.5rem 0;
    border: none;
    outline: none;
}


.btn {
    background-color: #f25d8e;
    box-shadow: 0 4px 4px rgba(255, 112, 159, .3);
    border-radius: 5px;
    color: #e7e7e7;
    border: none;
    cursor: pointer;
    font-size: 0.8rem;
    font-weight: bold;
    letter-spacing: 0.1rem;
    padding: 0.9rem 4rem;
    text-transform: uppercase;
    transition: transform 80ms ease-in;
}

.form>.btn {
    margin-top: 1.5rem;
}

.btn:active {
    transform: scale(0.95);
}

/* ---------- 叠加部分样式 ------------- */
.container-overlay {
    height: 100%;
    left: 50%;
    overflow: hidden;
    position: absolute;
    top: 0;
    transition: transform 0.6s ease-in-out;
    width: 50%;
    z-index: 100;
}

.overlay {
    width: 200%;
    height: 100%;
    position: relative;
    left: -100%;
    background: url("./img/background.jpg") no-repeat center fixed;
    background-size: cover;
    transition: transform 0.6s ease-in-out;
    transform: translateX(0);
}

.overlay-panel {
    height: 100%;
    width: 50%;
    position: absolute;
    top: 0;
    display: flex;
    justify-content: center;
    align-items: center;
    flex-direction: column;
    transform: translateX(0);
    transition: transform 0.6s ease-in-out;
}

.overlay-left {
    transform: translateX(-20%);
}

.overlay-right {
    right: 0;
    transform: translateX(0);
}

/* 设计激活时叠加层的位置 */
.panel-active .overlay-left {
    transform: translateX(0);
}

.panel-active .container-overlay {
    transform: translateX(-100%);
}

.panel-active .overlay {
    transform: translateX(50%);
}

/* 设置激活时,登录注册层的位置和透明度 */
.panel-active .container-signin {
    transform: translateX(100%);
}

.panel-active .container-signup {
    opacity: 1;
    z-index: 5;
    transform: translateX(100%);
}
实现思路拆分
body {
  height: 100vh; /* 定义页面高度为视口高度 */
  background: #e7e7e7 url("./img/background.jpg") center no-repeat fixed; /* 定义页面背景为灰色,并添加背景图片 */
  background-size: cover; /* 定义背景图片大小为覆盖整个页面 */
  backdrop-filter: blur(5px); /* 定义背景模糊效果 */
  display: flex; /* 定义页面为弹性盒子 */
  justify-content: center; /* 定义主轴对齐方式为居中 */
  align-items: center; /* 定义交叉轴对齐方式为居中 */
}
这段代码定义了页面的整体样式,包括高度、背景、边框、阴影等。其中,height: 100vh; 表示页面高度为视口高度,background: #e7e7e7 url("./img/background.jpg") center no-repeat fixed; 表示页面背景为灰色,并添加背景图片,background-size: cover; 表示背景图片大小为覆盖整个页面,backdrop-filter: blur(5px); 表示背景模糊效果。
.container-form {
  height: 100%; /* 定义容器高度为100% */
  position: absolute; /* 定义容器为绝对定位 */
  top: 0; /* 定义容器距离顶部为0 */
  transition: all 0.6s ease-in-out; /* 定义过渡效果 */
}

.container-signin {
  left: 0; /* 定义登录框距离左侧为0 */
  width: 50%; /* 定义登录框宽度为50% */
  z-index: 2; /* 定义登录框层级为2 */
}

.container-signup {
  left: 0; /* 定义注册框距离左侧为0 */
  opacity: 0; /* 定义注册框透明度为0 */
  width: 50%; /* 定义注册框宽度为50% */
  z-index: 1; /* 定义注册框层级为1 */
}
这段代码定义了登录、注册框的样式,包括位置、透明度、层级等。其中,height: 100%; 表示容器高度为100%,position: absolute; 表示容器为绝对定位,top: 0; 表示容器距离顶部为0,transition: all 0.6s ease-in-out; 表示过渡效果。
.form {
  background-color: #e7e7e7; /* 定义表单背景为灰色 */
  display: flex; /* 定义表单为弹性盒子 */
  align-items: center; /* 定义交叉轴对齐方式为居中 */
  justify-content: center; /* 定义主轴对齐方式为居中 */
  flex-direction: column; /* 定义主轴方向为垂直方向 */
  padding: 0 3rem; /* 定义表单内边距为左右各3rem */
  height: 100%; /* 定义表单高度为100% */
  text-align: center; /* 定义表单文本对齐方式为居中 */
}

.form-title {
  font-weight: 300; /* 定义标题字体粗细为300 */
  margin: 0; /* 定义标题外边距为0 */
  margin-bottom: 1.25rem; /* 定义标题下边距为1.25rem */ }
  .link { color: #333; /* 定义链接颜色为黑色 / font-size: 0.9rem; / 定义链接字体大小为0.9rem / margin: 1.5rem 0; / 定义链接外边距为上下各1.5rem,左右各0 / text-decoration: none; / 定义链接去除下划线 */ }
  .input { width: 100%; /* 定义输入框宽度为100% / background-color: #fff; / 定义输入框背景为白色 / padding: 0.9rem 0.9rem; / 定义输入框内边距为上下各0.9rem,左右各0.9rem / margin: 0.5rem 0; / 定义输入框外边距为上下各0.5rem,左右各0 / border: none; / 定义输入框无边框 / outline: none; / 定义输入框无轮廓线 */ }
  .btn { background-color: #f25d8e; /* 定义按钮背景为粉红色 / box-shadow: 0 4px 4px rgba(255, 112, 159,.3); / 定义按钮阴影效果 / border-radius: 5px; / 定义按钮圆角半径为5px / color: #e7e7e7; / 定义按钮文本颜色为白色 / border: none; / 定义按钮无边框 / cursor: pointer; / 定义按钮为指针类型 / font-size: 0.8rem; / 定义按钮字体大小为0.8rem / font-weight: bold; / 定义按钮字体粗细为bold / letter-spacing: 0.1rem; / 定义按钮字母间距为0.1rem / padding: 0.9rem 4rem; / 定义按钮内边距为上下各0.9rem,左右各4rem / text-transform: uppercase; / 定义按钮文本为大写字母 / transition: transform 80ms ease-in; / 定义按钮过渡效果 */ }
  .form>.btn { margin-top: 1.5rem; /* 定义按钮上边距为1.5rem */ }
  .btn:active { transform: scale(0.95); /* 定义按钮激活时缩放效果 */}
这段代码定义了登录和注册表单的样式,包括背景、字体、输入框、按钮等。其中,background-color: #e7e7e7; 表示表单背景为灰色,display: flex; 表示表单为弹性盒子,align-items: center; 表示交叉轴对齐方式为居中,justify-content: center; 表示主轴对齐方式为居中,flex-direction: column; 表示主轴方向为垂直方向,padding: 0 3rem; 表示表单内边距为左右各3rem,height: 100%; 表示表单高度为100%,text-align: center; 表示表单文本对齐方式为居中。文章来源:https://www.toymoban.com/news/detail-823638.html
.container-overlay {
    height: 100%;
    /* 定义容器高度为100% / left: 50%; / 定义容器距离左侧为50% / overflow: hidden; / 定义容器溢出部分隐藏 / position: absolute; / 定义容器为绝对定位 / top: 0; / 定义容器距离顶部为0 / transition: transform 0.6s ease-in-out; / 定义过渡效果 / width: 50%; / 定义容器宽度为50% / z-index: 100; / 定义容器层级为100 */
}

.overlay {
    width: 200%;
    /* 定义叠加层宽度为200% / height: 100%; / 定义叠加层高度为100% / position: relative; / 定义叠加层为相对定位 / left: -100%; / 定义叠加层距离左侧为-100% / background: url("./img/background.jpg") no-repeat center fixed; / 定义叠加层背景为背景图片,并居中对齐 / background-size: cover; / 定义叠加层背景大小为覆盖整个页面 / transition: transform 0.6s ease-in-out; / 定义过渡效果 / transform: translateX(0); / 定义叠加层初始位置为0 */
}

.overlay-panel {
    height: 100%;
    /* 定义叠加层面板高度为100% / width: 50%; / 定义叠加层面板宽度为50% / position: absolute; / 定义叠加层面板为绝对定位 / top: 0; / 定义叠加层面板距离顶部为0 / display: flex; / 定义叠加层面板为弹性盒子 / justify-content: center; / 定义主轴对齐方式为居中 / align-items: center; / 定义交叉轴对齐方式为居中 / flex-direction: column; / 定义主轴方向为垂直方向 / transform: translateX(0); / 定义叠加层面板初始位置为0 / transition: transform 0.6s ease-in-out; / 定义过渡效果 */
}

.overlay-left {
    transform: translateX(-20%);
    /* 定义左侧叠加层面板位置为向左移动20% */
}

.overlay-right {
    right: 0;
    /* 定义右侧叠加层面板距离右侧为0 / transform: translateX(0); / 定义右侧叠加层面板位置为0 */
}

/* 设计激活时叠加层的位置 / .panel-active.overlay-left { transform: translateX(0); / 定义左侧叠加层面板位置为0 */
}

.panel-active.container-overlay {
    transform: translateX(-100%);
    /* 定义容器距离左侧为-100% */
}

.panel-active.overlay {
    transform: translateX(50%);
    /* 定义叠加层位置为向右移动50% */
}

/* 设置激活时,登录注册层的位置和透明度 / .panel-active.container-signin { transform: translateX(100%); / 定义登录层位置为向右移动100% */
}

.panel-active.container-signup {
    opacity: 1;
    /* 定义注册层透明度为1 / z-index: 5; / 定义注册层层级为5 / transform: translateX(100%); / 定义注册层位置为向右移动100% */
}
这段代码定义了登录和注册页面的叠加层的样式,包括位置、大小、透明度、层级等。其中,height: 100%; 表示容器高度为100%,left: 50%; 表示容器距离左侧为50%,overflow: hidden; 表示容器溢出部分隐藏,position: absolute; 表示容器为绝对定位,top: 0; 表示容器距离顶部为0,transition: transform 0.6s ease-in-out; 表示过渡效果,width: 50%; 表示容器宽度为50%,z-index: 100; 表示容器层级为100。
居中对齐,background-size: cover; 表示叠加层背景大小为覆盖整个页面,transition: transform 0.6s ease-in-out; 表示过渡效果,transform: translateX(0); 表示叠加层初始位置为0。
叠加层面板的样式包括叠加层面板的高度、宽度、位置、显示方式、对齐方式、主轴方向、过渡效果、初始位置等。其中,height: 100%; 表示叠加层面板高度为100%,width: 50%; 表示叠加层面板宽度为50%,position: absolute; 表示叠加层面板为绝对定位,top: 0; 表示叠加层面板距离顶部为0,display: flex; 表示叠加层面板为弹性盒子,justify-content: center; 表示主轴对齐方式为居中,align-items: center; 表示交叉轴对齐方式为居中,flex-direction: column; 表示主轴方向为垂直方向,transform: translateX(0); 表示叠加层面板初始位置为0,transition: transform 0.6s ease-in-out; 表示过渡效果。
叠加层面板的左侧和右侧样式分别定义为 overlay-left 和 overlay-right,分别表示左侧和右侧叠加层面板的样式。其中,transform: translateX(-20%); 表示左侧叠加层面板位置为向左移动20%,right: 0; 表示右侧叠加层面板距离右侧为0,transform: translateX(0); 表示右侧叠加层面板位置为0。
当激活时,叠加层的位置和透明度会发生变化,包括左侧叠加层面板位置、容器距离左侧、叠加层位置、注册层透明度、注册层位置等。其中,.panel-active.overlay-left 表示当激活时,左侧叠加层面板位置为0,.panel-active.container-overlay 表示当激活时,容器距离左侧为-100%,.panel-active.overlay 表示当激活时,叠加层位置为向右移动50%,.panel-active.container-signin 表示当激活时,登录层位置为向右移动100%,.panel-active.container-signup 表示当激活时,注册层透明度为1,注册层层级为5,注册层位置为向右移动100%。文章来源地址https://www.toymoban.com/news/detail-823638.html
到了这里,关于HTML+CSS:炫酷登录切换的文章就介绍完了。如果您还想了解更多内容,请在右上角搜索TOY模板网以前的文章或继续浏览下面的相关文章,希望大家以后多多支持TOY模板网!


![[HTML]Web前端开发技术16(HTML5、CSS3、JavaScript )表格课后练习网页标题:域标签的使用网页标题:美家装饰联系我们网页标题:登录界面网页标题问卷调查——喵喵画网页](https://imgs.yssmx.com/Uploads/2024/01/820808-1.png)