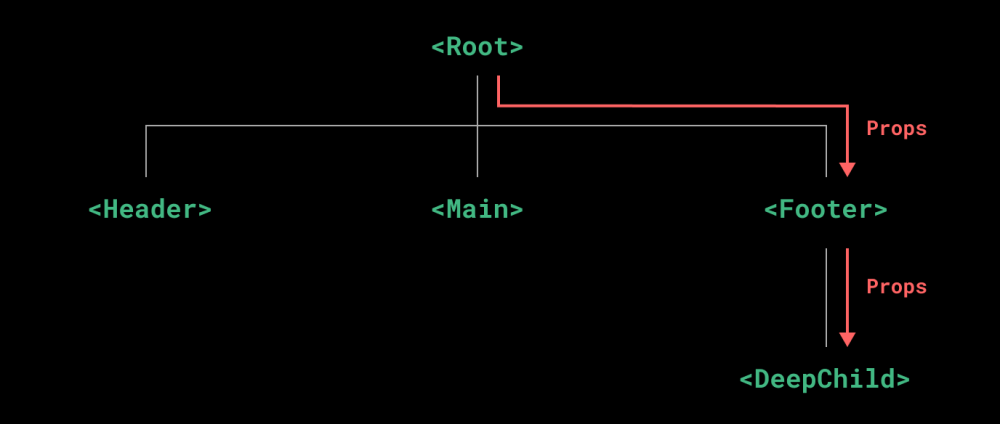
一、props方式:父<->子通信
适用于: 父向子传递参数、方法, 子触发父传递的方法
props方式组件通信和vue2中的props传参类似,只是使用方式和接收方式有一些区别。
注意点: 通过props方式传递的参数为只读属性,不可修改
父组件
<template>
  <div class="">
    <h3>父组件</h3>
    <Children :car="car" :sendToyFn="getChildToyFn"/>
  </div>
</template>

<script setup lang="ts">
import { ref } from 'vue'
import Children from "./children.vue";
let car = ref('小绵羊')
function getChildToyFn(val:string){
  console.log('父拿到的:',val);
}
</script>
子组件
<template>
  <div class="">
    <h3>子组件</h3>
    <p>玩具:{{ toy }}</p>
    <p>父亲的车:{{ car }}</p>
    <button @click="sendToyFn(toy)">把玩具给父亲</button>
  </div>
</template>

<script setup lang="ts">
import { ref } from 'vue'
let toy = ref('哑铃')
// 声明接收  如果要在script标签中使用接收的参数,就必须先接收defineProps的返回值
let props = defineProps(['car','sendToyFn'])
// console.log(car); // 不能拿到接收的car
console.log(props.car)

</script>
<style lang="scss" scoped>

</style>
二、自定义事件:子->父通信
// 父组件
<Children @set-toy-fn="getToyFn"/>
// 子组件
// 通过 defineEmits 接收父组件传递来的方法
const emit = defineEmits(['set-toy-fn'])
// 调用方法 emit('方法名',参数1,参数2...)
emit('set-toy-fn','玩具')
三、mitt方式:任意组件通信
1、首先要安装 npm i mitt
2、在src/utils/下新建文件 emitter.ts(可自定义文件位置以及命名)
3、在emitter.ts文件中引入、创建、导出mitt
import mitt from "mitt";
// 调用mitt得到emitter ,emitter能绑定事件、触发事件
const emiiter = mitt()
// 四个api:  all-操作所有事件 emit-触发事件 off-解绑事件 on-绑定某一个事件
export default emiiter
4、在组件中使用
组件A :绑定事件-接收数据
import { ref } from 'vue'
import emitter from "@/utils/emitter.ts";
let num = ref(0)
// 绑定事件
emitter.on('getData',(data)=>{
  num.value ++
  console.log('拿到了数据:',data);
  if(num.value==3){
    emitter.off('getData');// 解除绑定
  }
})
组件B:触发事件-传递数据
import { ref,reactive } from 'vue'
import emitter from "@/utils/emitter.ts";

let info = reactive({
  userName:'张三',
  userId:'007'
})
let toy = ref('小猪佩奇')
function toData() {
  // 触发事件并传递参数
  emitter.emit('getData',{info ,toy})

}
四、v-model传参:父<->子通信
这种方式可以参考Vue3-在HTML标签、组件标签上使用v-model,这里就不再详述
五、$attrs:父->子->孙
$attrs:父组件通过props向子组件传参时,子组件未声明接收的值。通过$attrs接收到的参数是只读的
父组件
<template>
  <div class="">
    <p>父组件</p>
    <p>b:{{ b }}</p>
    <Children v-bind="{a,b,c,d,addA}"/>
    <!-- 这种写法相当于 -->
    <!-- <Children :a="a" :b="b" :c="c" :d="d" :addA="addA"/> -->
  </div>
</template>

<script setup lang="ts">
import { ref } from 'vue'
import Children from "./children.vue";
let a = ref(1)
let b = ref(2)
let c = ref(3)
let d = ref(4)
function addA(num:number=1){
  a.value += num
}
</script>
子组件
// 子组件  在子组件中不对父组件传递的参数做任何操作
// 传递的方法值不在页面中显示 但是可以直接通过 $attrs.方法名 调用
<template>
  <div class="">
    <p>子组件</p>
    {{ $attrs }} // { "a": 1, "b": 2, "c": 3, "d": 4 }
    {{ $attrs.addA }} // function addA(num = 1) { a.value += num; }
    <hr/>
    <GrandChild v-bind="$attrs"/>
  </div>
</template>

<script setup lang="ts">
import GrandChild from "./grandChild.vue";

</script>
<style lang="scss" scoped>

</style>
孙组件
<template>
  <div class="">
    <p>孙组件</p>
    <p>$attrs的值:{{$attrs}}</p> // { "b": 2, "c": 3, "d": 4 }
    <button @click="(<Function>$attrs.addA)(2)">触发父组件方法</button> // 此处为ts的类型断言,ts不能确定$attrs上面的addA是一个方法
  </div>
</template>

<script setup lang="ts">
import {  } from 'vue'

defineProps(['a'])
</script>
<style lang="scss" scoped>

</style>
六、$refs、$parent:父<->子通信
注意:此种方式只能在组件模板中拿到$refs和$parent的值。并且$refs获取不到孙组件
1、$refs获取所有子组件
父组件 :在组件模板中拿到$refs并当做参数传递使用
<template>
  <div class="">
    <p>父组件sum值:{{ sum }}</p>
    <button @click="getAllRefs($refs)">获取所有子组件ref</button>
    <Children ref="c1"/>
    <Children2 ref="c2"/>
  </div>
</template>

<script setup lang="ts">
import { ref } from 'vue'
import Children from "./children.vue";
import Children2 from "./children2.vue";
let c1 = ref()
let c2 = ref()
let sum = ref(1)
function getAllRefs(refs:any){// 调用方法时需要传 $refs
  console.log(refs,'所有子组件');
  // 可以直接通过 refs.子组件名来操作子组件暴露出来的数据
}
// 暴露数据
defineExpose({sum})
</script>
<style lang="scss" scoped>

</style>
2、$parent获取父组件
<template>
  <div class="">
    <p>子组件sum值:{{ sum }}</p>
    <button @click="getParent($parent)">获取父组件</button>
  </div>
</template>

<script setup lang="ts">
import { ref } from 'vue'
let toy = ref('奥特曼')

function getParent(parent:any){// 调用方法时需要传 $parent
  console.log('父组件',parent);
  // 可以直接通过 parent.属性名 来操作父组件暴露出的数据
}
// 暴露数据
defineExpose({toy})
</script>
七、provide-inject:父->子->孙
说明:父组件通过provide暴露数据,任意一级子组件都可以直接通过inject获取数据,数据为响应式
1、provide传递数据
注意:通过provide传递ref定义的数据时,不要加 .value 否则数据会失去响应式
import { provide, reactive } from 'vue'
import Children from "./children.vue";
let info = reactive({
  label:'父组件',
  str:'数据'
})
function changeInfo(){
  info.str += '-小猪'
}
//格式 provide('参数名',参数值)
provide('provideData',{info,changeInfo})
2、任意子组件通过inject接收数据
// 格式 inject('接收的参数名',参数的默认值) // 默认值可有可无 有函数或对象类型时建议写
// let {info,changeInfo} =inject('parentData')
let {info,changeInfo} = inject('parentData',{info:{str:'',label:''},changeInfo:()=>{}})

function changParentInfo(){
  // 可以直接对接收到的值进行修改,数据是响应式的
  info.str+='-大猪'
}
八、slot
1、默认插槽
父组件-在子组件标签中编写需要插入的代码
<Category>
  <p>数据</p>
</Category>
子组件-写slot标签标识插槽的位置(如果父组件未传递插槽内容,就会显示slot中的默认内容)
<template>
  <div class="">
    <slot><p>默认内容</p></slot>
  </div>
</template>
2、具名插槽
父组件 :给插槽内容命名,插入到指定name的slot标签中,如果没有对应name的标签就不插入
// 命名方式 v-slot:插槽名 或 #插槽名
// 写法一:直接在组件标签上命名  不推荐
<Category #:cName>
  <p>数据1</p>
</Category>
// 写法二:在template上命名
<Category>
  <template #:cName>
    <p>数据2</p>
  </template>
  <template #:xxx>
    <p>数据2</p>
  </template>
</Category>
子组件:给slot标签加上name作为标识
<template>
  <div class="">
    <slot name="xxx"><p>默认内容</p></slot>
  </div>
  <div class="">
    <slot name="cName"><p>默认内容</p></slot>
  </div>
</template>
3、插槽传值:子->父
子组件
<template>
  <div class="category">
    <div class="content">
      <slot name="c1" :str="str" a="哈哈">c1默认内容</slot>
    </div>
  </div>
</template>

<script setup lang="ts">
import { ref } from 'vue'

let str = ref('字符串str')

</script>
父组件
<Category title="热门城市">
  <template #c2="params">
    <p>插槽传递的参数:{{ params }}</p> //params={ "str": "字符串str", "a": "哈哈" }
  </template>
</Category>
九、Pinia:任意组件通信
1、安装 npm install pinia
2、引入
在main.ts文件中修改
import { createApp } from "vue";
import App from "./App.vue";

import { createPinia } from "pinia";
const pinia = createPinia()

const myApp = createApp(App)
myApp.use(pinia)
myApp.mount('#app')
3、创建/src/store/xxx.ts
①、基础写法
import { defineStore } from "pinia";

// 基础写法
export const useCountStore = defineStore('count',{
  state(){
    return {
      sum:6,//在组件中使用时可以直接修改
    }
  },
  getters:{
    bigSum(state){
      return state.sum*3
    }
  },
  actions:{
    addSum(val:number){
      this.sum+=val
    },
  },
})
②、进阶写法(常用)
import { defineStore } from "pinia";
import { ref } from 'vue'
export default defineStore('text',()=>{
  let sum = ref(6)
  function addSum(val:number){
    sum.value+=val
  }
  let bigSum = computed(()=>{
    return sum.value*3
  })
  return {sum,addSum,bigSum }
})
4、在代码中使用
父组件文章来源:https://www.toymoban.com/news/detail-824886.html
<template>
  <div class="">
    <h3>Pinia</h3>
    <p>当前sun值:{{ sumStore.sum }}。bigSum:{{sumStore.bigSum}}</p>
    <childrenCount/>
  </div>
</template>

<script setup lang="ts">
import childrenCount from "./children/08-pinia-count.vue";
import childrenText from "./children/08-pinia-text.vue";
import useSumStore from "@/store/count";
import { ref,reactive } from "vue";
const sumStore = useSumStore ()
// 监听store中的数据变化,类似于watch
sumStore .$subscribe((mutate,state)=>{
  // mutate:本次修改数据,state:store中的state
  console.log(mutate,state,'数据变化了');
})

</script>
子组件文章来源地址https://www.toymoban.com/news/detail-824886.html
<template>
  <div class="">
    <h4>组件一</h4>
    <button @click="addSum">增加sum值</button>
    <button @click="jianSum">减少sum值</button>
  </div>
</template>

<script setup lang="ts">
import { useCountStore } from "@/store/count";
import { storeToRefs } from "pinia";
const countStore = useCountStore()
// 解构pinia中的数据时,使用 storeToRefs
let {sum} = storeToRefs(countStore)

function addSum(){
  // 可以直接修改通过pinia定义的数据
  // 第一种修改方式  单个修改
  // countStore.sum++
  // 第二种修改方式  批量修改
  // countStore.$patch({
  //   sum:9,
  // })
  countStore.addSum(3)
}
function jianSum(){
  sum --
}
</script>
到了这里,关于Vue3组件通信相关内容整理的文章就介绍完了。如果您还想了解更多内容,请在右上角搜索TOY模板网以前的文章或继续浏览下面的相关文章,希望大家以后多多支持TOY模板网!


