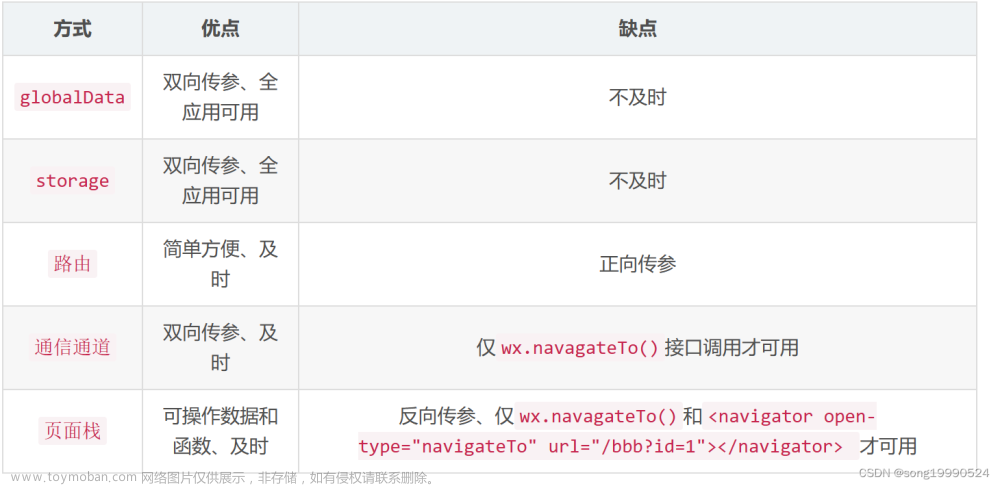
在uniapp中,页面传参是非常常见的需求。本文将详细讲解uniapp中页面传参的传递方式和接受方式,以及使用案例,同时附上代码注释。
一、传递方式
1. URL传参
URL传参是一种比较简单的传递方式,它是通过URL地址来传递参数的。我们可以在URL地址后面加上参数,例如:
<uni-button @click="goToDetail">跳转到详情页</uni-button>//编程式传参  比较常用
<navigator url="/pages/detail/detail?id=123">跳转到详情页</navigator>//标签传参
// 跳转到详情页,并传递id参数
goToDetail() {
  uni.navigateTo({
    url: '/pages/detail/detail?id=123'
  })
}
在接收页面中,我们可以通过this.$route.query来获取传递的参数:
export default {
  onLoad() {
    console.log(this.$route.query.id) // 输出:123
  }
}
对于微信小程序 this.$ route.query.id 可能不能使用 因为微信小程序不识别 this.$ route
而替代方案
不使用this.$ route 使用 onload传参
onLoad(getData) {//getData就是参数对象  兼用微信小程序
	console.log(getData.id);
}
2. Storage传参
Storage传参是通过uni-app提供的Storage API来传递参数的。我们可以在跳转之前将参数存储到Storage中,然后在接收页面中获取:
<uni-button @click="goToDetail">跳转到详情页</uni-button>

// 跳转到详情页,并将id参数存储到Storage中
goToDetail() {
  uni.setStorageSync('id', 123)
  uni.navigateTo({
    url: '/pages/detail/detail'
  })
}
在接收页面中,我们可以通过uni.getStorageSync来获取存储的参数:
export default {
  onLoad() {
    console.log(uni.getStorageSync('id')) // 输出:123
  }
}
3. Vuex传参
Vuex传参是通过uni-app提供的Vuex API来传递参数的。我们可以在跳转之前将参数存储到Vuex中,然后在接收页面中获取:
<uni-button @click="goToDetail">跳转到详情页</uni-button>

// 跳转到详情页,并将id参数存储到Vuex中
goToDetail() {
  uni.$emit('setId', 123)
  uni.navigateTo({
    url: '/pages/detail/detail'
  })
}
在Vuex中,我们可以定义一个state来存储参数:
const store = new Vuex.Store({
  state: {
    id: ''
  },
  mutations: {
    setId(state, id) {
      state.id = id
    }
  }
})
在接收页面中,我们可以通过mapState来获取存储的参数:
import { mapState } from 'vuex'

export default {
  computed: {
    ...mapState(['id'])
  },
  onLoad() {
    console.log(this.id) // 输出:123
  }
}
4.api传参eventChannel
api传参是通过uni-app提供的API来传递参数的。我们可以在跳转之前将参数存储到options中,例如:
<uni-button @click="goToDetail">跳转到详情页</uni-button>

// 跳转到详情页,并传递id参数
goToDetail() {
  uni.navigateTo({
    url: '/pages/detail/detail',
    success: (res) => {
      res.eventChannel.emit('acceptDataFromOpenerPage', { id: 123 })
    }
  })
}
在这个例子中,我们使用了eventChannel来传递参数。我们在跳转之前,通过success回调函数来获取eventChannel,然后通过emit方法来传递参数。
在api传参的方式中,我们可以通过uni.on来监听传递的参数:
export default {
  onLoad() {
    const eventChannel = this.getOpenerEventChannel()
    eventChannel.on('acceptDataFromOpenerPage', (data) => {
      console.log(data.id) // 输出:123
    })
  }
}
在这个例子中,我们通过getOpenerEventChannel方法来获取eventChannel,然后通过on方法来监听传递的参数。
二、接受方式
1. URL传参
在URL传参的方式中,我们可以通过this.$route.query来获取传递的参数:
export default {
  onLoad() {
    console.log(this.$route.query.id) // 输出:123
  }
}
2. Storage传参
在Storage传参的方式中,我们可以通过uni.getStorageSync来获取存储的参数:
export default {
  onLoad() {
    console.log(uni.getStorageSync('id')) // 输出:123
  }
}
3. Vuex传参
在Vuex传参的方式中,我们可以通过mapState来获取存储的参数:
import { mapState } from 'vuex'

export default {
  computed: {
    ...mapState(['id'])
  },
  onLoad() {
    console.log(this.id) // 输出:123
  }
}
4.api传参eventChannel
在api传参的方式中,我们可以通过uni.on来监听传递的参数:
export default {
  onLoad() {
    const eventChannel = this.getOpenerEventChannel()
    eventChannel.on('acceptDataFromOpenerPage', (data) => {
      console.log(data.id) // 输出:123
    })
  }
}
在这个例子中,我们通过getOpenerEventChannel方法来获取eventChannel,然后通过on方法来监听传递的参数。
三、使用案例
下面是一个完整的使用案例,包括传递和接收参数的方式:
// pages/index/index.vue
<template>
  <view>
    <uni-button @click="goToDetail">跳转到详情页</uni-button>
  </view>
</template>

<script>
export default {
  methods: {
    goToDetail() {
      // URL传参
      // uni.navigateTo({
      //   url: '/pages/detail/detail?id=123'
      // })

      // Storage传参
      // uni.setStorageSync('id', 123)
      // uni.navigateTo({
      //   url: '/pages/detail/detail'
      // })

      // Vuex传参
      uni.$emit('setId', 123)
      uni.navigateTo({
        url: '/pages/detail/detail'
      })
    }
  }
}
</script>

// pages/detail/detail.vue
<template>
  <view>
    <text>{{ id }}</text>
  </view>
</template>

<script>
import { mapState } from 'vuex'

export default {
  computed: {
    ...mapState(['id'])
  },
  onLoad() {
    // URL传参
    // console.log(this.$route.query.id)

    // Storage传参
    // console.log(uni.getStorageSync('id'))

    // Vuex传参
    // console.log(this.id)
  }
}
</script>

// store/index.js
import Vue from 'vue'
import Vuex from 'vuex'

Vue.use(Vuex)

const store = new Vuex.Store({
  state: {
    id: ''
  },
  mutations: {
    setId(state, id) {
      state.id = id
    }
  }
})

uni.$on('setId', id => {
  store.commit('setId', id)
})

export default store
以上就是uniapp中页面传参的传递方式和接受方式的详细讲解,以及使用案例和代码注释。希望对大家有所帮助!
四.提醒
以上的页面传参方式中文章来源:https://www.toymoban.com/news/detail-825971.html
- URL传参
- Storage传参
比较常用 可以满足大家的开发需求
另外的传参方式 看场景和需求在做处理
希望对你有所帮助文章来源地址https://www.toymoban.com/news/detail-825971.html
到了这里,关于[uniapp的页面传参]详细讲解uniapp中页面传参的传递方式和接受方式 使用案例 代码注释的文章就介绍完了。如果您还想了解更多内容,请在右上角搜索TOY模板网以前的文章或继续浏览下面的相关文章,希望大家以后多多支持TOY模板网!


