①首先写一个登录页面
<template>
<div style="background-color: #42b983;display: flex;align-items: center;justify-content: center;height: 100vh">
  <div style="background-color: white;display: flex;width: 50%;height: 50%;overflow: hidden;border-radius: 5px">
    <div style="flex:1">
      <img src="@/assets/login.png" style="width: 100%">
    </div>
    <div style="flex: 1;display: flex;justify-content: center;align-items: center">
      <el-form style="width: 80%" :model="user">
        <div style="font-weight: bold;font-size: 20px;margin-bottom: 20px">
          欢迎登录后台管理系统
        </div>
        <el-form-item>
          <el-input placeholder="请输入用户名" prefix-icon="el-icon-user" v-model="user.username"></el-input>
        </el-form-item>
        <el-form-item>
          <el-input placeholder="请输入密码" prefix-icon="el-icon-lock" v-model="user.password" show-password></el-input>
        </el-form-item>
        <el-form-item>
          <el-input placeholder="请输入验证码" prefix-icon="el-icon-circle-check" v-model="user.validcode"></el-input>
        </el-form-item>
        <el-form-item>
          <el-button type="primary" style="width: 100%">登录</el-button>
        </el-form-item>
        <div style="display: flex">
          <div style="flex: 1">还没账号?去<span style="color: #42b983;cursor: pointer">注册</span></div>
          <div style="text-align: right;flex: 1;color: #42b983;cursor:pointer;">忘记密码</div>
        </div>
      </el-form>
    </div>
  </div>
</div>
</template>
<script>
export default {
  data(){
    return{
      user:{
        username:'',
        password:'',
        validcode:''
      }
    }
  }
}
</script>
<style scoped>

</style>
大致效果:

②引入验证码组件
在component目录下新建一个ValidCode.vue:

<template>
  <div class="ValidCode disabled-select" style="width: 100%; height: 100%" @click="refreshCode">
    <span v-for="(item, index) in codeList" :key="index" :style="getStyle(item)">{{item.code}}</span>
  </div>
</template>

<script>
export default {
  name: 'validCode',
  data () {
    return {
      length: 4,
      codeList: []
    }
  },
  mounted () {
    this.createdCode()
  },
  methods: {
    refreshCode () {
      this.createdCode()
    },
    createdCode () {
      let len = this.length,
          codeList = [],
          chars = 'ABCDEFGHJKMNPQRSTWXYZabcdefhijkmnprstwxyz0123456789',
          charsLen = chars.length
      // 生成
      for (let i = 0; i < len; i++) {
        let rgb = [Math.round(Math.random() * 220), Math.round(Math.random() * 240), Math.round(Math.random() * 200)]
        codeList.push({
          code: chars.charAt(Math.floor(Math.random() * charsLen)),
          color: `rgb(${rgb})`,
          padding: `${[Math.floor(Math.random() * 10)]}px`,
          transform: `rotate(${Math.floor(Math.random() * 90) - Math.floor(Math.random() * 90)}deg)`
        })
      }
      // 指向
      this.codeList = codeList
      // 将当前数据派发出去
      this.$emit('update:value', codeList.map(item => item.code).join(''))
    },
    getStyle (data) {
      return `color: ${data.color}; font-size: ${data.fontSize}; padding: ${data.padding}; transform: ${data.transform}`
    }
  }
}
</script>

<style>
.ValidCode{
  display: flex;
  justify-content: center;
  align-items: center;
  cursor: pointer;
}
.ValidCode span {
  display: inline-block;
  font-size: 18px;
}
</style>
在登录页引入:
<template>
<div style="background-color: #42b983;display: flex;align-items: center;justify-content: center;height: 100vh">
  <div style="background-color: white;display: flex;width: 50%;height: 50%;overflow: hidden;border-radius: 5px">
    <div style="flex:1">
      <img src="@/assets/login.png" style="width: 100%">
    </div>
    <div style="flex: 1;display: flex;justify-content: center;align-items: center">
      <el-form style="width: 80%" :model="user">
        <div style="font-weight: bold;font-size: 20px;margin-bottom: 20px">
          欢迎登录后台管理系统
        </div>
        <el-form-item>
          <el-input placeholder="请输入用户名" prefix-icon="el-icon-user" v-model="user.username"></el-input>
        </el-form-item>
        <el-form-item>
          <el-input placeholder="请输入密码" prefix-icon="el-icon-lock" v-model="user.password" show-password></el-input>
        </el-form-item>
        <el-form-item>
          <div style="display: flex">
            <el-input placeholder="请输入验证码" prefix-icon="el-icon-circle-check" v-model="user.validCode" style="flex: 1"></el-input>
            <div style="flex: 1;height: 32px">
              <valid-code @update:value="getCode"></valid-code>
            </div>
          </div>
        </el-form-item>
        <el-form-item>
          <el-button type="primary" style="width: 100%">登录</el-button>
        </el-form-item>
        <div style="display: flex">
          <div style="flex: 1">还没账号?去<span style="color: #42b983;cursor: pointer">注册</span></div>
          <div style="text-align: right;flex: 1;color: #42b983;cursor:pointer;">忘记密码</div>
        </div>
      </el-form>
    </div>
  </div>
</div>
</template>
<script>
import ValidCode from "@/components/ValidCode.vue";

export default {
  name:'login-demo',
  components:{
    ValidCode
  },
  data(){
    return{
      code:'',
      user:{
        username:'',
        password:'',
        validCode:''
      }
    }
  },
  methods:{
    getCode(code){
      this.code=code
    }
  }
}
</script>
<style scoped>

</style>
效果图(可以看到多了验证码):

③springboot搭建后端接口
首先准备数据库:

CREATE TABLE `user` (
`id` int(11) NOT NULL AUTO_INCREMENT,
`username` varchar(255) COLLATE utf8mb4_unicode_ci DEFAULT NULL COMMENT '用户名',
`password` varchar(255) COLLATE utf8mb4_unicode_ci DEFAULT NULL COMMENT '密码',
`name` varchar(255) COLLATE utf8mb4_unicode_ci DEFAULT NULL COMMENT '姓名',
`phone` varchar(255) COLLATE utf8mb4_unicode_ci DEFAULT NULL COMMENT '电话',
`email` varchar(255) COLLATE utf8mb4_unicode_ci DEFAULT NULL COMMENT '邮箱',
`address` varchar(255) COLLATE utf8mb4_unicode_ci DEFAULT NULL COMMENT '地址',
`avatar` varchar(255) COLLATE utf8mb4_unicode_ci DEFAULT NULL COMMENT '头像',
PRIMARY KEY (`id`)
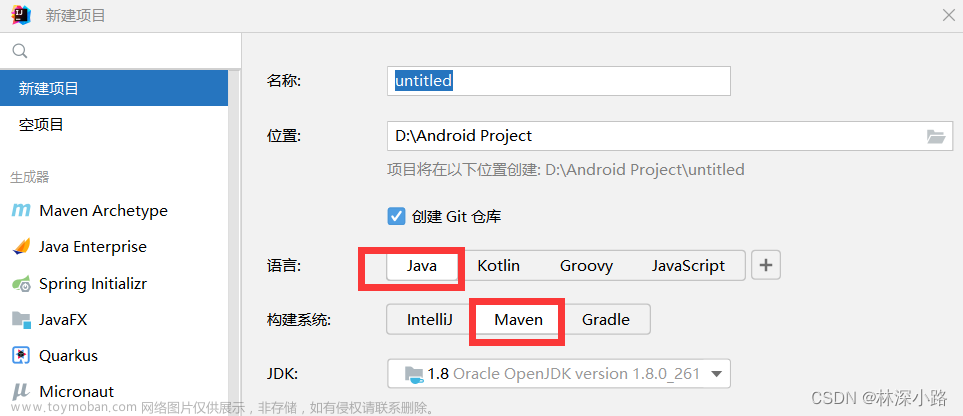
) ENGINE=InnoDB DEFAULT CHARSET=utf8mb4 COLLATE=utf8mb4_unicode_ci COMMENT='用户表';用IDEA创建springboot工程:
创建springboot教程

连接数据库:
application.yml:
server:
  port: 9090
spring:
  datasource:
    driver-class-name: com.mysql.cj.jdbc.Driver
    url: jdbc:mysql://localhost:3306/honey2024?useSSL=false&useUnicode=true&characterEncoding=UTF-8&serverTimezone=GMT%2b8
    username: root
    password: 123456
目录结构:
按照该目录创建文件夹

CorsConfig:解决跨域问题
package com.example.springboot.common;

import org.springframework.context.annotation.Bean;
import org.springframework.context.annotation.Configuration;
import org.springframework.web.cors.CorsConfiguration;
import org.springframework.web.cors.UrlBasedCorsConfigurationSource;
import org.springframework.web.filter.CorsFilter;

@Configuration
public class CorsConfig {

    // 当前跨域请求最大有效时长。这里默认1天
    private static final long MAX_AGE = 24 * 60 * 60;

    @Bean
    public CorsFilter corsFilter() {
        UrlBasedCorsConfigurationSource source = new UrlBasedCorsConfigurationSource();
        CorsConfiguration corsConfiguration = new CorsConfiguration();
        corsConfiguration.addAllowedOrigin("*"); // 1 设置访问源地址
        corsConfiguration.addAllowedHeader("*"); // 2 设置访问源请求头
        corsConfiguration.addAllowedMethod("*"); // 3 设置访问源请求方法
        corsConfiguration.setMaxAge(MAX_AGE);
        source.registerCorsConfiguration("/**", corsConfiguration); // 4 对接口配置跨域设置
        return new CorsFilter(source);
    }
}
Result:返回数据
package com.example.springboot.common;

import lombok.AllArgsConstructor;
import lombok.Builder;
import lombok.Data;
import lombok.NoArgsConstructor;

/**
 * 接口统一返回包装类
 * 作者:程序员青戈
 */
@Data
@AllArgsConstructor
@NoArgsConstructor
@Builder
public class Result {

    public static final String CODE_SUCCESS = "200";
    public static final String CODE_AUTH_ERROR = "401";
    public static final String CODE_SYS_ERROR = "500";

    private String code;
    private String msg;
    private Object data;


    public static Result success() {
        return new Result(CODE_SUCCESS, "请求成功", null);
    }

    public static Result success(Object data) {
        return new Result(CODE_SUCCESS, "请求成功", data);
    }

    public static Result error(String msg) {
        return new Result(CODE_SYS_ERROR, msg, null);
    }

    public static Result error(String code, String msg) {
        return new Result(code, msg, null);
    }

    public static Result error() {
        return new Result(CODE_SYS_ERROR, "系统错误", null);
    }

}
WebController(controller文件夹下只用写这个):控制登录和注册接口
package com.example.springboot.controller;

import cn.hutool.core.util.StrUtil;
import com.example.springboot.common.Result;
import com.example.springboot.entity.User;
import com.example.springboot.exception.ServiceException;
import com.example.springboot.service.UserService;
import org.springframework.web.bind.annotation.*;

import javax.annotation.Resource;

@RestController
public class WebController {
    @Resource
    UserService userService;

    @GetMapping("/")
    public Result hello(){
        return Result.success("success");
    }

    @PostMapping("/login")
    public Result login(@RequestBody User user){
        if(StrUtil.isBlank(user.getUsername())||StrUtil.isBlank(user.getPassword())){
            return Result.error("数据输入错误");
        }
        user=userService.login(user);
        return Result.success(user);
    }

    @PostMapping("/register")
    public Result register(@RequestBody User user){
        if(StrUtil.isBlank(user.getUsername())||StrUtil.isBlank(user.getPassword())){
            throw new ServiceException("输入不合法");
        }
        if(user.getUsername().length()>10||user.getPassword().length()>20){
            throw new ServiceException("长度过长");
        }
        user=userService.register(user);
        return Result.success(user);
    }
}
User:用户实体类,用来承接数据
package com.example.springboot.entity;

import lombok.AllArgsConstructor;
import lombok.Data;

@Data
public class User {
    private Integer id;
    private String username;
    private String password;
    private String name;
    private String phone;
    private String email;
    private String address;
    private String avatar;
}
GlobalException:引入自定义并使用
package com.example.springboot.exception;

import com.example.springboot.common.Result;
import org.springframework.web.bind.annotation.ControllerAdvice;
import org.springframework.web.bind.annotation.ExceptionHandler;
import org.springframework.web.bind.annotation.ResponseBody;

@ControllerAdvice
public class GlobalExeception {

    @ExceptionHandler(ServiceException.class)
    @ResponseBody
    public Result serviceException(ServiceException e){
        return Result.error("500",e.getMessage());
    }
}
ServiceException: 自定义异常
package com.example.springboot.exception;

public class ServiceException extends RuntimeException{
    public ServiceException(String msg){
        super(msg);
    }
}
UserMapper:定义接口,对数据库进行增删改查
package com.example.springboot.mapper;

import com.example.springboot.entity.User;
import org.apache.ibatis.annotations.*;

import java.util.List;

@Mapper
public interface UserMapper {
    @Insert("insert into `user` (username, password, name, phone, email, address, avatar) " +
            "values (#{username}, #{password}, #{name}, #{phone}, #{email}, #{address}, #{avatar})")
    void insert(User user);

    @Update("update `user` set username = #{username} , password = #{password} , name = #{name} , phone=#{phone} , email = #{email} , avatar=#{avatar} where id = #{id}")
    void updateUser(User user);

    @Delete("delete from `user` where id=#{id}")
    void deleteUser(Integer id);

    @Select("select * from `user` order by id desc")
    List<User> selectall();

    @Select("select * from `user` where id =#{id} order by id desc")
    User selectbyid(Integer id);

    @Select("select * from `user` where name = #{name} order by id desc")
    List<User> selectbyname(String name);
    @Select("select * from `user` where username = #{username} and name = #{name} order by id desc")
    List<User> selectbymore(@Param("username") String username,@Param("name") String name);

    @Select("select * from `user` where username like  concat('%',#{username},'%') or name like concat('%',#{name},'%') order by id desc")
    List<User> selectbymo(@Param("username") String username,@Param("name") String name);

    @Select("select * from `user` where username = #{username} order by id desc")
    User selectbyUsername(String username);
}
Userservice:给接口编写实体方法
package com.example.springboot.service;

import com.example.springboot.entity.User;
import com.example.springboot.exception.ServiceException;
import com.example.springboot.mapper.UserMapper;
import org.springframework.beans.factory.annotation.Autowired;
import org.springframework.stereotype.Service;
import org.springframework.web.bind.annotation.RequestBody;

import java.util.List;

@Service
public class UserService {
    @Autowired
    UserMapper userMapper;
    public void insertUser(User user){
        userMapper.insert(user);
    }

    public void updateUser(User user) {
        userMapper.updateUser(user);
    }

    public void deleteUser(Integer id) {
        userMapper.deleteUser(id);
    }

    public void batchdeleteUser(List<Integer> ids) {
        for(Integer id : ids){
            userMapper.deleteUser(id);
        }
    }


    public List<User> selectall() {
        return userMapper.selectall();
    }

    public User selectbyid(Integer id) {
        return userMapper.selectbyid(id);
    }

    public List<User> selectbyname(String name) {
        return userMapper.selectbyname(name);
    }

    public List<User> selectbymore(String username, String name) {
        return userMapper.selectbymore(username,name);
    }

    public List<User> selectbymo(String username, String name) {
        return userMapper.selectbymo(username,name);
    }

    public User login(User user) {
        User dbuser=userMapper.selectbyUsername(user.getUsername());
        if(dbuser == null){
            throw new ServiceException("账号不存在");
        }
        if(!user.getPassword().equals(dbuser.getPassword())){
            throw new ServiceException("账号或者密码错误");
        }
        return dbuser;
    }

    public User register(User user) {
        User dbuser=userMapper.selectbyUsername(user.getUsername());
        if(dbuser != null){
            throw new ServiceException("用户名已存在");
        }
        userMapper.insert(user);
        return user;
    }
}
引入hutool:在pom.xml引进依赖
<dependency>
  <groupId>cn.hutool</groupId>
  <artifactId>hutool-all</artifactId>
  <version>5.8.18</version>
</dependency>
④封装vue的网络请求
在vue终端安装依赖:
npm i axios在vue中新建utils文件夹,该文件夹下新建request.js文件:
import axios from 'axios'

// 创建可一个新的axios对象
const request = axios.create({
    baseURL: 'http://localhost:9090',   // 后端的接口地址  ip:port
    timeout: 30000
})

// request 拦截器
// 可以自请求发送前对请求做一些处理
// 比如统一加token,对请求参数统一加密
request.interceptors.request.use(config => {
    config.headers['Content-Type'] = 'application/json;charset=utf-8';
    // let user = localStorage.getItem("user") ? JSON.parse(localStorage.getItem("user")) : null
    // config.headers['token'] = 'token'  // 设置请求头

    return config
}, error => {
    console.error('request error: ' + error) // for debug
    return Promise.reject(error)
});

// response 拦截器
// 可以在接口响应后统一处理结果
request.interceptors.response.use(
    response => {
        let res = response.data;

        // 兼容服务端返回的字符串数据
        if (typeof res === 'string') {
            res = res ? JSON.parse(res) : res
        }
        return res;
    },
    error => {
        console.error('response error: ' + error) // for debug
        return Promise.reject(error)
    }
)


export default request
main.js引入:
import Vue from 'vue'
import App from './App.vue'
import router from './router'
import ElementUI from 'element-ui';
import 'element-ui/lib/theme-chalk/index.css';
import request from "@/utils/request";
Vue.config.productionTip = false
Vue.use(ElementUI,{size:'small'});
Vue.prototype.$request=request //引入request
new Vue({
  router,
  render: h => h(App)
}).$mount('#app')
登录页补充登录函数:
<template>
<div style="background-color: #42b983;display: flex;align-items: center;justify-content: center;height: 100vh">
  <div style="background-color: white;display: flex;width: 50%;height: 50%;overflow: hidden;border-radius: 5px">
    <div style="flex:1">
      <img src="@/assets/login.png" style="width: 100%">
    </div>
    <div style="flex: 1;display: flex;justify-content: center;align-items: center">
      <el-form style="width: 80%" :model="user">
        <div style="font-weight: bold;font-size: 20px;margin-bottom: 20px">
          欢迎登录后台管理系统
        </div>
        <el-form-item>
          <el-input placeholder="请输入用户名" prefix-icon="el-icon-user" v-model="user.username"></el-input>
        </el-form-item>
        <el-form-item>
          <el-input placeholder="请输入密码" prefix-icon="el-icon-lock" v-model="user.password" show-password></el-input>
        </el-form-item>
        <el-form-item>
          <div style="display: flex">
            <el-input placeholder="请输入验证码" prefix-icon="el-icon-circle-check" v-model="user.validCode" style="flex: 1"></el-input>
            <div style="flex: 1;height: 32px">
              <valid-code @update:value="getCode"></valid-code>
            </div>
          </div>
        </el-form-item>
        <el-form-item>
          <el-button type="primary" style="width: 100%" @click="login">登录</el-button>
        </el-form-item>
        <div style="display: flex">
          <div style="flex: 1">还没账号?去<span style="color: #42b983;cursor: pointer">注册</span></div>
          <div style="text-align: right;flex: 1;color: #42b983;cursor:pointer;">忘记密码</div>
        </div>
      </el-form>
    </div>
  </div>
</div>
</template>
<script>
import ValidCode from "@/components/ValidCode.vue";

export default {
  name:'login-demo',
  components:{
    ValidCode
  },
  data(){
    return{
      code:'',
      user:{
        username:'',
        password:'',
        validCode:''
      }
    }
  },
  methods:{
    getCode(code){
      this.code=code
    },
    login(){
      this.$request.post('/login',this.user).then(res=>{
        console.log(res)
      })
    }
  }
}
</script>
<style scoped>

</style>
效果图:

⑤表单验证
填写完表单验证规则后就是最终代码:
<template>
<div style="background-color: #42b983;display: flex;align-items: center;justify-content: center;height: 100vh">
  <div style="background-color: white;display: flex;width: 50%;height: 50%;overflow: hidden;border-radius: 5px">
    <div style="flex:1">
      <img src="@/assets/login.png" style="width: 100%">
    </div>
    <div style="flex: 1;display: flex;justify-content: center;align-items: center">
      <el-form style="width: 80%" :model="user" :rules="rules" ref="loginRef">
        <div style="font-weight: bold;font-size: 20px;margin-bottom: 20px">
          欢迎登录后台管理系统
        </div>
        <el-form-item prop="username">
          <el-input placeholder="请输入用户名" prefix-icon="el-icon-user" v-model="user.username"></el-input>
        </el-form-item>
        <el-form-item prop="password">
          <el-input placeholder="请输入密码" prefix-icon="el-icon-lock" v-model="user.password" show-password></el-input>
        </el-form-item>
        <el-form-item prop="code">
          <div style="display: flex">
            <el-input placeholder="请输入验证码" prefix-icon="el-icon-circle-check" v-model="user.code" style="flex: 1"></el-input>
            <div style="flex: 1;height: 32px">
              <valid-code @update:value="getCode"></valid-code>
            </div>
          </div>
        </el-form-item>
        <el-form-item>
          <el-button type="primary" style="width: 100%" @click="login">登录</el-button>
        </el-form-item>
        <div style="display: flex">
          <div style="flex: 1">还没账号?去<span style="color: #42b983;cursor: pointer">注册</span></div>
          <div style="text-align: right;flex: 1;color: #42b983;cursor:pointer;">忘记密码</div>
        </div>
      </el-form>
    </div>
  </div>
</div>
</template>
<script>
import ValidCode from "@/components/ValidCode.vue";

export default {
  name:'login-demo',
  components:{
    ValidCode
  },
  data(){
    const validateCode = (rule, value, callback) => {
      if (value === '') {
        callback(new Error('请输入验证码'));
      } else if(value.toLowerCase() !== this.code){
        callback(new Error('验证码错误'));
      } else {
        callback();
      }
    };
    return{
      code:'',
      user:{
        username:'',
        password:'',
        code:''
      },
      rules:{
        username:[{
          required:true,trigger:'blur',message:'请输入用户名'
        }],
        password:[{
          required:true,trigger:'blur',message:'请输入密码'
        }],
        code:[{
          validator:validateCode,trigger:'blur'
        }],
      }
    }
  },
  methods:{
    getCode(code){
      this.code=code.toLowerCase()
    },
    login(){
      this.$refs['loginRef'].validate((valid)=>{
        if(valid){
          this.$request.post("/login",this.user).then(res=>{
            if(res.code === '200'){
              this.$router.push('/')
              this.$message.success('登录成功')
              localStorage.setItem('honey-user',JSON.stringify(res.data))
            }else{
              this.$message.error(res.msg)
            }
            console.log(res);
          })
        }
      })
    }
  }
}
</script>
<style scoped>

</style>
注册页面与登录页面代码逻辑相似:
<template>
  <div style="display: flex;align-items: center;justify-content: center;background-color: #669fefff;height: 100vh;">
    <div style="display: flex;width: 50%;background-color: white;border-radius: 5px;overflow: hidden;">
      <div style="flex: 1;">
        <img src="@/assets/register.png" alt="" style="width: 100%;">
      </div>
      <div style="flex: 1;display: flex;align-items: center;justify-content: center;">
        <el-form :model="user" style="width: 80%;" :rules="rules" ref="registerRef">
          <div style="font-weight: bold; font-size: 20px;margin-bottom: 20px;text-align: center;">
            欢迎注册后台管理系统
          </div>
          <el-form-item prop="username">
            <el-input placeholder="请输入用户名" v-model="user.username" prefix-icon="el-icon-user"></el-input>
          </el-form-item>
          <el-form-item prop="password">
            <el-input placeholder="请输入密码" v-model="user.password" show-password prefix-icon="el-icon-lock"></el-input>
          </el-form-item>
          <el-form-item prop="confirmPass">
            <el-input placeholder="请确认密码" v-model="user.confirmPass"></el-input>
          </el-form-item>
          <el-form-item>
            <el-button type="primary" style="width: 100%;" @click="register">注册</el-button>
          </el-form-item>
          <div style="display: flex;">
            <div style="flex: 1;text-align: left">已没有账号?去<span style="color:aquamarine;cursor: pointer;" @click="$router.push('/login')">登录</span></div>
          </div>
        </el-form>
      </div>
    </div>
  </div>
</template>

<script>
export default {
  name:'register',
  data() {
    const validatePass = (rule, value, callback) => {
      if (value === '') {
        callback(new Error('请输入确认密码'));
      } else if(value !== this.user.password){
        callback(new Error('两次密码不一致'));
      } else {
        callback();
      }
    };
    return {
      code:'',
      user: {
        code:'',
        username: '',
        password: '',
        confirmPass:''
      },
      rules:{
        username:[{
          required:'true',message:'请输入账号',trigger:'blur'
        }],
        password:[{
          required:'true',message:'请输入密码',trigger:'blur'
        }],
        confirmPass:[{
          validator:validatePass,trigger:'blur'
        }],
      },
    }
  },
  methods:{
    getCode(code){
      this.code=code.toLowerCase()
    },
    register(){
      this.$refs['registerRef'].validate((valid=>{
        if(valid){
          this.$request.post("/register",this.user).then(res=>{
            if(res.code === '200'){
              this.$router.push('/login')
              this.$message.success('注册成功')
            }else{
              this.$message.error(res.msg)
            }
            console.log(res);
          })
        }
      }))
    }
  }
}
</script>

<style scoped></style>
最终效果:
 文章来源:https://www.toymoban.com/news/detail-827207.html
 文章来源地址https://www.toymoban.com/news/detail-827207.html
到了这里,关于vue+springboot登录与注册功能的实现的文章就介绍完了。如果您还想了解更多内容,请在右上角搜索TOY模板网以前的文章或继续浏览下面的相关文章,希望大家以后多多支持TOY模板网!