一、什么是图结构
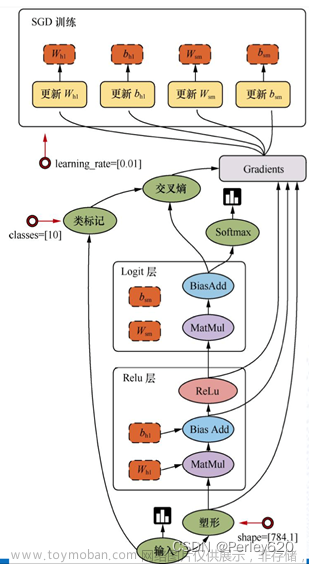
1、图包含了一组tf.Operation代表的计算单元对象和tf.Tensor代表的计算单元之间流动的数据
图结构:数据(Tensor) + 操作(Operation)
二、图相关操作
1、默认图
通常TensorFlow会默认帮我们创建一张图
查看默认图的两种方法:
(1)通过调用tf.compat.v1.get_default_graph()访问,要将操作添加到默认图形中,直接创建OP即可
(2)op、sess都含有graph属性,默认都在一张图中
注:2.x版本(使用默认图)不支持调用属性,会报错“AttributeError: Tensor.graph is meaningless when eager execution is enabled.”
import os
os.environ['TF_CPP_MIN_LOG_LEVEL']='2'
import tensorflow as tf

def tensorflow_demo():
    """
    TensorFlow的基本结构
    """

    # TensorFlow实现加减法运算
    a_t = tf.constant(2)
    b_t = tf.constant(3)
    c_t = a_t + b_t
    print("TensorFlow加法运算结果:\n", c_t)
    print(c_t.numpy())

    # 2.0版本不需要开启会话,已经没有会话模块了

    return None

def graph_demo():
    """
    图的演示
    """
    # TensorFlow实现加减法运算
    a_t = tf.constant(2)
    b_t = tf.constant(3)
    c_t = a_t + b_t
    print("TensorFlow加法运算结果:\n", c_t)
    print(c_t.numpy())

    # 查看默认图
    # 方法1:调用方法
    default_g = tf.compat.v1.get_default_graph()
    print("default_g:\n", default_g)

    # 方法2:查看属性
    # print("a_t的图属性:\n", a_t.graph)
    # print("c_t的图属性:\n", c_t.graph)

    return None

if __name__ == "__main__":
    # 代码1:TensorFlow的基本结构
    # tensorflow_demo()
    # 代码2:图的演示
    graph_demo()
python3 day01_deeplearning.py
TensorFlow加法运算结果:
tf.Tensor(5, shape=(), dtype=int32)
5
default_g:
<tensorflow.python.framework.ops.Graph object at 0x7f27651b5be0>2、创建图
(1)可以通过tf.Graph()自定义创建图
(2)如果要在这张图中创建OP,典型用法是使用tf.Graph.as_default()上下文管理器文章来源:https://www.toymoban.com/news/detail-829799.html
import os
os.environ['TF_CPP_MIN_LOG_LEVEL']='2'
import tensorflow as tf

def tensorflow_demo():
    """
    TensorFlow的基本结构
    """

    # TensorFlow实现加减法运算
    a_t = tf.constant(2)
    b_t = tf.constant(3)
    c_t = a_t + b_t
    print("TensorFlow加法运算结果:\n", c_t)
    print(c_t.numpy())

    # 2.0版本不需要开启会话,已经没有会话模块了

    return None

def graph_demo():
    """
    图的演示
    """
    # TensorFlow实现加减法运算
    a_t = tf.constant(2)
    b_t = tf.constant(3)
    c_t = a_t + b_t
    print("TensorFlow加法运算结果:\n", c_t)
    print(c_t.numpy())

    # 查看默认图
    # 方法1:调用方法
    default_g = tf.compat.v1.get_default_graph()
    print("default_g:\n", default_g)

    # 方法2:查看属性
    # print("a_t的图属性:\n", a_t.graph)
    # print("c_t的图属性:\n", c_t.graph)

    # 自定义图
    new_g = tf.Graph()
    # 在自己的图中定义数据和操作
    with new_g.as_default():
        a_new = tf.constant(20)
        b_new = tf.constant(30)
        c_new = a_new + b_new
        print("c_new:\n", c_new)
        print("a_new的图属性:\n", a_new.graph)
        print("b_new的图属性:\n", b_new.graph)

    # 开启new_g的会话
    with tf.compat.v1.Session(graph=new_g) as sess:
        c_new_value = sess.run(c_new)
        print("c_new_value:\n", c_new_value)
        print("我们自己创建的图为:\n", sess.graph)
    return None

if __name__ == "__main__":
    # 代码1:TensorFlow的基本结构
    # tensorflow_demo()
    # 代码2:图的演示
    graph_demo()
python3 day01_deeplearning.py
TensorFlow加法运算结果:
tf.Tensor(5, shape=(), dtype=int32)
5
default_g:
<tensorflow.python.framework.ops.Graph object at 0x7f19806c4d68>
c_new:
Tensor("add:0", shape=(), dtype=int32)
a_new的图属性:
<tensorflow.python.framework.ops.Graph object at 0x7f19809f5748>
b_new的图属性:
<tensorflow.python.framework.ops.Graph object at 0x7f19809f5748>
c_new_value:
50
我们自己创建的图为:
<tensorflow.python.framework.ops.Graph object at 0x7f19809f5748>说明:
(1)默认图执行结果是tf.Tensor(5, shape=(), dtype=int32)
(2)自定义图执行结果是Tensor("add:0", shape=(), dtype=int32)
(3)自定义图没有即时执行,需要开启Session指定图来执行
(4)可以看到默认图地址为0x7f19806c4d68,自定义图地址为0x7f19809f5748
文章来源地址https://www.toymoban.com/news/detail-829799.html
到了这里,关于深度学习基础之《TensorFlow框架(2)—图》的文章就介绍完了。如果您还想了解更多内容,请在右上角搜索TOY模板网以前的文章或继续浏览下面的相关文章,希望大家以后多多支持TOY模板网!


