目录
一、同声翻译插件的申请
二、uni-app中的引用
一、同声翻译插件的申请
小程序开发者官网:微信公众平台


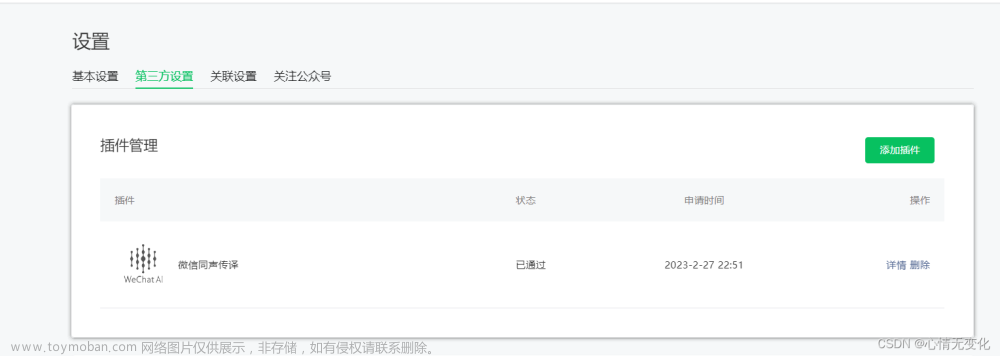
点击小程序管理后台后,再次点击设置,选中第三方服务

搜索同声传译,将插件添加至自己的小程序服务中
 点击详情可看到官方文档及AppId(后续使用中会用到)
二、uni-app中的引用

新建项目后,选中manifest.json文件,切换至源码视图(右侧菜单栏最下方!)
 在mp--weixin的appid(千万别看错了,上方还有一个AppID)同级下写插件的相关信息
"mp-weixin": {
		/* 小程序特有相关 */
		"appid": "你自己的小程序id",
		"plugins": {
			"WechatSI": {
				"version": "0.3.3",
				"provider": "wx069ba97219f66d99"
			}
		},
		"setting": {
			"urlCheck": false
		},
		"usingComponents": true
	},
特别注意!!!!!!!!!!version版本最好是0.3.3,高于此版本可能会无法使用,并且provider应该都是这个,所以复制即用!
<template>
	<view>
		<!-- 语音识别区 -->
		<!-- 语音内容图片+转文字,没有语音时是隐藏状态 -->
		<view class="content" v-if="shows">
			<!-- 语音声纹图片 -->
			<view class="tet" style="position: relative;">
				<view style="position: absolute;width: 30px;height: 30px;background-color: #e9c2db;right: 0;border-radius: 50%;top: 10px;" :class="num == 1 ? '' : 'op'">
					<!-- 转文字按钮  fanyi为转译事件 -->
					<image style="width: 30px;height: 30px;" src="https://pic.imgdb.cn/item/64c85b431ddac507cc0e7284.png" @tap="fanyi"></image>
				</view>
			</view>
			<!-- 翻译内容点击fanyi后出现 -->
			<view class="voicepad" style="margin-top: 20px;width: 94%;margin-left: 3%;padding: 10px; font-size: 12px;">
				{{endOne}}
			</view>
		</view>
		<!-- 语音音阶动画 长按说话时的动画 -->
		<view class="prompt" v-if="animation">
			<section class="dots-container">
				<view class="dot"></view>
				<view class="dot"></view>
				<view class="dot"></view>
				<view class="dot"></view>
				<view class="dot"></view>
			</section>
			<text>录音中...</text>
		</view>
		<!-- 按钮功能区 -->
		<view class="action" v-show="!shows">
			<!-- 开始录音按钮  长按录音  松手上传 text为-----开始录音----上传录音文字 -->
			<button @longpress="startRecord" @touchend="endRecord" @tap="startRecord">{{text}}</button>
		</view>
		<view class="actioning" v-show="shows">
			<button @tap="playVoice" style="background-color: #d1f2d7;color: #18bc37;">播放录音</button>
			<button @tap="resetVoice" style="background-color: #fdedd9;color: #f3a73f;">重置录音</button>
		</view>

	</view>
</template>
<script>
// 录音播放事件引入
const innerAudioContext = uni.createInnerAudioContext();
innerAudioContext.autoplay = true;
// 翻译事件引入
var plugin = requirePlugin("WechatSI")
let manager = plugin.getRecordRecognitionManager()
export default {
data() {
return {
text: '开始录音',
voicePath: '',
// 音频展示
shows: false,
// 动画状态
animation: false,
voiceState: "点击录音进行翻译",
endOne: '',
num: 1
}
},
onShow() {
},
onLoad() {
// 初始化调用
this.initRecord();
},
methods: {
startRecord() {
console.log('开始录音');
manager.start({
duration: 30000,
lang: "zh_CN"
})
this.text = '松手上传';
this.animation = true
},
endRecord() {
console.log('录音结束');
this.text = '开始录音';
this.animation = false
this.shows = true
manager.stop();
},
playVoice() {
console.log('播放录音');
if (this.voicePath) {
innerAudioContext.src = this.voicePath;
innerAudioContext.play();
}
},
resetVoice() {
console.log('重置录音');
innerAudioContext.stop();
this.shows = false
this.voicePath = '';
this.endOne = ''
this.voiceState = ''
this.num = 1
},
fanyi() {
if (this.num == 1) {
console.log(this.voicePath);
this.endOne = this.voiceState
this.num = this.num + 1
uni.showToast({
title: '转换成功',
icon: 'success',
duration: 2000, //持续时间为 2秒
})
}else{
uni.showToast({
title: '文字已翻译,请勿重复点击',
icon: 'error',
duration: 2000, //持续时间为 2秒
})
}
},
/**
* 初始化语音识别回调
* 绑定语音播放开始事件
*/
initRecord: function() {
manager.onStart = function(res) {
this.voiceState = "onStart:" + res.msg + "正在录音"
};
//有新的识别内容返回,则会调用此事件
manager.onRecognize = (res) => {
this.voiceState = res.result;
}
// 识别结束事件
manager.onStop = (res) => {
this.voicePath = res.tempFilePath;
this.voiceState = res.result;
if (this.voiceState == '') {
console.log('没有说话')
this.endOne = '周围太安静啦~再试试~';
}
}
// 识别错误事件
manager.onError = (res) => {
this.voiceState = '翻译员去吃饭啦,等下再试试';
this.shows = false
uni.showToast({
title: '翻译员去吃饭啦,等下再试试',
icon: 'error',
duration: 2000, //持续时间为 2秒
})
}
},
}
}
</script><style>
.content {
box-sizing: border-box;
width: 98%;
margin-left: 1%;
min-height: 300px;
padding-top: 20px;
padding-left: 15px;
padding-right: 15px;
padding-bottom: 20px;
display: flex;
flex-direction: column;
align-items: center;
}
.tet {
width: 100%;
height: 50px;
margin-top: 25px;
border-radius: 30px;
background-repeat: no-repeat;
background-size: 100% 100%;
background-image: url('https://pic.imgdb.cn/item/64c85a901ddac507cc0d52a4.png');
position: relative;
}
.action {
position: fixed;
bottom: 20px;
width: 100%;
}
.action button {
background-color: #d1f2d7;
color: #18bc37;
font-size: 14px;
display: flex;
height: 40px;
width: 96%;
margin-left: 2%;
align-items: center;
justify-content: center;
}
.actioning {
position: fixed;
bottom: 20px;
width: 100%;
display: flex;
align-items: center;
justify-content: space-between;
}
.actioning button {
height: 40px;
width: 45%;
border: 0;
font-size: 14px;
display: flex;
align-items: center;
justify-content: center;
}
.bbig {
width: 94%;
}
.op{
visibility: hidden;
}
/* 动画 */
.prompt {
width: 100%;
height: 80px;
position: fixed;
bottom: 70px;
}
.prompt text {
position: absolute;
bottom: 2px;
color: #f3a73f;
left: calc(45%);
animation: puls 1.5s infinite ease-in-out;
}
.dots-container {
display: flex;
align-items: center;
justify-content: center;
height: 80px;
width: 45%;
position: absolute;
bottom: 0px;
left: calc(27.5%);
background-color: #fdedd9;
border-radius: 20px;
}
.dot {
height: 16px;
width: 16px;
margin-right: 10px;
border-radius: 10px;
background-color: #f3a73f;
animation: pulse 1.5s infinite ease-in-out;
}
.dot:last-child {
margin-right: 0;
}
.dot:nth-child(1) {
animation-delay: -0.3s;
}
.dot:nth-child(2) {
animation-delay: -0.1s;
}
.dot:nth-child(3) {
animation-delay: 0.1s;
}
@keyframes pulse {
0% {
transform: scale(0.8);
background-color: #f3a73f;
box-shadow: 0 0 0 0 rgba(243, 167, 63, 0.7);
}
50% {
transform: scale(1.2);
background-color: #f9d39f;
box-shadow: 0 0 0 10px rgba(178, 212, 252, 0);
}
100% {
transform: scale(0.8);
background-color: #f3a73f;
box-shadow: 0 0 0 0 rgba(243, 167, 63, 0.7);
}
}
@keyframes puls {
0% {
transform: translateY(0px)
}
50% {
transform: translateY(-4px)
}
100% {
transform: translateY(0px)
}
}
</style>至此同声翻译就可以使用了,本文主要使用的是录音完毕后,提供播放录音及翻译录音两个选项,也可以改动后支持同声同步翻译。文章来源:https://www.toymoban.com/news/detail-841911.html
demo复制即可使用,只需要修改图片,如果真机运行报错,建议切换真机1.0进行测试。文章来源地址https://www.toymoban.com/news/detail-841911.html
到了这里,关于uni-app语音转文字功能demo(小程序同声翻译开箱即用)的文章就介绍完了。如果您还想了解更多内容,请在右上角搜索TOY模板网以前的文章或继续浏览下面的相关文章,希望大家以后多多支持TOY模板网!