一、Grounding DINO + Segment Anything Model (SAM)
在本教程中,我们将学习如何使用两个突破性的模型自动注释图像 - Grounding DINO 和 Segment Anything Model (SAM)。
然后,我们可以使用此数据集来训练实时对象检测或实例分割模型。 以传统方式使用多边形对图像进行注释极其耗时且昂贵。 借助 Grounding DINO 和 SAM,初始注释仅需几分钟,我们的工作将简化为手动验证所获得的标签。

1.1 开始
让我们确保我们可以访问 GPU。 我们可以使用 nvidia-smi 命令来做到这一点。
!nvidia-smi
Tue Sep 19 21:10:12 2023
+-----------------------------------------------------------------------------+
| NVIDIA-SMI 525.85.12    Driver Version: 525.85.12    CUDA Version: 12.0     |
|-------------------------------+----------------------+----------------------+
| GPU  Name        Persistence-M| Bus-Id        Disp.A | Volatile Uncorr. ECC |
| Fan  Temp  Perf  Pwr:Usage/Cap|         Memory-Usage | GPU-Util  Compute M. |
|                               |                      |               MIG M. |
|===============================+======================+======================|
|   0  Tesla T4            Off  | 00000000:00:04.0 Off |                    0 |
| N/A   53C    P8    10W /  70W |      0MiB / 15360MiB |      0%      Default |
|                               |                      |                  N/A |
+-------------------------------+----------------------+----------------------+

+-----------------------------------------------------------------------------+
| Processes:                                                                  |
|  GPU   GI   CI        PID   Type   Process name                  GPU Memory |
|        ID   ID                                                   Usage      |
|=============================================================================|
|  No running processes found                                                 |
+-----------------------------------------------------------------------------+
注意:为了让我们更容易管理数据集、图像和模型,我们创建了一个 HOME 常量。
import os
HOME = os.getcwd()
print("HOME:", HOME)
输出为:
HOME: /content
1.2 Install Grounding DINO and Segment Anything Model
我们的项目将使用两种突破性的设计:Grounding DINO(用于零样本检测)和 Segment Anything Model(SAM)(用于将盒子转换为分段)。 我们必须先安装它们。
%cd {HOME}
!git clone https://github.com/IDEA-Research/GroundingDINO.git
%cd {HOME}/GroundingDINO
!git checkout -q 57535c5a79791cb76e36fdb64975271354f10251
!pip install -q -e .
部分输出结果为:
/content
Cloning into 'GroundingDINO'...
remote: Enumerating objects: 267, done.
remote: Counting objects: 100% (41/41), done.
remote: Compressing objects: 100% (25/25), done.
remote: Total 267 (delta 18), reused 16 (delta 16), pack-reused 226
Receiving objects: 100% (267/267), 12.33 MiB | 22.16 MiB/s, done.
Resolving deltas: 100% (122/122), done.
/content/GroundingDINO
  Preparing metadata (setup.py) ... done
     ━━━━━━━━━━━━━━━━━━━━━━━━━━━━━━━━━━━━━━━━ 7.0/7.0 MB 40.4 MB/s eta 0:00:00
     ━━━━━━━━━━━━━━━━━━━━━━━━━━━━━━━━━━━━━━ 200.9/200.9 kB 14.2 MB/s eta 0:00:00
     ━━━━━━━━━━━━━━━━━━━━━━━━━━━━━━━━━━━━━━ 549.1/549.1 kB 32.1 MB/s eta 0:00:00
     ━━━━━━━━━━━━━━━━━━━━━━━━━━━━━━━━━━━━━━ 200.1/200.1 kB 16.4 MB/s eta 0:00:00
     ━━━━━━━━━━━━━━━━━━━━━━━━━━━━━━━━━━━━━━━━ 7.8/7.8 MB 62.7 MB/s eta 0:00:00
%cd {HOME}

import sys
!{sys.executable} -m pip install 'git+https://github.com/facebookresearch/segment-anything.git'
部分输出结果为:
/content
Looking in indexes: https://pypi.org/simple, https://us-python.pkg.dev/colab-wheels/public/simple/
Collecting git+https://github.com/facebookresearch/segment-anything.git
  Cloning https://github.com/facebookresearch/segment-anything.git to /tmp/pip-req-build-e2789hn3
  Running command git clone --filter=blob:none --quiet https://github.com/facebookresearch/segment-anything.git /tmp/pip-req-build-e2789hn3
  Resolved https://github.com/facebookresearch/segment-anything.git to commit 567662b0fd33ca4b022d94d3b8de896628cd32dd
  Preparing metadata (setup.py) ... done
Building wheels for collected packages: segment-anything
  Building wheel for segment-anything (setup.py) ... done
  Created wheel for segment-anything: filename=segment_anything-1.0-py3-none-any.whl size=36610 sha256=ed90a8a550d5948a1b3b9c5f2a173970657a518009512fb20e89dc5ec5240160
  Stored in directory: /tmp/pip-ephem-wheel-cache-xtm37yc6/wheels/d5/11/03/7aca746a2c0e09f279b10436ced7175926bc38f650b736a648
Successfully built segment-anything
Installing collected packages: segment-anything
Successfully installed segment-anything-1.0
注意:为了将演示的所有元素粘合在一起,我们将使用监督 pip 包,它将帮助我们处理、过滤和可视化我们的检测以及保存我们的数据集。
然而,在这个演示中,我们需要最新版本中引入的功能。 因此,我们卸载当前的supervsion版本并安装0.6.0版本。
!pip uninstall -y supervision
!pip install -q supervision==0.6.0

import supervision as sv
print(sv.__version__)
输出结果为:
Found existing installation: supervision 0.4.0
Uninstalling supervision-0.4.0:
  Successfully uninstalled supervision-0.4.0
ERROR: pip's dependency resolver does not currently take into account all the packages that are installed. This behaviour is the source of the following dependency conflicts.
groundingdino 0.1.0 requires supervision==0.4.0, but you have supervision 0.6.0 which is incompatible.
0.6.0
让我们安装 roboflow pip 包。
!pip install -q roboflow
部分结果如下所示:
   ━━━━━━━━━━━━━━━━━━━━━━━━━━━━━━━━━━━━━━━━ 56.2/56.2 kB 2.6 MB/s eta 0:00:00
     ━━━━━━━━━━━━━━━━━━━━━━━━━━━━━━━━━━━━━━━━ 67.8/67.8 kB 8.0 MB/s eta 0:00:00
  Preparing metadata (setup.py) ... done
     ━━━━━━━━━━━━━━━━━━━━━━━━━━━━━━━━━━━━━━━━ 54.5/54.5 kB 4.9 MB/s eta 0:00:00
     ━━━━━━━━━━━━━━━━━━━━━━━━━━━━━━━━━━━━━━━━ 58.8/58.8 kB 6.2 MB/s eta 0:00:00
  Building wheel for wget (setup.py) ... done
1.3 Download Grounding DINO Model Weights
要运行 Grounding DINO,我们需要两个文件 - 配置和模型权重。 配置文件是 Grounding DINO 存储库的一部分,我们已经克隆了它。 另一方面,我们需要下载权重文件。 我们将这两个文件的路径写入 GROUNDING_DINO_CONFIG_PATH 和 GROUNDING_DINO_CHECKPOINT_PATH 变量,并验证路径是否正确以及文件是否存在于磁盘上。
import os

GROUNDING_DINO_CONFIG_PATH = os.path.join(HOME, "GroundingDINO/groundingdino/config/GroundingDINO_SwinT_OGC.py")
print(GROUNDING_DINO_CONFIG_PATH, "; exist:", os.path.isfile(GROUNDING_DINO_CONFIG_PATH))
输出结果为:
/content/GroundingDINO/groundingdino/config/GroundingDINO_SwinT_OGC.py ; exist: True
%cd {HOME}
!mkdir -p {HOME}/weights
%cd {HOME}/weights

!wget -q https://github.com/IDEA-Research/GroundingDINO/releases/download/v0.1.0-alpha/groundingdino_swint_ogc.pth
输出结果为:
/content
/content/weights
import os

GROUNDING_DINO_CHECKPOINT_PATH = os.path.join(HOME, "weights", "groundingdino_swint_ogc.pth")
print(GROUNDING_DINO_CHECKPOINT_PATH, "; exist:", os.path.isfile(GROUNDING_DINO_CHECKPOINT_PATH))
输出结果为:
/content/weights/groundingdino_swint_ogc.pth ; exist: True
1.4 Download Segment Anything Model (SAM) Weights
与 Grounding DINO 一样,为了运行 SAM,我们需要一个权重文件,我们必须首先下载该文件。 我们将本地权重文件的路径写入 SAM_CHECKPOINT_PATH 变量,并验证路径是否正确以及文件是否存在于磁盘上。
%cd {HOME}
!mkdir -p {HOME}/weights
%cd {HOME}/weights

!wget -q https://dl.fbaipublicfiles.com/segment_anything/sam_vit_h_4b8939.pth
输出为:
/content
/content/weights
import os

SAM_CHECKPOINT_PATH = os.path.join(HOME, "weights", "sam_vit_h_4b8939.pth")
print(SAM_CHECKPOINT_PATH, "; exist:", os.path.isfile(SAM_CHECKPOINT_PATH))
输出结果为:
/content/weights/sam_vit_h_4b8939.pth ; exist: True
1.5 Load models
import torch

DEVICE = torch.device('cuda' if torch.cuda.is_available() else 'cpu')
1.5.1 Load Grounding DINO Model
%cd {HOME}/GroundingDINO

from groundingdino.util.inference import Model

grounding_dino_model = Model(model_config_path=GROUNDING_DINO_CONFIG_PATH, model_checkpoint_path=GROUNDING_DINO_CHECKPOINT_PATH)

1.5.2 Load Segment Anything Model (SAM)
SAM_ENCODER_VERSION = "vit_h"
from segment_anything import sam_model_registry, SamPredictor

sam = sam_model_registry[SAM_ENCODER_VERSION](checkpoint=SAM_CHECKPOINT_PATH).to(device=DEVICE)
sam_predictor = SamPredictor(sam)
1.6 Download Example Data
f"{HOME}/data"
输出为:
/content/data
%cd {HOME}
!mkdir {HOME}/data
%cd {HOME}/data

!wget -q https://media.roboflow.com/notebooks/examples/dog.jpeg
!wget -q https://media.roboflow.com/notebooks/examples/dog-2.jpeg
!wget -q https://media.roboflow.com/notebooks/examples/dog-3.jpeg
!wget -q https://media.roboflow.com/notebooks/examples/dog-4.jpeg
!wget -q https://media.roboflow.com/notebooks/examples/dog-5.jpeg
!wget -q https://media.roboflow.com/notebooks/examples/dog-6.jpeg
!wget -q https://media.roboflow.com/notebooks/examples/dog-7.jpeg
!wget -q https://media.roboflow.com/notebooks/examples/dog-8.jpeg
输出结果为:
/content
/content/data
1.7 Single Image Mask Auto Annotation
在我们自动注释整个数据集之前,让我们先关注单个图像。
SOURCE_IMAGE_PATH = f"{HOME}/data/dog-3.jpeg"
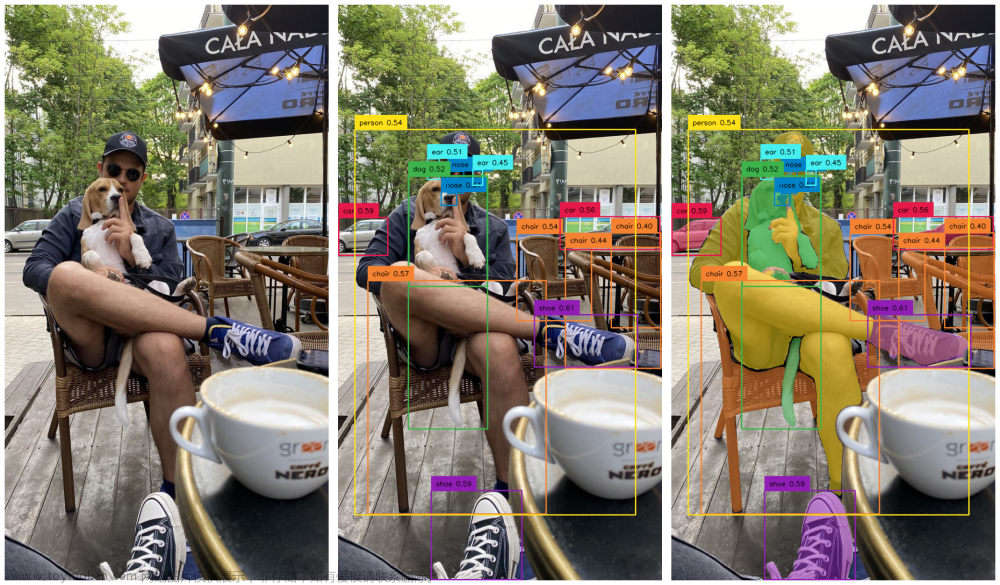
CLASSES = ['car', 'dog', 'person', 'nose', 'chair', 'shoe', 'ear']
BOX_TRESHOLD = 0.35
TEXT_TRESHOLD = 0.25
1.7.1 Zero-Shot Object Detection with Grounding DINO
注意:为了获得更好的Grounding DINO检测,我们将使用下面定义的enhance_class_name函数来利用一些提示工程。
from typing import List

def enhance_class_name(class_names: List[str]) -> List[str]:
    return [
        f"all {class_name}s"
        for class_name
        in class_names
    ]
import cv2
import supervision as sv

# load image
image = cv2.imread(SOURCE_IMAGE_PATH)

# detect objects
detections = grounding_dino_model.predict_with_classes(
    image=image,
    classes=enhance_class_name(class_names=CLASSES),
    box_threshold=BOX_TRESHOLD,
    text_threshold=TEXT_TRESHOLD
)

# annotate image with detections
box_annotator = sv.BoxAnnotator()
labels = [
    f"{CLASSES[class_id]} {confidence:0.2f}"
    for _, _, confidence, class_id, _
    in detections]
annotated_frame = box_annotator.annotate(scene=image.copy(), detections=detections, labels=labels)

%matplotlib inline
sv.plot_image(annotated_frame, (16, 16))
输出结果为:
1.7.2 Prompting SAM with detected boxes
import numpy as np
from segment_anything import SamPredictor


def segment(sam_predictor: SamPredictor, image: np.ndarray, xyxy: np.ndarray) -> np.ndarray:
    sam_predictor.set_image(image)
    result_masks = []
    for box in xyxy:
        masks, scores, logits = sam_predictor.predict(
            box=box,
            multimask_output=True
        )
        index = np.argmax(scores)
        result_masks.append(masks[index])
    return np.array(result_masks)
import cv2

# convert detections to masks
detections.mask = segment(
    sam_predictor=sam_predictor,
    image=cv2.cvtColor(image, cv2.COLOR_BGR2RGB),
    xyxy=detections.xyxy
)

# annotate image with detections
box_annotator = sv.BoxAnnotator()
mask_annotator = sv.MaskAnnotator()
labels = [
    f"{CLASSES[class_id]} {confidence:0.2f}"
    for _, _, confidence, class_id, _
    in detections]
annotated_image = mask_annotator.annotate(scene=image.copy(), detections=detections)
annotated_image = box_annotator.annotate(scene=annotated_image, detections=detections, labels=labels)

%matplotlib inline
sv.plot_image(annotated_image, (16, 16))

import math

grid_size_dimension = math.ceil(math.sqrt(len(detections.mask)))

titles = [
    CLASSES[class_id]
    for class_id
    in detections.class_id
]

sv.plot_images_grid(
    images=detections.mask,
    titles=titles,
    grid_size=(grid_size_dimension, grid_size_dimension),
    size=(16, 16)
)

1.8 Full Dataset Mask Auto Annotation
import os

IMAGES_DIRECTORY = os.path.join(HOME, 'data')
IMAGES_EXTENSIONS = ['jpg', 'jpeg', 'png']

CLASSES = ['car', 'dog', 'person', 'nose', 'chair', 'shoe', 'ear', 'coffee', 'backpack', 'cap']
BOX_TRESHOLD = 0.35
TEXT_TRESHOLD = 0.25
1.8.1 Extract labels from images
import cv2
from tqdm.notebook import tqdm

images = {}
annotations = {}

image_paths = sv.list_files_with_extensions(
    directory=IMAGES_DIRECTORY,
    extensions=IMAGES_EXTENSIONS)

for image_path in tqdm(image_paths):
    image_name = image_path.name
    image_path = str(image_path)
    image = cv2.imread(image_path)

    detections = grounding_dino_model.predict_with_classes(
        image=image,
        classes=enhance_class_name(class_names=CLASSES),
        box_threshold=BOX_TRESHOLD,
        text_threshold=TEXT_TRESHOLD
    )
    detections = detections[detections.class_id != None]
    detections.mask = segment(
        sam_predictor=sam_predictor,
        image=cv2.cvtColor(image, cv2.COLOR_BGR2RGB),
        xyxy=detections.xyxy
    )
    images[image_name] = image
    annotations[image_name] = detections
输出结果为:

注意:在以 Pascal VOC XML 格式保存检测之前,让我们看一下我们获得的注释。 此步骤是可选的,请随意跳过。
plot_images = []
plot_titles = []

box_annotator = sv.BoxAnnotator()
mask_annotator = sv.MaskAnnotator()

for image_name, detections in annotations.items():
    image = images[image_name]
    plot_images.append(image)
    plot_titles.append(image_name)

    labels = [
        f"{CLASSES[class_id]} {confidence:0.2f}"
        for _, _, confidence, class_id, _
        in detections]
    annotated_image = mask_annotator.annotate(scene=image.copy(), detections=detections)
    annotated_image = box_annotator.annotate(scene=annotated_image, detections=detections, labels=labels)
    plot_images.append(annotated_image)
    title = " ".join(set([
        CLASSES[class_id]
        for class_id
        in detections.class_id
    ]))
    plot_titles.append(title)

sv.plot_images_grid(
    images=plot_images,
    titles=plot_titles,
    grid_size=(len(annotations), 2),
    size=(2 * 4, len(annotations) * 4)
)

1.8.2 Save labels in Pascal VOC XML
在将注释上传到 Roboflow 之前,我们必须首先将它们保存到硬盘上。 为此,我们将使用最新的监督功能之一(在 0.6.0 更新中提供) - 数据集保存。
ANNOTATIONS_DIRECTORY = os.path.join(HOME, 'annotations')

MIN_IMAGE_AREA_PERCENTAGE = 0.002
MAX_IMAGE_AREA_PERCENTAGE = 0.80
APPROXIMATION_PERCENTAGE = 0.75
sv.Dataset(
    classes=CLASSES,
    images=images,
    annotations=annotations
).as_pascal_voc(
    annotations_directory_path=ANNOTATIONS_DIRECTORY,
    min_image_area_percentage=MIN_IMAGE_AREA_PERCENTAGE,
    max_image_area_percentage=MAX_IMAGE_AREA_PERCENTAGE,
    approximation_percentage=APPROXIMATION_PERCENTAGE
)
1.8.3 Upload annotations to Roboflow
现在我们准备使用 API 将注释上传到 Roboflow。
PROJECT_NAME = "auto-generated-dataset-7"
PROJECT_DESCRIPTION = "auto-generated-dataset-7"
import roboflow
from roboflow import Roboflow

roboflow.login()

workspace = Roboflow().workspace()
new_project = workspace.create_project(
    project_name=PROJECT_NAME,
    project_license="MIT",
    project_type="instance-segmentation",
    annotation=PROJECT_DESCRIPTION)
部分结果如下:
visit https://app.roboflow.com/auth-cli to get your authentication token.
Paste the authentication token here: ··········
loading Roboflow workspace...
loading Roboflow project...
import os

for image_path in tqdm(image_paths):
    image_name = image_path.name
    annotation_name = f"{image_path.stem}.xml"
    image_path = str(image_path)
    annotation_path = os.path.join(ANNOTATIONS_DIRECTORY, annotation_name)
    new_project.upload(
        image_path=image_path,
        annotation_path=annotation_path,
        split="train",
        is_prediction=True,
        overwrite=True,
        tag_names=["auto-annotated-with-grounded-sam"],
        batch_name="auto-annotated-with-grounded-sam"
    )

1.8.4 Convert Object Detection to Instance Segmentation Dataset
如果您已经拥有数据集,但它带有边界框注释,您可以快速轻松地将其转换为实例分割数据集。 SAM 允许使用框作为提示。
1.8.5 Download Object Detection Dataset from Roboflow
要使用本教程中的数据集,请确保以 Pascal VOC XML 格式下载。 我们将使用 BlueBerries 数据集作为示例。
%cd {HOME}

import roboflow
from roboflow import Roboflow

roboflow.login()

rf = Roboflow()

project = rf.workspace("inkyu-sa-e0c78").project("blueberries-u0e84")
dataset = project.version(1).download("voc")

dataset.location
位置为:/content/BlueBerries-1
!ls {dataset.location}
输出为:README.dataset.txt README.roboflow.txt test train valid
1.8.6 Load and Visualize Object Detection Dataset with Supervision
object_detection_dataset = sv.Dataset.from_pascal_voc(
    images_directory_path=f"{dataset.location}/train",
    annotations_directory_path=f"{dataset.location}/train"
)
import random
random.seed(9001)
注意:重新运行下面的单元格以查看数据集中的不同图像。
image_names = list(object_detection_dataset.images.keys())
image_name = random.choice(image_names)

image = object_detection_dataset.images[image_name]
detections = object_detection_dataset.annotations[image_name]

box_annotator = sv.BoxAnnotator()

annotated_image = box_annotator.annotate(scene=image.copy(), detections=detections, skip_label=True)

%matplotlib inline
sv.plot_image(annotated_image, (16, 16))

1.8.7 Run SAM convert Boxes into Masks
from tqdm.notebook import tqdm

for image_name, image in tqdm(object_detection_dataset.images.items()):
    detections = object_detection_dataset.annotations[image_name]
    detections.mask = segment(
        sam_predictor=sam_predictor,
        image=cv2.cvtColor(image, cv2.COLOR_BGR2RGB),
        xyxy=detections.xyxy
    )
 文章来源:https://www.toymoban.com/news/detail-852165.html
image_names = list(object_detection_dataset.images.keys())
image_name = random.choice(image_names)

image = object_detection_dataset.images[image_name]
detections = object_detection_dataset.annotations[image_name]

mask_annotator = sv.MaskAnnotator()

annotated_image = mask_annotator.annotate(scene=image.copy(), detections=detections)

%matplotlib inline
sv.plot_image(annotated_image, (16, 16))
 文章来源地址https://www.toymoban.com/news/detail-852165.html
到了这里,关于【计算机视觉 | 目标检测 | 图像分割】Grounding DINO + Segment Anything Model (SAM)源代码分享(含源代码)的文章就介绍完了。如果您还想了解更多内容,请在右上角搜索TOY模板网以前的文章或继续浏览下面的相关文章,希望大家以后多多支持TOY模板网!


