准备编写环境 Y v Y(修改中,仅供参考)
操作系统:
windows11
Android Studio 属性 :
文件版本 2023.2.0.0
产品版本 2023.2.0.AI-232.10227.8.2321._BUILD_NUMBER_
JAVA属性:
java version "17.0.10" 2024-01-16 LTS
Java(TM) SE Runtime Environment (build 17.0.10+11-LTS-240)
Java HotSpot(TM) 64-Bit Server VM (build 17.0.10+11-LTS-240, mixed mode, sharing)
Android Studio版本不需要跟我的一样,只要检查好JAVA属性(版本)就ok了
win+R,打开CMD命令窗口,输入 java -version 查看java版本是否1.17 版本(或者高过)
开始新建项目
1、选择新建一个项目 New Project,在 Templates 选择到 Phone and Tablet
(一般这里不用选择,一进来默认就选定了)
2、找到并选择 Bottom Navigition Views Activity,然后下一步Next。
3、设置项目属性(具体如下),设置完成之后点击 Finish 就可以
(在新建过程尽量不要动这个窗口<最小化也行>,可能建项目的过程有些慢)
如果想省事的直接复制我的代码成功运行,项目名字尽量要跟我的一样 WeChat
如果你要坚持要自己名字的,那你注意我的代码出现 wechat 时看看需不需要更改SDK如果想用低版本的,比如:我想用Android 10,记得在Minimum SDK下更改版本

4、以下就是整个项目的全貌,我展开的都是需要经常用的到文件
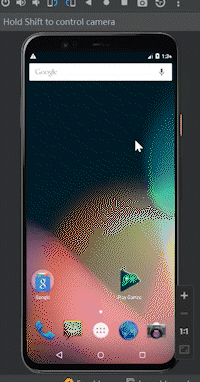
5、创建一个 Android 模拟器 运行项目的时候要使用


这样Android 模拟器就新建好了,这个项目也就新建好了
准备开始构建项目
1、找到 res/values/themes.xml (后缀 后面 有个night不要选择),然后进行修改,shift+F10 运行一下
<resources xmlns:tools="http://schemas.android.com/tools">
    <!-- Base application theme. -->
    <style name="Theme.WeChat" parent="Theme.AppCompat">
        <!-- Primary brand color. -->
        <item name="colorOnPrimary">@color/white</item>
        <item name="colorOnSecondary">@color/black</item>
    </style>
</resources> 

2、将自己的图标(就是底部导航栏的图标)放到 res/drawable 文件目录下
(具体路径查询看下方)这些是我在iconmonstr网站下载 下载格式 .PNG


3、找到 res/menu/bottom_nav_menu.xml 文件 进行修改
(这时候运行一下,如果模拟器能显示出来界面,导航栏多了个东西,就差不多可以了,不过导航栏却动不了,这个是正常的,因为还没有设置到它)
<?xml version="1.0" encoding="utf-8"?>
<menu xmlns:android="http://schemas.android.com/apk/res/android">

    <item
        android:id="@+id/navigation_WeChat"
        android:icon="@drawable/message"
        android:title="微信" />

    <item
        android:id="@+id/navigation_Friend"
        android:icon="@drawable/friend"
        android:title="通讯录" />
    <item
        android:id="@+id/navigation_Search"
        android:icon="@drawable/find"
        android:title="发现" />
    <item
        android:id="@+id/navigation_Self"
        android:icon="@drawable/self"
        android:title="我" />
</menu>
4、现在开始设置底部导航栏的跳转, 找到 res/navigation/mobile_navigation.xml 文件修改
<?xml version="1.0" encoding="utf-8"?>
<navigation xmlns:android="http://schemas.android.com/apk/res/android"
    xmlns:app="http://schemas.android.com/apk/res-auto"
    xmlns:tools="http://schemas.android.com/tools"
    android:id="@+id/mobile_navigation"
    app:startDestination="@+id/navigation_WeChat">

    <fragment
        android:id="@+id/navigation_WeChat"
        android:name="com.example.wechat.ui.home.HomeFragment"
        android:label="@string/title_home"
        tools:layout="@layout/fragment_home" />

    <fragment
        android:id="@+id/navigation_Friend"
        android:name="com.example.wechat.ui.dashboard.DashboardFragment"
        android:label="@string/title_dashboard"
        tools:layout="@layout/fragment_dashboard" />

    <fragment
        android:id="@+id/navigation_Search"
        android:name="com.example.wechat.ui.notifications.NotificationsFragment"
        android:label="@string/title_notifications"
        tools:layout="@layout/fragment_notifications" />

    <fragment
        android:id="@+id/navigation_Self"
        android:name="com.example.wechat.ui.home.HomeFragment"
        android:label="@string/title_home"
        tools:layout="@layout/fragment_home" />
</navigation>
5、找到 MainActivity 进行修改
package com.example.wechat

import android.os.Bundle
import com.google.android.material.bottomnavigation.BottomNavigationView
import androidx.appcompat.app.AppCompatActivity
import androidx.navigation.findNavController
import androidx.navigation.ui.AppBarConfiguration
import androidx.navigation.ui.setupActionBarWithNavController
import androidx.navigation.ui.setupWithNavController
import com.example.wechat.databinding.ActivityMainBinding

class MainActivity : AppCompatActivity() {

    private lateinit var binding: ActivityMainBinding

    override fun onCreate(savedInstanceState: Bundle?) {
        super.onCreate(savedInstanceState)

        binding = ActivityMainBinding.inflate(layoutInflater)
        setContentView(binding.root)

        val navView: BottomNavigationView = binding.navView

        val navController = findNavController(R.id.nav_host_fragment_activity_main)
        // Passing each menu ID as a set of Ids because each
        // menu should be considered as top level destinations.
        val appBarConfiguration = AppBarConfiguration(
            setOf(
                R.id.navigation_WeChat,
                R.id.navigation_Friend,
                R.id.navigation_Search,
                R.id.navigation_Self
            )
        )
        setupActionBarWithNavController(navController, appBarConfiguration)
        navView.setupWithNavController(navController)
    }
}
修改完成!直接运行项目(running)

恭喜你完成最最简单的微信主界面UI🎉🎉🎉
这似乎有点粗糙,那么接下来继续完善
(也就是把咖啡上别人的拉花,换成自己的拉花,内核没有什么大的改动)
主要都是 更改名字 为项目后面 操作流畅 打下基础
1、找到 res/values/string.xml 文件修改
<resources>
    <string name="app_name">WeChat</string>
    <string name="title_WeiChat">WeChat</string>
    <string name="title_Friend">Friend</string>
    <string name="title_Search">Search</string>
    <string name="title_Self">Self</string>
</resources>
2、修改 res/layout 文件夹下的文件
一、首先新建一个xml文件在 res/layout 目录下 fragment_self.xml


二、然后编写 fragment_self.xml
<?xml version="1.0" encoding="utf-8"?>
<androidx.constraintlayout.widget.ConstraintLayout xmlns:android="http://schemas.android.com/apk/res/android"
    xmlns:app="http://schemas.android.com/apk/res-auto"
    xmlns:tools="http://schemas.android.com/tools"
    android:layout_width="match_parent"
    android:layout_height="match_parent"
    tools:context=".ui.home.HomeFragment">

    <TextView
        android:id="@+id/text_self"
        android:layout_width="match_parent"
        android:layout_height="wrap_content"
        android:layout_marginStart="8dp"
        android:layout_marginTop="8dp"
        android:layout_marginEnd="8dp"
        android:textAlignment="center"
        android:textSize="20sp"
        app:layout_constraintBottom_toBottomOf="parent"
        app:layout_constraintEnd_toEndOf="parent"
        app:layout_constraintStart_toStartOf="parent"
        app:layout_constraintTop_toTopOf="parent" />
</androidx.constraintlayout.widget.ConstraintLayout>
3、修改 ui 文件


一、修改self文件夹下文件名称(主要操作改名)如图


这时候运行一下项目看看是否改名成功,项目运行成功接着往下做
一般情况下这个Rename Variables只有一个选项直接勾选就可以,只不过因为我们是复制UI下同个文件夹,导致它判断出多个情况
你可以根据这个顺序更改文件名:
home - > weichat
dashboard -> friend
notifiction - > search
二、同理将ui下的另外三个文件夹都给改了名字

三、更改文件中的代码
----------------------------------------------------------------------------
friendFragment文件::
----------------------------------------------------------------------------
package com.example.wechat.ui.friend

import android.os.Bundle
import android.view.LayoutInflater
import android.view.View
import android.view.ViewGroup
import android.widget.TextView
import androidx.fragment.app.Fragment
import androidx.lifecycle.ViewModelProvider
import com.example.wechat.databinding.FragmentFriendBinding

class friendFragment : Fragment() {

    private var _binding: FragmentFriendBinding? = null

    // This property is only valid between onCreateView and
    // onDestroyView.
    private val binding get() = _binding!!

    override fun onCreateView(
        inflater: LayoutInflater,
        container: ViewGroup?,
        savedInstanceState: Bundle?
    ): View {
        val friendViewModel =
            ViewModelProvider(this).get(friendViewModel::class.java)

        _binding = FragmentFriendBinding.inflate(inflater, container, false)
        val root: View = binding.root

        val textView: TextView = binding.textFriend
        friendViewModel.text.observe(viewLifecycleOwner) {
            textView.text = it
        }
        return root
    }

    override fun onDestroyView() {
        super.onDestroyView()
        _binding = null
    }
}

----------------------------------------------------------------------------
friendViewModel文件::
----------------------------------------------------------------------------
package com.example.wechat.ui.friend

import androidx.lifecycle.LiveData
import androidx.lifecycle.MutableLiveData
import androidx.lifecycle.ViewModel

class friendViewModel : ViewModel() {

    private val _text = MutableLiveData<String>().apply {
        value = "This is Friend Fragment"
    }
    val text: LiveData<String> = _text
}
---------------------------------------------------------------------------
searchFragment文件::
---------------------------------------------------------------------------
package com.example.wechat.ui.search

import android.os.Bundle
import android.view.LayoutInflater
import android.view.View
import android.view.ViewGroup
import android.widget.TextView
import androidx.fragment.app.Fragment
import androidx.lifecycle.ViewModelProvider
import com.example.wechat.databinding.FragmentSearchBinding

class searchFragment : Fragment() {

    private var _binding: FragmentSearchBinding? = null

    // This property is only valid between onCreateView and
    // onDestroyView.
    private val binding get() = _binding!!

    override fun onCreateView(
        inflater: LayoutInflater,
        container: ViewGroup?,
        savedInstanceState: Bundle?
    ): View {
        val searchViewModel =
            ViewModelProvider(this).get(searchViewModel::class.java)

        _binding = FragmentSearchBinding.inflate(inflater, container, false)
        val root: View = binding.root

        val textView: TextView = binding.textSearch
        searchViewModel.text.observe(viewLifecycleOwner) {
            textView.text = it
        }
        return root
    }

    override fun onDestroyView() {
        super.onDestroyView()
        _binding = null
    }
}
---------------------------------------------------------------------------
searchViewModel文件::
---------------------------------------------------------------------------
package com.example.wechat.ui.search

import androidx.lifecycle.LiveData
import androidx.lifecycle.MutableLiveData
import androidx.lifecycle.ViewModel

class searchViewModel : ViewModel() {

    private val _text = MutableLiveData<String>().apply {
        value = "This is Search Fragment"
    }
    val text: LiveData<String> = _text
}
---------------------------------------------------------------------------
selfFragment文件::
---------------------------------------------------------------------------
package com.example.wechat.ui.self

import android.os.Bundle
import android.view.LayoutInflater
import android.view.View
import android.view.ViewGroup
import android.widget.TextView
import androidx.fragment.app.Fragment
import androidx.lifecycle.ViewModelProvider
import com.example.wechat.databinding.FragmentSelfBinding

class selfFragment : Fragment() {

    private var _binding: FragmentSelfBinding? = null

    // This property is only valid between onCreateView and
    // onDestroyView.
    private val binding get() = _binding!!

    override fun onCreateView(
        inflater: LayoutInflater,
        container: ViewGroup?,
        savedInstanceState: Bundle?
    ): View {
        val selfViewModel =
            ViewModelProvider(this).get(selfViewModel::class.java)

        _binding = FragmentSelfBinding.inflate(inflater, container, false)
        val root: View = binding.root

        val textView: TextView = binding.textSelf
        selfViewModel.text.observe(viewLifecycleOwner) {
            textView.text = it
        }
        return root
    }

    override fun onDestroyView() {
        super.onDestroyView()
        _binding = null
    }
}

---------------------------------------------------------------------------
selfViewModel文件::
---------------------------------------------------------------------------
package com.example.wechat.ui.self

import androidx.lifecycle.LiveData
import androidx.lifecycle.MutableLiveData
import androidx.lifecycle.ViewModel

class selfViewModel : ViewModel() {

    private val _text = MutableLiveData<String>().apply {
        value = "This is Self Fragment"
    }
    val text: LiveData<String> = _text
}

---------------------------------------------------------------------------
wechatFragment文件::
---------------------------------------------------------------------------
package com.example.wechat.ui.wechat

import android.os.Bundle
import android.view.LayoutInflater
import android.view.View
import android.view.ViewGroup
import android.widget.TextView
import androidx.fragment.app.Fragment
import androidx.lifecycle.ViewModelProvider
import com.example.wechat.databinding.FragmentWechatBinding

class wechatFragment : Fragment() {

    private var _binding: FragmentWechatBinding? = null

    // This property is only valid between onCreateView and
    // onDestroyView.
    private val binding get() = _binding!!

    override fun onCreateView(
        inflater: LayoutInflater,
        container: ViewGroup?,
        savedInstanceState: Bundle?
    ): View {
        val wechatViewModel =
            ViewModelProvider(this).get(wechatViewModel::class.java)

        _binding = FragmentWechatBinding.inflate(inflater, container, false)
        val root: View = binding.root

        val textView: TextView = binding.textWechat
        wechatViewModel.text.observe(viewLifecycleOwner) {
            textView.text = it
        }
        return root
    }

    override fun onDestroyView() {
        super.onDestroyView()
        _binding = null
    }
}

---------------------------------------------------------------------------
wechathViewModel文件::
---------------------------------------------------------------------------
package com.example.wechat.ui.wechat

import androidx.lifecycle.LiveData
import androidx.lifecycle.MutableLiveData
import androidx.lifecycle.ViewModel

class wechatViewModel : ViewModel() {

    private val _text = MutableLiveData<String>().apply {
        value = "This is Wechat Fragment"
    }
    val text: LiveData<String> = _text
}
5、更改 res/layout 文件下文件
一、更改文件名字

请根据这个顺序更改文件名(不要到后面会混乱的):
home - > wechat
dashboard -> friend
notifiction - > search文章来源:https://www.toymoban.com/news/detail-853371.html
二、更改文件中的代码
fragment_wechat.xml

        android:id="@+id/text_home"

改成-------

        android:id="@+id/text_wechat"

-------------------------------------------------------
fragment_friend.xml

        android:id="@+id/text_dashboard"

改成-------

        android:id="@+id/text_friend"

-------------------------------------------------------

fragment_search.xml

        android:id="@+id/text_notifications"

改成-------

        android:id="@+id/text_friend"
5、找到 res/navigation/moobile_navigation.xml 文件修改
<?xml version="1.0" encoding="utf-8"?>
<navigation xmlns:android="http://schemas.android.com/apk/res/android"
    xmlns:app="http://schemas.android.com/apk/res-auto"
    xmlns:tools="http://schemas.android.com/tools"
    android:id="@+id/mobile_navigation"
    app:startDestination="@+id/navigation_WeChat">

    <fragment
        android:id="@+id/navigation_WeChat"
        android:name="com.example.wechat.ui.wechat.wechatFragment"
        android:label="@string/title_WeiChat"
        tools:layout="@layout/fragment_wechat" />

    <fragment
        android:id="@+id/navigation_Friend"
        android:name="com.example.wechat.ui.search.searchFragment"
        android:label="@string/title_Friend"
        tools:layout="@layout/fragment_friend" />

    <fragment
        android:id="@+id/navigation_Search"
        android:name="com.example.wechat.ui.friend.friendFragment"
        android:label="@string/title_Search"
        tools:layout="@layout/fragment_search" />

    <fragment
        android:id="@+id/navigation_Self"
        android:name="com.example.wechat.ui.self.selfFragment"
        android:label="@string/title_Self"
        tools:layout="@layout/fragment_self" />
</navigation>
恭喜你完成最简单的微信主界面UI🎉🎉🎉
文章来源地址https://www.toymoban.com/news/detail-853371.html
到了这里,关于Android Studio Kotlin 简单实现微信主界面UI的文章就介绍完了。如果您还想了解更多内容,请在右上角搜索TOY模板网以前的文章或继续浏览下面的相关文章,希望大家以后多多支持TOY模板网!