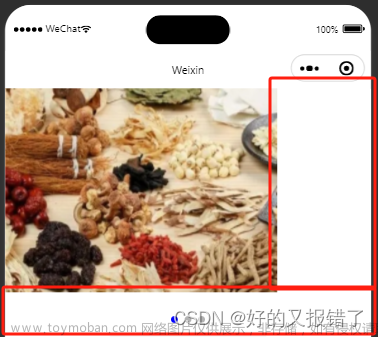
先上个效果图,代码可以直接拿~
安装swiper和vue-awesome-swiper
因为项目用的是nuxt2,所以考虑到swiper的兼容问题,选择的是"swiper": “^5.2.0”
首先是安装swiper和vue-awesome-swiper,并指定版本
npm install swiper@5.2.0 --save

npm install vue-awesome-swiper@4.1.1 --save
然后引入,在nuxt.config.js中引入
css: [
    'swiper/css/swiper.css'
],
plugins: [
    { src: '@/plugins/vue-swiper', ssr: false }
],
基本用法
在plugins下新建一个vue-swiper.js
import Vue from 'vue'
import VueAwesomeSwiper from 'vue-awesome-swiper'
Vue.use(VueAwesomeSwiper)
在components下新建一个VueSwiper.vue
<template>
  <div v-if="initStatus" v-swiper:mySwiper="swiperOption" class="swiper mySwiper swiperBox">
    <div class="swiper-wrapper">
      <div class="swiper-slide" v-for="(item, index) in list.value" :key="index">
        <div class="pr">
          <div class="swiper-slide-imgbox uf uf-ac uf-jc">
            <img :src="item.imageUrl" />
          </div>
          <div class="font12 c8 txt-box">{{ item.title }}</div>
        </div>
      </div>
    </div>
    <div class="swiper-button-prev"></div>
    <div class="swiper-button-next"></div>
  </div>
</template>
<script>
export default {
  props: {
    list: {//banner数组
      type: Object,
      default: function () {
        return {}
      }
    },
    slidesPerView: {//一页显示几个
      type: Number,
      default: 1
    }
  },
  data() {
    return {
      initStatus: false,//初始化状态
      swiperOption: {},//swiper参数
    }
  },
  mounted() {
    let self = this;
    this.$nextTick(() => {
      this.swiperOption = {
        loop: true,
        loopAdditionalSlides: 3,
        coverflowEffect: {
          rotate: 60, //侧转角度(正值凹陷)
          stretch: -80,//每个slide之间拉伸值(正值紧贴)
          depth: 100,  //值越大为远景(可负值)
          modifier: 1, //depth和rotate和stretch的倍率
          shadows: false
       },
        centeredSlides: true,
        initialSlide: 1,
        slidesPerView: self.slidesPerView,//一页显示几个
        spaceBetween: 10,//间隔
        updateOnWindowResize: true,
        watchSlidesProgress: true,//
        noSwiping: true,//
        effect: 'coverflow', //设置Slide的切换效果,默认为"slide"(普通位移切换),还可设置为"fade"(淡入)、"cube"(方块)、"coverflow"(3d流)、"flip"(3d翻转)、"cards"(卡片式)、"creative"(创意性)。
        freeMode: 1,
        autoplay: {//自动轮播//
          delay: 3000, //
          disableOnInteraction: false,//操作swiper后 自动轮播不会停止//
        },
        navigation: {
          nextEl: '.swiper-button-next',
          prevEl: '.swiper-button-prev',
        },
      }
      this.initStatus = true //渲染swiper
    })
  },
}
</script>
<style lang="scss" scoped>
.swiper {
  margin-left: auto;
  margin-right: auto;
  position: relative;
  box-sizing: border-box;
}
.swiper-wraper {
  width: 100%;
  height: 100%;
  z-index: 1;
  display: flex;
  box-sizing: content-box;
}
.swiper-slide {
  flex-shrink: 0;
  width: 100%;
  height: 100%;
}
.swiper-slide-imgbox{
  width: 315px;
  height: 302px;
  opacity: 1;
  background: rgba(255, 255, 255, 1);
  padding: 20px;
  box-sizing: border-box;
}
.pr{
  position: relative;
}
.txt-box{
  position: absolute;
  bottom: -40px;
  left: 0;
  right: 0;
  margin: 0 auto;
}
</style>
在plugins下引入
// 引入vue 及 组件
import Vue from 'vue'
import VueSwiper from '@/components/VueSwiper'

// 全局注册组件
Vue.component('VueSwiper', VueSwiper)
然后是使用这个组件,在pages下新建一个honor.vue
<template>
  <div class="main-container">
    <PageHeader />

    <!-- banner -->
    <div class="banner-box">
      <div class="font48 weight700 c3">资质与荣誉</div>
      <div class="font16 weight400 c7 op7 mt30">Qualifications and Honors</div>
    </div>

    <div class="content-box" v-for="(honorItem, index) in honorTypes" :key="index">
      <div class="font36 pt100 mb40 vc" v-if="honorInfo[index] && honorInfo[index].value && honorInfo[index].value.length">{{ honorItem.title }}</div>
      <div class="review-content" v-if="honorInfo[index] && honorInfo[index].value && honorInfo[index].value.length">
        <vue-swiper :list="honorInfo[index]" :slidesPerView="3"></vue-swiper>
      </div>
    </div>

    <PageFooter />
  </div>
</template>

<script>
import { shareToWechat } from "../../utils/format";
export default {
  name: "Honor",

  data() {
    return {
      showType: "honor",
      honorTypes: [],
      honors: [],
      honorInfo: []
    };
  },

  methods:{
    async findHonorTypeData() {
      let _params = {
        order: 'sort'
      }
      this.loading = true;
      const res = await this.$axios.$get("/certType", { params: _params });
      this.loading = false;
      let _this = this
      if (res && res.status === 0) {
        this.honorTypes = res.result
        res.result.forEach((item, i) => {
          _this.findHonorsData(item.title)
        })
      } else {
        this.$message.error(res.message);
      }
    },

    async findHonorsData(certType) {
      let _params = {
        order: 'sort',
        certType: certType,
        pageNum: 1,
        pageSize: 30
      }
      this.loading = true;
      const res = await this.$axios.$get("/certList", { params: _params });
      this.loading = false;
      let _this = this
      if (res && res.status === 0) {
        res.result.rows.forEach((item, i) => {
          item.imageUrl = `/images${item.imageUrl}`
        })
        let _obj = {
          name: certType,
          value: res.result.rows
        }
        _this.honorInfo.push(_obj)
      } else {
        this.$message.error(res.message);
      }
    },
  },

  mounted () {
    this.findHonorTypeData()
  }
};
</script>

<style lang="scss" scoped>
.content-box{
  background-color: rgba(239, 241, 244, 1);
  padding-bottom: 100px;
}
.review-content {
  width: 100%;
  height: 302px;
  position: relative;
  margin: 0 auto;
  .swiperBox {
    height: 360px;
    width: 100%;
    position: static;
    padding-top: 20px;
    & /deep/ {
      .swiper-slide {
        text-align: center;
        font-size: 18px;
        background: #fff;
        width: 315px !important;
        height: 302px;/* Center slide text vertically */
        display: -webkit-box;
        display: -ms-flexbox;
        display: -webkit-flex;
        display: flex;
        -webkit-box-pack: center;
        -ms-flex-pack: center;
        -webkit-justify-content: center;
        justify-content: center;
        -webkit-box-align: center;
        -ms-flex-align: center;
        -webkit-align-items: center;
        align-items: center;
        transition-property: all;
        img {
          max-width: 295px;
          height: auto;
          max-height: 282px;
          border-radius: 2px;
        }
        .swiper-slide-shadow-left{
          background-image: none
        }
        .swiper-slide-shadow-right{
          background-image: none
        }
      }
      .swiper-slide-active {
        .mask {
          display: none;
        }
      }
      .swiper-button-prev,.swiper-button-next {
        position: absolute;
        width: 34px;
        height: 64px;
        line-height: 64px;
        border-radius: 6px;
        font-size:30px;
        color: #00A2FF;
        top: 50%;
      }
      .swiper-button-prev:after,.swiper-button-next:after {
        font-size: 30px;
        &:hover{
          background-color: none;
        }
      }
      .swiper-button-prev {
        left: 0px;
      }
      .swiper-button-next {
        right: 0px;
      }
      .swiper-button-prev:hover,.swiper-button-next:hover {
        background: rgba(209, 209, 209, 0.5);
        color: rgba(255, 255, 255, 0.5);
      }
    }
  }
}
.banner-box {
  height: 370px;
  opacity: 1;
  padding: 172px 120px 0 120px;
  box-sizing: border-box;
  background: url(/images/productImages/honor.png) right 120px bottom 20px / 320px auto no-repeat,linear-gradient(90deg, rgba(137, 247, 254, 1) 0%, rgba(84, 156, 252, 1) 100%);;
}
.honor-box {
  max-width: 990px;
  padding-bottom: 82px;
  margin: 0 auto;
  & .honor-card {
    width: 300px;
    margin: 0 15px 48px;
    box-shadow: 0px 4px 8px rgba(0, 0, 0, 0.16);
    border-radius: 4px;
    background-clip: content-box;
    background-color: rgba(255, 255, 255, 1);
    background-position: center center;
    background-size: 100% auto;
    background-repeat: no-repeat;
    &.large {
      padding: 32px;
    }
    &.small {
      padding: 19px 15px;
    }
  }
}
@media screen and (max-width: 768px) {
  .banner-box {
    height: 260px;
    background-position: center top 100px, left top;
    background-size: auto 80px, auto 100%;
    & .banner-content {
      top: 260px;
      width: 100%;
    }
  }
  .honor-box {
    justify-content: center;
    padding: 0 30px 20px;
    & .honor-card {
      width: 300px;
      margin: 0 15px 20px;
    }
  }
}
</style>
出现空白页的bug
使用了swiper的coverflowEffect效果,设置了同时显示3个,同时开启了loop模式。
当切换到倒数第二张时没有新的slider生成,导致最后一张的右边是空白的,只有切换到最后一张时才会再在后面复制新的slider,怎么让它在显示倒数第二张时就生成新的slider?

最后发现slidesPerView设置为auto,就正常了
然后调整coverflowEffect里的stretch和depth来弄就没问题了文章来源:https://www.toymoban.com/news/detail-854468.html
VueSwiper.vue文章来源地址https://www.toymoban.com/news/detail-854468.html
<template>
  <div v-if="initStatus" v-swiper:mySwiper="swiperOption" class="swiper mySwiper swiperBox">
    <div class="swiper-wrapper">
      <div class="swiper-slide" v-for="(item, index) in list.value" :key="index">
        <div class="pr">
          <div class="swiper-slide-imgbox uf uf-ac uf-jc">
            <img :src="item.imageUrl" />
          </div>
          <div class="font12 c8 txt-box">{{ item.title }}</div>
        </div>
      </div>
    </div>
    <div class="swiper-button-prev"></div>
    <div class="swiper-button-next"></div>
  </div>
</template>
<script>
export default {
  props: {
    list: {//banner数组
      type: Object,
      default: function () {
        return {}
      }
    }
  },
  data() {
    return {
      initStatus: false,//初始化状态
      swiperOption: {},//swiper参数
    }
  },
  mounted() {
    let self = this;
    this.$nextTick(() => {
      this.swiperOption = {
        loop: true,
        loopAdditionalSlides: 3,
        coverflowEffect: {
          rotate: 50, //侧转角度(正值凹陷)
          stretch: -110,//每个slide之间拉伸值(正值紧贴)
          depth: 100,  //值越大为远景(可负值)
          modifier: 1, //depth和rotate和stretch的倍率
          shadows: false
       },
        centeredSlides: true,
        initialSlide: 1,
        slidesPerView: 'auto',//一页显示几个
        spaceBetween: 10,//间隔
        updateOnWindowResize: true,
        watchSlidesProgress: true,//
        noSwiping: true,//
        effect: 'coverflow', //设置Slide的切换效果,默认为"slide"(普通位移切换),还可设置为"fade"(淡入)、"cube"(方块)、"coverflow"(3d流)、"flip"(3d翻转)、"cards"(卡片式)、"creative"(创意性)。
        freeMode: 1,
        autoplay: {//自动轮播//
          delay: 3000, //
          disableOnInteraction: false,//操作swiper后 自动轮播不会停止//
        },
        navigation: {
          nextEl: '.swiper-button-next',
          prevEl: '.swiper-button-prev',
        },
      }
      this.initStatus = true //渲染swiper
    })
  },
}
</script>
<style lang="scss" scoped>
.swiper {
  margin-left: auto;
  margin-right: auto;
  position: relative;
  box-sizing: border-box;
}
.swiper-wraper {
  width: 100%;
  height: 100%;
  z-index: 1;
  display: flex;
  box-sizing: content-box;
}
.swiper-slide {
  flex-shrink: 0;
  width: 100%;
  height: 100%;
}
.swiper-slide-imgbox{
  width: 315px;
  height: 302px;
  opacity: 1;
  background: rgba(255, 255, 255, 1);
  padding: 20px;
  box-sizing: border-box;
}
.pr{
  position: relative;
}
.txt-box{
  position: absolute;
  bottom: -40px;
  left: 0;
  right: 0;
  margin: 0 auto;
}
</style>
到了这里,关于实现swiper 3d 轮播效果的文章就介绍完了。如果您还想了解更多内容,请在右上角搜索TOY模板网以前的文章或继续浏览下面的相关文章,希望大家以后多多支持TOY模板网!


