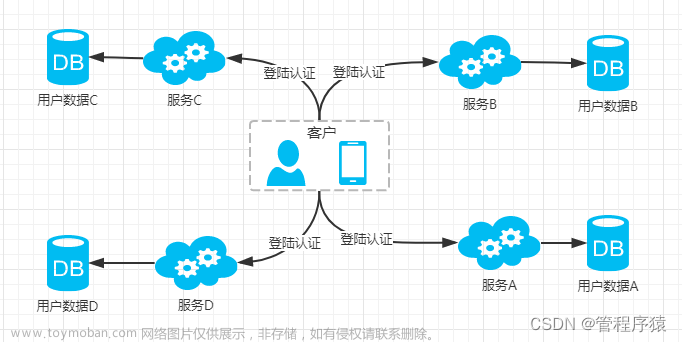
什么是 2FA(双因素身份验证)?
双因素身份验证(2FA)是一种安全系统,要求用户提供两种不同的身份验证方式才能访问某个系统或服务。国内普遍做短信验证码这种的用的比较少,不过在国外的网站中使用双因素身份验证的还是很多的。用户通过使用验证器扫描二维码,就能在app上获取登录的动态口令,进一步加强了账户的安全性。
主要步骤
pom.xml中增加依赖
<!-- 用于SecureKey生成 -->
<dependency>
    <groupId>commons-codec</groupId>
    <artifactId>commons-codec</artifactId>
    <version>1.15</version>
</dependency>
<!-- 二维码依赖 -->
<dependency>
    <groupId>org.iherus</groupId>
    <artifactId>qrext4j</artifactId>
    <version>1.3.1</version>
</dependency>
用户表中增加secretKey列
为用户绑定secretKey字段,用以生成二维码及后期校验
工具类
谷歌身份验证器工具类
/**
 * 谷歌身份验证器工具类
 */
public class GoogleAuthenticator {

    /**
     * 时间前后偏移量
     * 用于防止客户端时间不精确导致生成的TOTP与服务器端的TOTP一直不一致
     * 如果为0,当前时间为 10:10:15
     * 则表明在 10:10:00-10:10:30 之间生成的TOTP 能校验通过
     * 如果为1,则表明在
     * 10:09:30-10:10:00
     * 10:10:00-10:10:30
     * 10:10:30-10:11:00 之间生成的TOTP 能校验通过
     * 以此类推
     */
    private static int WINDOW_SIZE = 0;

    /**
     * 加密方式,HmacSHA1、HmacSHA256、HmacSHA512
     */
    private static final String CRYPTO = "HmacSHA1";

    /**
     * 生成密钥,每个用户独享一份密钥
     *
     * @return
     */
    public static String getSecretKey() {
        SecureRandom random = new SecureRandom();
        byte[] bytes = new byte[20];
        random.nextBytes(bytes);
        Base32 base32 = new Base32();
        String secretKey = base32.encodeToString(bytes);
        // make the secret key more human-readable by lower-casing and
        // inserting spaces between each group of 4 characters
        return secretKey.toUpperCase();
    }

    /**
     * 生成二维码内容
     *
     * @param secretKey 密钥
     * @param account   账户名
     * @param issuer    网站地址(可不写)
     * @return
     */
    public static String getQrCodeText(String secretKey, String account, String issuer) {
        String normalizedBase32Key = secretKey.replace(" ", "").toUpperCase();
        try {
            return "otpauth://totp/"
                    + URLEncoder.encode((!StringUtils.isEmpty(issuer) ? (issuer + ":") : "") + account, "UTF-8").replace("+", "%20")
                    + "?secret=" + URLEncoder.encode(normalizedBase32Key, "UTF-8").replace("+", "%20")
                    + (!StringUtils.isEmpty(issuer) ? ("&issuer=" + URLEncoder.encode(issuer, "UTF-8").replace("+", "%20")) : "");
        } catch (UnsupportedEncodingException e) {
            throw new IllegalStateException(e);
        }
    }

    /**
     * 获取验证码
     *
     * @param secretKey
     * @return
     */
    public static String getCode(String secretKey) {
        String normalizedBase32Key = secretKey.replace(" ", "").toUpperCase();
        Base32 base32 = new Base32();
        byte[] bytes = base32.decode(normalizedBase32Key);
        String hexKey = Hex.encodeHexString(bytes);
        long time = (System.currentTimeMillis() / 1000) / 30;
        String hexTime = Long.toHexString(time);
        return TOTP.generateTOTP(hexKey, hexTime, "6", CRYPTO);
    }

    /**
     * 检验 code 是否正确
     *
     * @param secret 密钥
     * @param code   code
     * @param time   时间戳
     * @return
     */
    public static boolean checkCode(String secret, long code, long time) {
        Base32 codec = new Base32();
        byte[] decodedKey = codec.decode(secret);
        // convert unix msec time into a 30 second "window"
        // this is per the TOTP spec (see the RFC for details)
        long t = (time / 1000L) / 30L;
        // Window is used to check codes generated in the near past.
        // You can use this value to tune how far you're willing to go.
        long hash;
        for (int i = -WINDOW_SIZE; i <= WINDOW_SIZE; ++i) {
            try {
                hash = verifyCode(decodedKey, t + i);
            } catch (Exception e) {
                // Yes, this is bad form - but
                // the exceptions thrown would be rare and a static
                // configuration problem
                // e.printStackTrace();
                throw new RuntimeException(e.getMessage());
            }
            if (hash == code) {
                return true;
            }
        }
        return false;
    }

    /**
     * 根据时间偏移量计算
     *
     * @param key
     * @param t
     * @return
     * @throws NoSuchAlgorithmException
     * @throws InvalidKeyException
     */
    private static long verifyCode(byte[] key, long t) throws NoSuchAlgorithmException, InvalidKeyException {
        byte[] data = new byte[8];
        long value = t;
        for (int i = 8; i-- > 0; value >>>= 8) {
            data[i] = (byte) value;
        }
        SecretKeySpec signKey = new SecretKeySpec(key, CRYPTO);
        Mac mac = Mac.getInstance(CRYPTO);
        mac.init(signKey);
        byte[] hash = mac.doFinal(data);
        int offset = hash[20 - 1] & 0xF;
        // We're using a long because Java hasn't got unsigned int.
        long truncatedHash = 0;
        for (int i = 0; i < 4; ++i) {
            truncatedHash <<= 8;
            // We are dealing with signed bytes:
            // we just keep the first byte.
            truncatedHash |= (hash[offset + i] & 0xFF);
        }
        truncatedHash &= 0x7FFFFFFF;
        truncatedHash %= 1000000;
        return truncatedHash;
    }

    public static void main(String[] args) {
        for (int i = 0; i < 100; i++) {
            String secretKey = getSecretKey();
            System.out.println("secretKey:" + secretKey);
            String code = getCode(secretKey);
            System.out.println("code:" + code);
            boolean b = checkCode(secretKey, Long.parseLong(code), System.currentTimeMillis());
            System.out.println("isSuccess:" + b);
        }
    }
}
二维码工具类
/**
 * 验证码生成工具类
 */
public class TOTP {

    private static final int[] DIGITS_POWER = {1, 10, 100, 1000, 10000, 100000, 1000000, 10000000, 100000000};

    /**
     * This method uses the JCE to provide the crypto algorithm. HMAC computes a
     * Hashed Message Authentication Code with the crypto hash algorithm as a
     * parameter.
     *
     * @param crypto   : the crypto algorithm (HmacSHA1, HmacSHA256, HmacSHA512)
     * @param keyBytes : the bytes to use for the HMAC key
     * @param text     : the message or text to be authenticated
     */
    private static byte[] hmac_sha(String crypto, byte[] keyBytes, byte[] text) {
        try {
            Mac hmac;
            hmac = Mac.getInstance(crypto);
            SecretKeySpec macKey = new SecretKeySpec(keyBytes, "RAW");
            hmac.init(macKey);
            return hmac.doFinal(text);
        } catch (GeneralSecurityException gse) {
            throw new UndeclaredThrowableException(gse);
        }
    }

    /**
     * This method converts a HEX string to Byte[]
     *
     * @param hex : the HEX string
     * @return: a byte array
     */
    private static byte[] hexStr2Bytes(String hex) {
        // Adding one byte to get the right conversion
        // Values starting with "0" can be converted
        byte[] bArray = new BigInteger("10" + hex, 16).toByteArray();

        // Copy all the REAL bytes, not the "first"
        byte[] ret = new byte[bArray.length - 1];
        System.arraycopy(bArray, 1, ret, 0, ret.length);
        return ret;
    }

    /**
     * This method generates a TOTP value for the given set of parameters.
     *
     * @param key          : the shared secret, HEX encoded
     * @param time         : a value that reflects a time
     * @param returnDigits : number of digits to return
     * @param crypto       : the crypto function to use
     * @return: a numeric String in base 10 that includes
     */
    public static String generateTOTP(String key, String time, String returnDigits, String crypto) {
        int codeDigits = Integer.decode(returnDigits);
        String result = null;

        // Using the counter
        // First 8 bytes are for the movingFactor
        // Compliant with base RFC 4226 (HOTP)
        while (time.length() < 16) {
            time = "0" + time;
        }

        // Get the HEX in a Byte[]
        byte[] msg = hexStr2Bytes(time);
        byte[] k = hexStr2Bytes(key);
        byte[] hash = hmac_sha(crypto, k, msg);

        // put selected bytes into result int
        int offset = hash[hash.length - 1] & 0xf;

        int binary = ((hash[offset] & 0x7f) << 24)
                | ((hash[offset + 1] & 0xff) << 16)
                | ((hash[offset + 2] & 0xff) << 8) | (hash[offset + 3] & 0xff);

        int otp = binary % DIGITS_POWER[codeDigits];

        result = Integer.toString(otp);
        while (result.length() < codeDigits) {
            result = "0" + result;
        }
        return result;
    }
}
Service
@Transactional(isolation = Isolation.REPEATABLE_READ, propagation = Propagation.REQUIRED)
@Service
public class TwoFAService {
    @Autowired
    private UserMapper userMapper;

   /**
    * 获取SecureKey
    */
    public String getSecureKey(Integer userId) {
        User user = userMapper.selectUserById(userId);
        return user.getSecretKey();
    }

    /**
     * 更新secureKey
     */
    public Integer updateSecureKey(Integer userId, String secureKey) {
        return userMapper.updateSecureKeyById(userId, secureKey);
    }

   /**
    * 校验动态码
    */
    public boolean chek2FACode(User user, String twoFACode) throws Exception {
        String secretKey = user.getSecretKey();
        // 没绑定设备就先验证通过
        if(secretKey == null || secretKey.isEmpty()) {
            return true;
        } else  {
           if(twoFACode.isEmpty()) { throw new Exception("已绑定设备,请输入动态码"); }
           boolean checkRes = GoogleAuthenticator.checkCode(secretKey, Long.parseLong(twoFACode), System.currentTimeMillis());
           if(!checkRes) {
               throw new Exception("动态码错误");
           } else {
               return true;
           }
        }
    }
}
Controller
用户登录中增加两步验证:文章来源:https://www.toymoban.com/news/detail-857589.html
@Controller
@RequestMapping(value = "/mgr")
public class UserController {
    @Autowired
    private UserService userService;
    @Autowired
    private LogService logService;
    @Autowired
    private TwoFAService twoFAService;

    /**
     * @Description: 用户登录
     */
    @RequestMapping(value = "/user/login", method = RequestMethod.POST)
    @ResponseBody
    public GlobalResult login(String userCode, String userPwd, String twoFACode) {
        try {
            UsernamePasswordToken token = new UsernamePasswordToken(userCode, userPwd);
            Subject subject = SecurityUtils.getSubject();
            subject.login(token);

            // 2FA验证
            User user = (User) subject.getPrincipal();
            twoFAService.chek2FACode(user, twoFACode);

            Log log = new Log();
            .......
        }
    }
}
两步验证的Controler文章来源地址https://www.toymoban.com/news/detail-857589.html
@RestController
@RequestMapping(value = "/2fa")
public class TwoFAController {
    @Autowired
    private TwoFAService twoFAService;

    /**
     * 生成二维码信息对象
     */
    @GetMapping("/getQrcode")
    public QrCodeResponse getQrcode(@RequestParam("userId") Integer userId, @RequestParam("userCode") String userCode, HttpServletResponse response) throws Exception {
        try {
            String secretKey = twoFAService.getSecureKey(userId);
            QrCodeResponse qrCodeResponse = new QrCodeResponse();
            if(secretKey == null || secretKey.isEmpty()) {
                secretKey = GoogleAuthenticator.getSecretKey();
                qrCodeResponse.setBind(false);
                // userMapper.updateSecureKeyById(userId, secretKey);
            } else {
                qrCodeResponse.setBind(true);
            }

            // 生成二维码内容
            String qrCodeText = GoogleAuthenticator.getQrCodeText(secretKey, userCode, "suggest-mgr");
            // 以流的形式返回生成二维码输出
            // new SimpleQrcodeGenerator().generate(qrCodeText).toStream(response.getOutputStream());
            BufferedImage image = new SimpleQrcodeGenerator().generate(qrCodeText).getImage();
            // 将图片转换为Base64字符串
            String base64Image = convertImageToBase64(image);
            qrCodeResponse.setQrCodeText(secretKey);
            qrCodeResponse.setBase64Image(base64Image);

            return qrCodeResponse;
        } catch (Exception e) {
            // 处理异常
            e.printStackTrace();
            return null; // 或者返回适当的错误信息
        }
    }

    /**
     * 更新SecretKey
     * @param userId
     * @param secretKey
     */
    @GetMapping("/updateSecretKey")
    public void updateSecretKey(@RequestParam("userId") Integer userId, @RequestParam("secretKey") String secretKey) {
        twoFAService.updateSecureKey(userId, secretKey);
    }

    /**
     * 获取新的secretKey 重置用
     * @param userId
     * @param userCode
     * @return
     */
    @GetMapping("/getNewSecretKey")
    public QrCodeResponse getNewSecretKey(@RequestParam("userId") Integer userId, @RequestParam("userCode") String userCode, HttpServletResponse response) throws Exception {
        try {
            String secretKey = secretKey = GoogleAuthenticator.getSecretKey();
            QrCodeResponse qrCodeResponse = new QrCodeResponse();
            qrCodeResponse.setBind(false);

            // 生成二维码内容
            String qrCodeText = GoogleAuthenticator.getQrCodeText(secretKey, userCode, "xxx-site");
            BufferedImage image = new SimpleQrcodeGenerator().generate(qrCodeText).getImage();
            // 将图片转换为Base64字符串
            String base64Image = convertImageToBase64(image);
            qrCodeResponse.setQrCodeText(secretKey);
            qrCodeResponse.setBase64Image(base64Image);

            // 返回包含qrCodeText和Base64编码图片的信息
            return qrCodeResponse;
        } catch (Exception e) {
            // 处理异常
            e.printStackTrace();
            return null; // 或者返回适当的错误信息
        }
    }

    /**
     * 将图片文件流转为base64
     */
    private String convertImageToBase64(BufferedImage image) {
        try {
            ByteArrayOutputStream baos = new ByteArrayOutputStream();
            ImageIO.write(image, "png", baos);
            byte[] imageBytes = baos.toByteArray();
            return Base64.getEncoder().encodeToString(imageBytes);
        } catch (Exception e) {
            // 处理异常
            return "";
        }
    }

    static public class QrCodeResponse {
        private String secretKey;
        private String base64Image;
        private boolean isBind;

        public String getSecretKey() {
            return secretKey;
        }

        public void setSecretKeyt(String secretKey) {
            this.secretKey = secretKey;
        }

        public String getBase64Image() {
            return base64Image;
        }

        public void setBase64Image(String base64Image) {
            this.base64Image = base64Image;
        }

        public boolean isBind() {
            return isBind;
        }

        public void setBind(boolean bind) {
            isBind = bind;
        }
    }
}
常用2FA验证工具
- Google Authenticator: google play, apple store
- Microsoft Authenticator: google play , apple store
- AuthenticatorPro(开源):https://github.com/jamie-mh/AuthenticatorPro
到了这里,关于SpringBoot项目添加2FA双因素身份认证的文章就介绍完了。如果您还想了解更多内容,请在右上角搜索TOY模板网以前的文章或继续浏览下面的相关文章,希望大家以后多多支持TOY模板网!