完整步骤
1.启动 Prometheus 普罗米修斯
prometheus --config.file=/usr/local/etc/prometheus.yml浏览器访问
http://localhost:9090/targets
2.启动Node_exporter
node_exporter访问:
http://localhost:91003.启动grafana
brew services start grafana访问
http://localhost:30004.添加数据源
5.查看Dashboard
一、搭建Node_exporter+Prometheus+Grafana监控系统
普罗米修斯是后端数据监控平台,通过Node_exporter收集数据,Grafana将数据用图形的方式展示出来
1. Prometheus安装
官网各平台下载
(1)通过brew安装
brew install prometheus(2)验证Prometheus
prometheus --version
(3)查看安装位置
which prometheus
找到默认配置prometheus.yml的位置
/usr/local/etc/prometheus.yml(4)启动Prometheus server
prometheus --config.file=/usr/local/etc/prometheus.yml
启动后浏览器输入: http://localhost:9090/targets
http://localhost:9090/targets查看监控数据
http://localhost:9090/metrich
查看到这个页面:

(5)配置Prometheus
- 在Prometheus.yml(/usr/local/etc/prometheus.yml)中有配置文件,我们可以对其进行配置,当然第一次安装也可以不管;
配置后重启服务才能生效
默认配置:

告警管理器(Alertmanager)的配置,目前还没有安装Alertmanager,可以提前配置好:
# my global config
global:
  scrape_interval:     15s # Set the scrape interval to every 15 seconds. Default is every 1 minute.
  evaluation_interval: 15s # Evaluate rules every 15 seconds. The default is every 1 minute.
  # scrape_timeout is set to the global default (10s).

# Alertmanager configuration
alerting:
  alertmanagers:
  - static_configs:
    - targets:
      # - alertmanager:9093

# Load rules once and periodically evaluate them according to the global 'evaluation_interval'.
rule_files:
  # - "first_rules.yml"
  # - "second_rules.yml"
注意输入的格式:yaml格式校验
修改后如下:

其大致可分为四部分:
- global:全局配置,其中scrape_interval表示抓取一次数据的间隔时间,evaluation_interval表示进行告警规则检测的间隔时间;
- alerting:告警管理器(Alertmanager)的配置,目前还没有安装Alertmanager;
- rule_files:告警规则有哪些;
- scrape_configs:抓取监控信息的目标。一个job_name就是一个目标,其targets就是采集信息的IP和端口。这里默认监控了Prometheus自己,可以通过修改这里来修改Prometheus的监控端口。Prometheus的每个exporter都会是一个目标,它们可以上报不同的监控信息,比如机器状态,或者mysql性能等等,不同语言sdk也会是一个目标,它们会上报你自定义的业务监控信息。
重载 prometheus
prometheus --config.file=/usr/local/etc/prometheus.yml
(6)监听 9090 端口
查看端口是否被占用
lsof -i :端口号
杀掉进程
kill PID
//或者
kill -9 PID
- 访问prometheus
- 输入: “ip地址”+":9090" 在浏览器中进行访问,如果出现可视化界面说明成功;
示例: 192.168.10.8:9090 直接在自己电脑中访问
如果访问不了,请检查防火墙是否开启9090端口 ,或者端口是否被占用
2.Node_exporter安装
机器状态监控(监控服务器CPU,硬盘,网络等状态)
下载 windows的 node_expoeter
(1)通过 Brew安装
安装:
brew install node_exporter验证:
node_exporter --version 
(2)启动 node_exporter
brew services start node_exporter 关闭服务
关闭服务
brew services stop node_exporter或者直接
node_exporter
关闭终端窗口就关闭服务了
(3)监听9100端口
- 本Centos中访问:
curl http://localhost:9100/metrics - 电脑浏览器中访问:
ip地址:9100
本地访问:http://localhost:9100
如果访问有内容显示则成功

启动服务的时候可使用nohup后台启动,如果是直接图中所示内容启动则重开连接
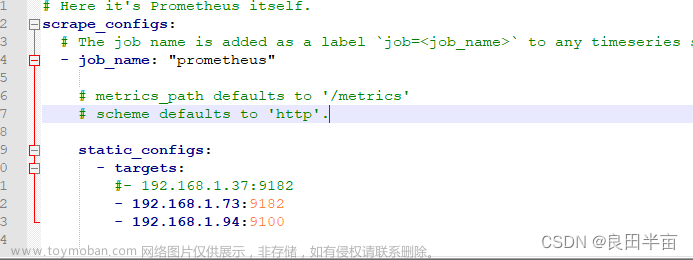
(4)配置Prometheus.yml
从 上面的1( 3) 可知路径:
/usr/local/etc/prometheus.yml添加配置scrape_configs部分如下:
注意输入的格式:yaml格式校验
scrape_configs:
  - job_name: "prometheus"
    static_configs:
    - targets: ["localhost:9090"]
  - job_name: "Node"
    static_configs:
    - targets: ["192.168.10.22:9100"]
重载配置:
重载配置:
prometheus --config.file=/usr/local/etc/prometheus.yml 浏览器查看:
http://localhost:9090/targets
(5)修改端口
如果未能启动成功,提示端口被占用,需要修改默认端口
node_exporter --web.listen-address=:9199
prometheus.yml的端口也要修改为9100 也要修改为 9199
(6) 查看端口是否被占用
lsof -i :端口号杀进程
kill PID3.Grafana安装
(1)通过 brew安装
brew install grafana

查看插件的安装路径
ps aux|grep grafana配置文件的位置
/usr/local/etc/grafana/grafana.ini
(2)插件安装
默认安装位置
/usr/local/var/lib/grafana/plugins当grafana自带的图标等不等满足我们的需求时,比如grafana默认的图片是没有饼图的。
可以安装piechart饼状图插件
先了解下 grafana cli
grafana cli --help 
官网查看插件
命令查看可用的插件:
grafana cli plugins list-remote 
插件有:
grafana-clock-panel
grafana-guidedtour-panel
grafana-polystat-panel
grafana-xyzchart-panel
本人安装的版本没有grafana-piechart-panel,所以安装了grafana-clock-panel
grafana cli plugins install grafana-clock-panel(3)启动grafana
brew services start grafana关闭服务
brew services stop grafana
-
安装并启动Grafana后,浏览器输入 IP:3000 来访问Grafana,管理员账号密码默认是admin/admin。首次登陆会让你修改管理员密码,不修改也可以,进入后还能修改。
-
本地访问
http://localhost:3000

二、监控使用
1. 在grafana添加数据源


先输入名称,然后填入http://ip:9090,然后直接点Save&Test

2. 添加模板
模板
点击Dashboards ,可选择一个,也可多个import

-
选择左侧边栏,Dashboards,New--Imput, 在Grafana.com Dashboard中输入: 8919或者 1860或者 11074
也可以自己选择官方展示面板,链接: https://grafana.com/dashboards


3. 查看效果
ID:8918

ID: 1860

ID 11074

黄色警告部分的原因 :一般是grafana的版本和旧版的panel plugins的兼容问题
三、搭建其他服务器监控系统
监控系统的Prometheus类似于一个注册中心,我们可以只需要配置一个Prometheus,而在其他服务器,只需要安装node_exporter,它们的数据流转就是通过exporter采集数据信息,然后告诉prometheus它的位置;而Prometheus则存储exporter的信息供Grafana询问;Grafana则负责信息的展示;所以可以只配置一个Prometheus,而其他服务器或者本机的服务器的exporter只需要在这一个Promethes中给出它的job_name,targets地址等信息即可;
Node_exporter安装在被测服务器上,启动服务
- 各步骤的IP地址要换为被测服务器的IP地址
- Prometheus.yml的 targets值
- 网页访问的ip部分
- grafana添加数据源的URL
注意:如果需要监控其他服务器,则只需要在其他服务器安装 node_exporter 即可,将其对应的ip地址,端口号等信息配置到已有的Prometheus的Prometheus.yml内即可;格式参照其他,job_name不能命名成一样的,可改成其他名称;Grafana添加数据源和注册仪表盘都是一致的;文章来源:https://www.toymoban.com/news/detail-858826.html
参考:windows的Grafana监控系统搭建 文章来源地址https://www.toymoban.com/news/detail-858826.html
到了这里,关于(mac)Prometheus监控之Node_exporter(CPU、内存、磁盘、网络等)的文章就介绍完了。如果您还想了解更多内容,请在右上角搜索TOY模板网以前的文章或继续浏览下面的相关文章,希望大家以后多多支持TOY模板网!


